Group Client Project – Island Survival Game
Brief
The purpose of this project was to create a multiplayer game that challenges players to survive on a deserted island with limited resources. The game is to be set on a deserted island where the players are stranded after a plane crash. The players will have to gather resources, build shelter, and fend off dangerous wildlife to survive. The player’s goal is to escape the island by any means possible. Players should be able to team up with other players to increase their chances of survival or choose to play alone.
The group plan
My group decided on a game where the players are stuck on an island surrounded by a raging storm comprised of 4 main colours. These colours would represent each player and an artefact on the island. Each player would have to survive for long enough to be able to find the artefact that is linked with their character for them to be able to pass the storm unscathed and escape. There will be multiple escape points, some solo and some for the whole group, this is to allow break away and possibly sabotage escape efforts if people wish to roleplay that way and be the selfish sole survivor. The game would have a crafting system, gathering system and a building system. There would be AI animals, peaceful and aggressive for players to hunt or be hunted by.
My tasks
- As I already had a working inventory system from the previous project, I was to improved and adapt it to use in this game.
- Create a crafting system.
- Create animal actors and program AI.
- Create inventory expansion ability
Inventory System
As I went into detail about the inventory system in the Year 2 – Semester 1 page I will only be covering what I have changed or added as to avoid wasting space.
Updated inventory slot
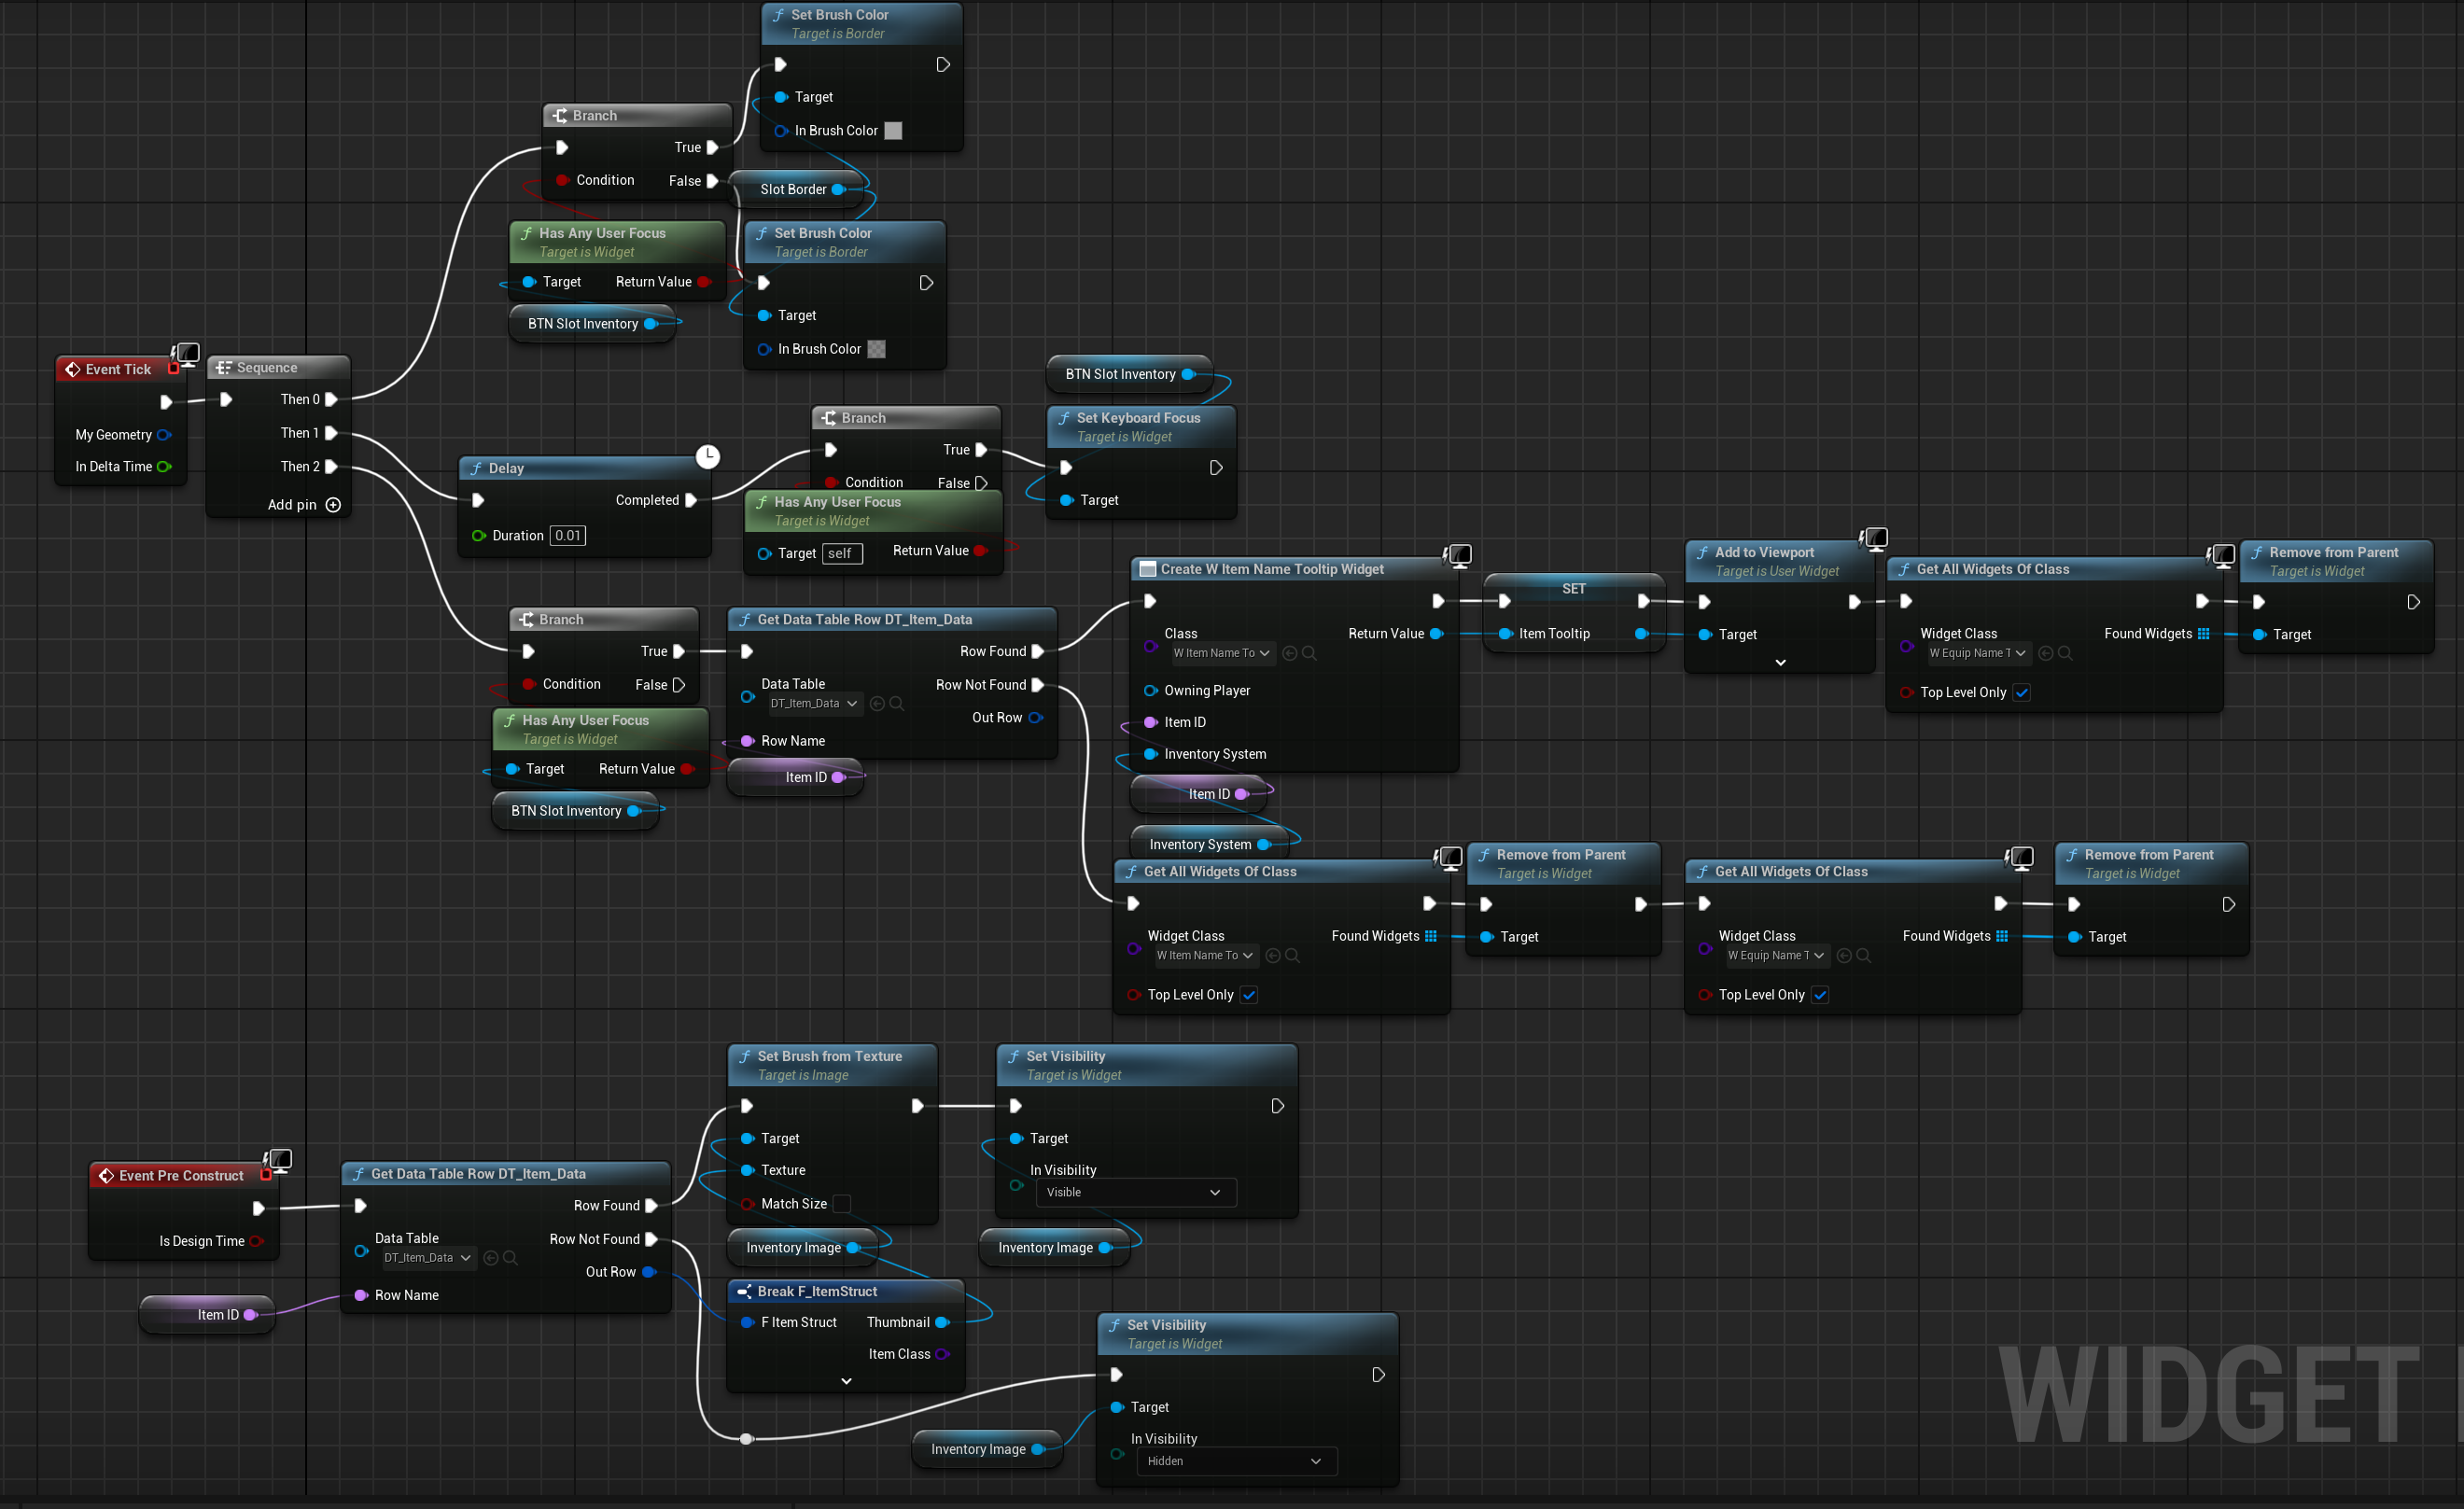
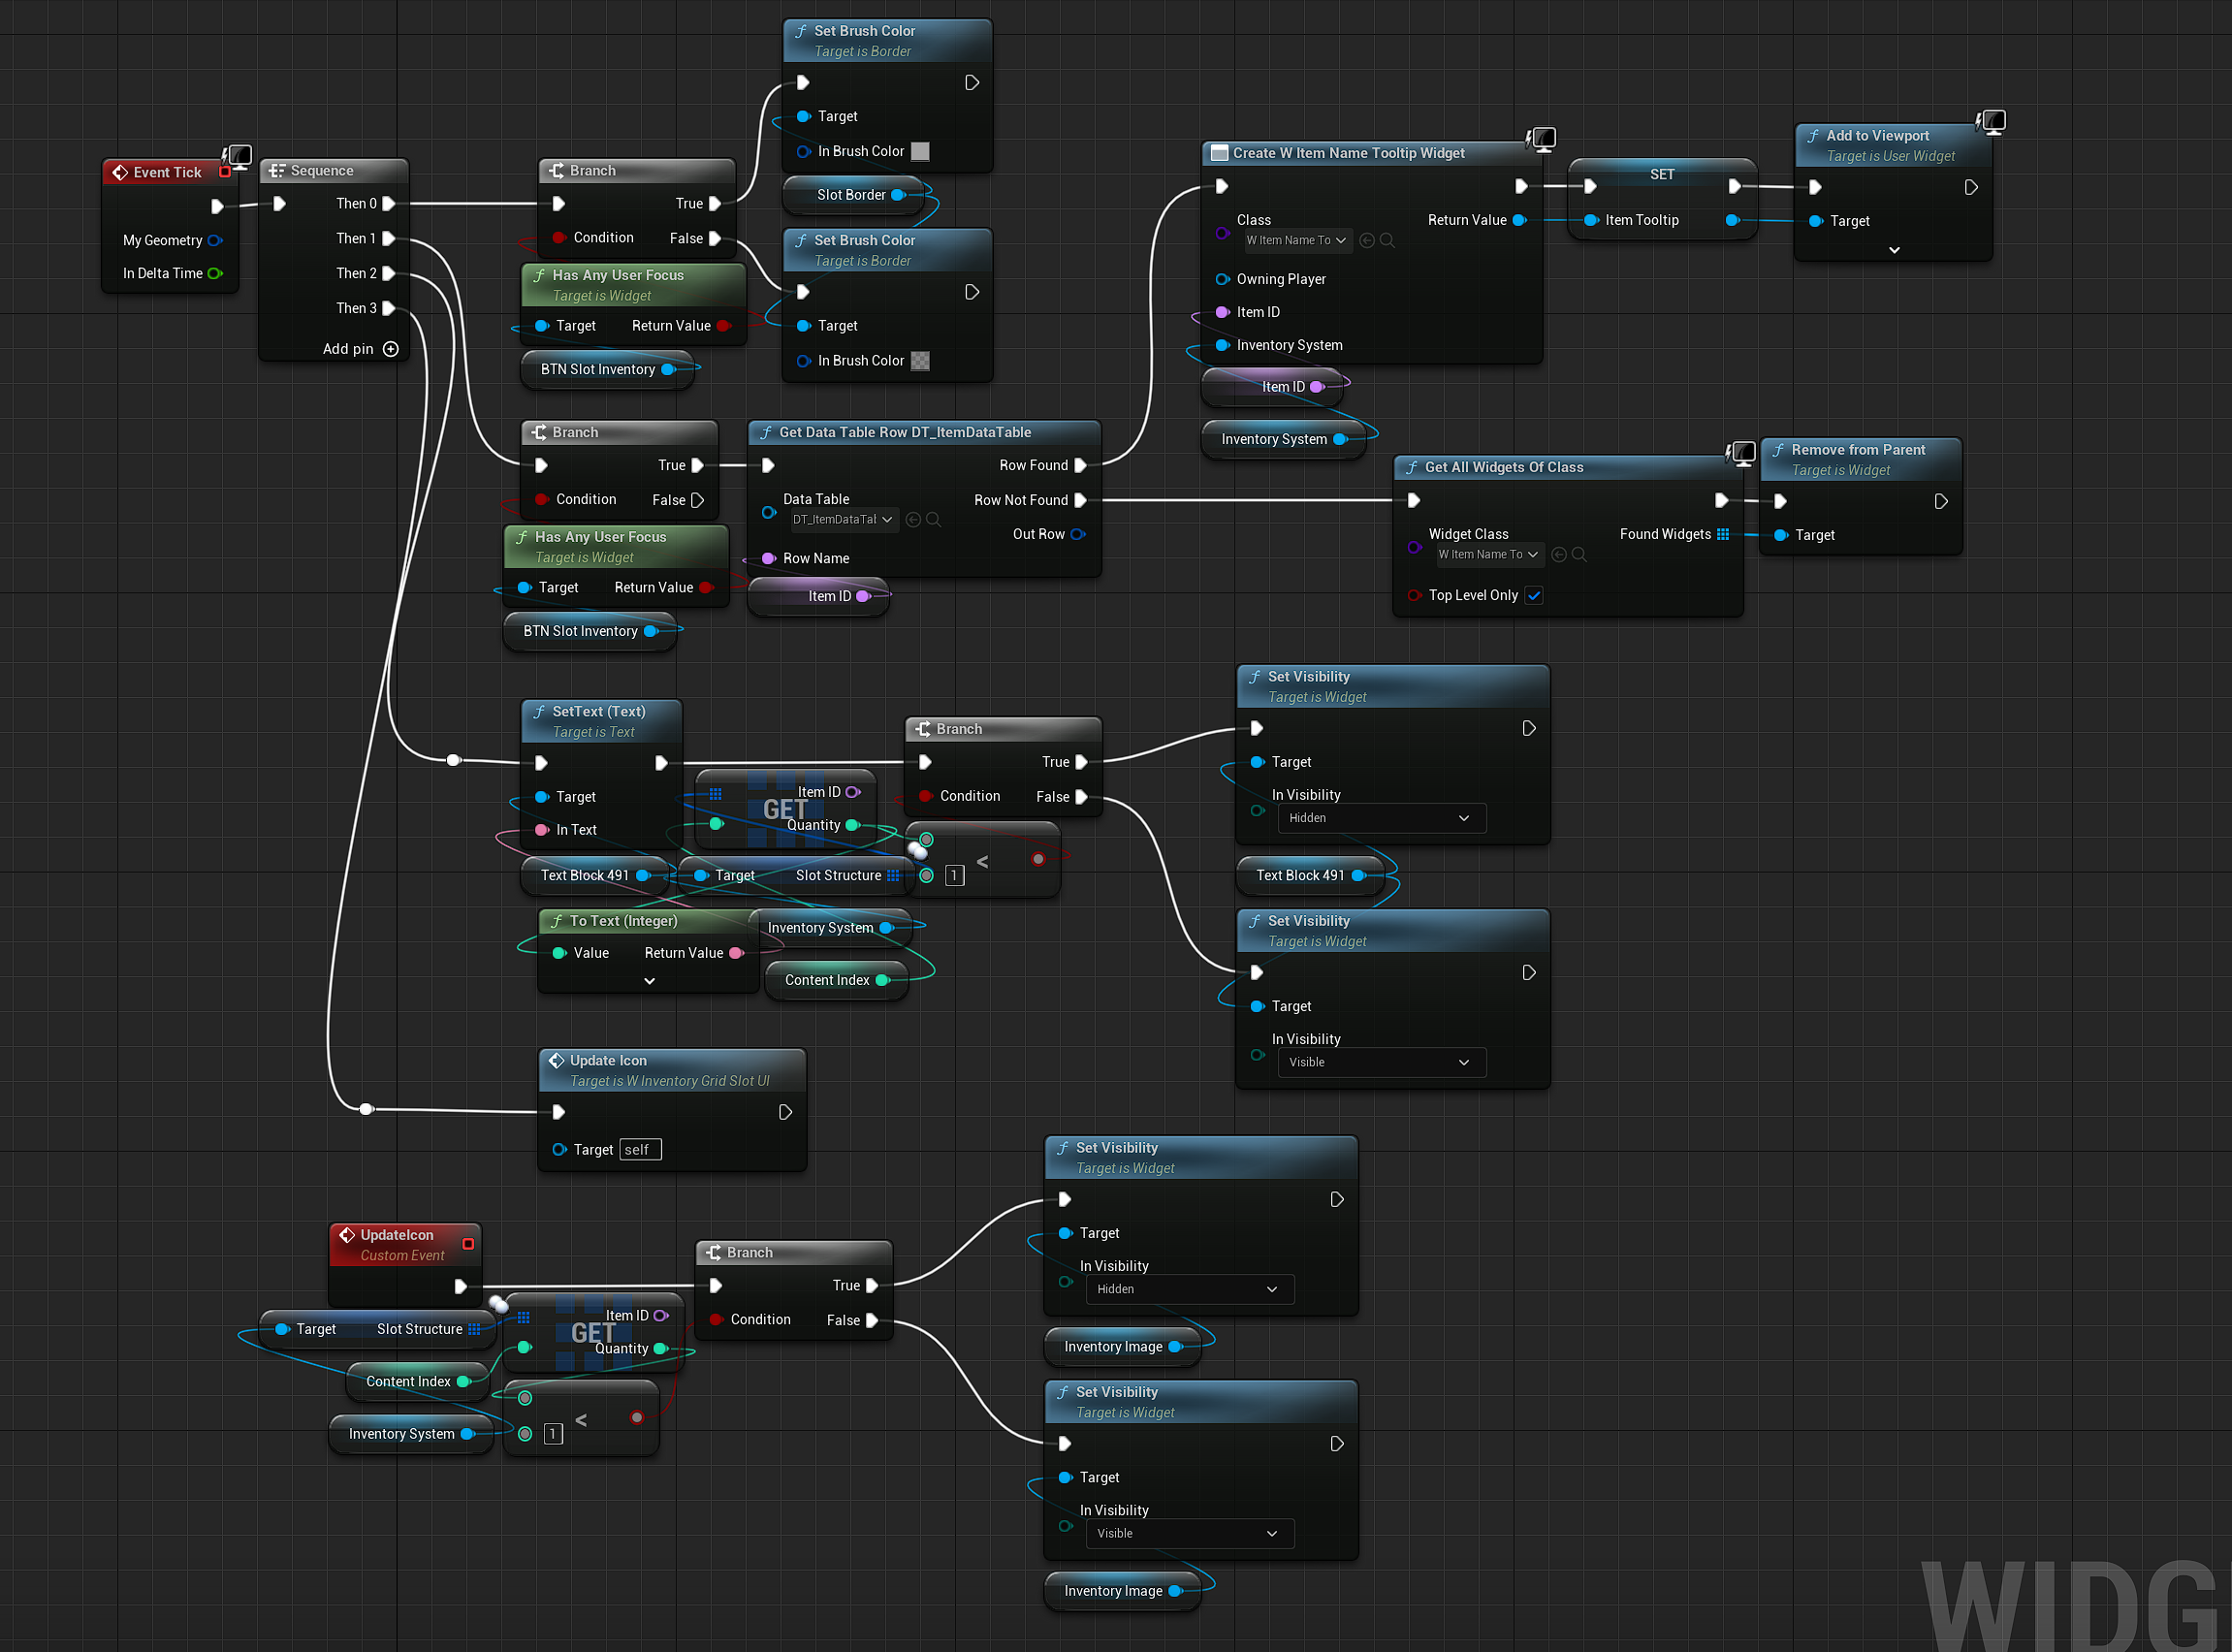
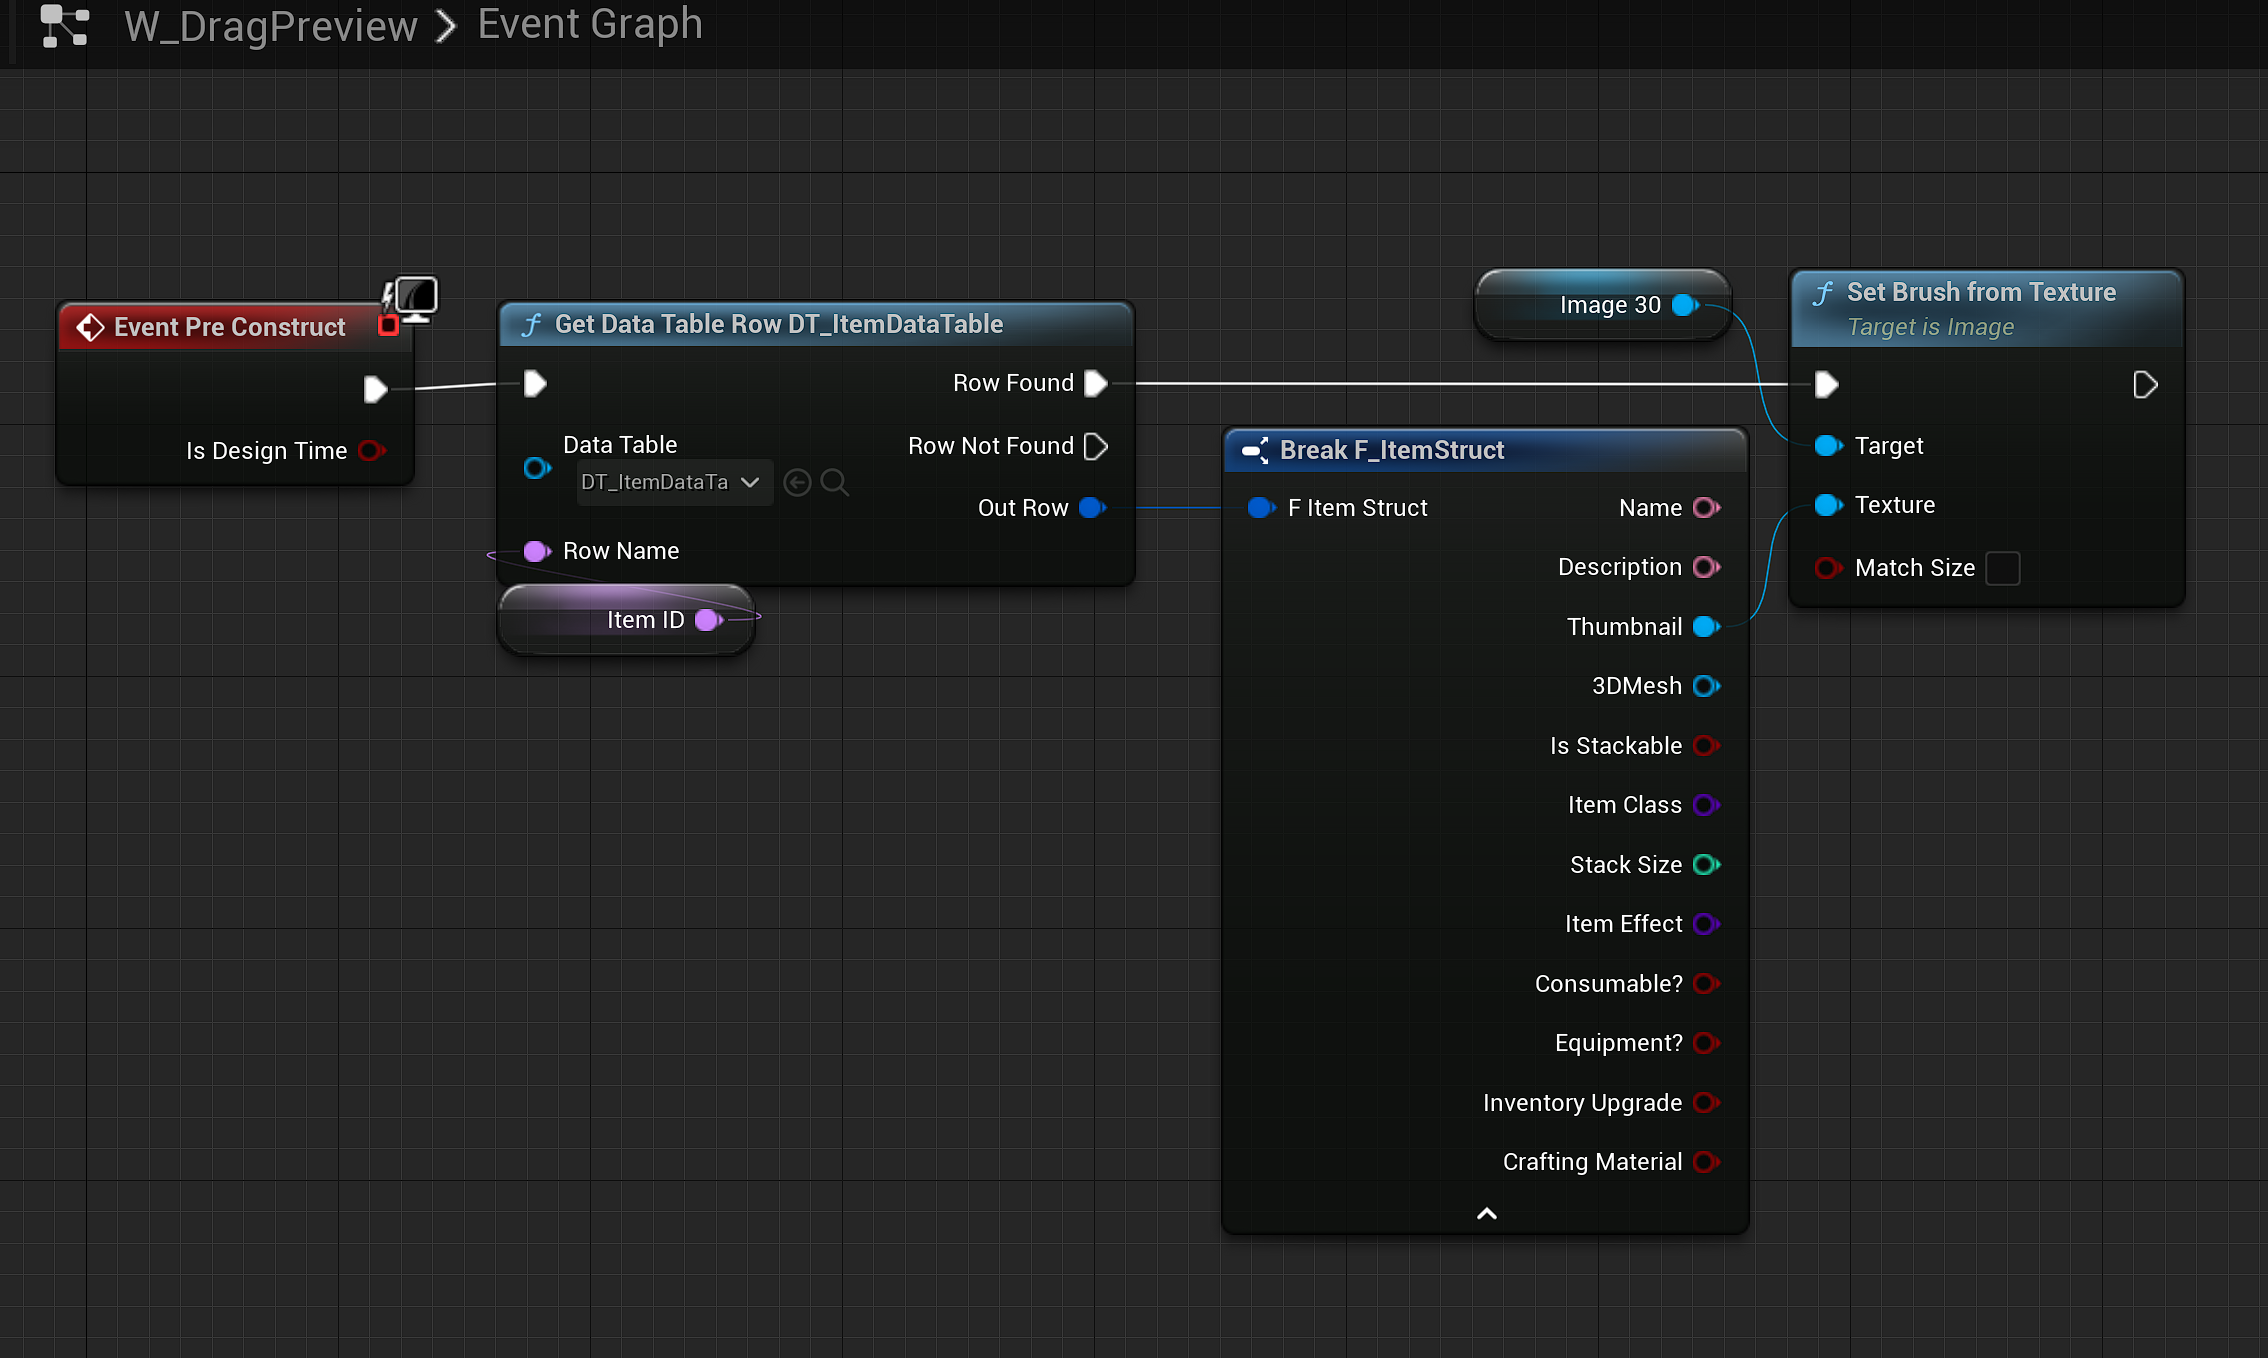
Due to having different needs for the inventory from the previous project (for example, the previous game only had an item stack size of one), I needed to allow the inventory slots to be able to show how many of an item the player has in that current slot due to stackable materials. Adding a crafting system also created another issue where the item icon would not disappear from the inventory slot if the item was removed via crafting something unless the inventory was closed and reopened. The new blueprint updates the icon and quantity every tick whilst open as to properly show the inventory contents.
Inventory Drag and drop capability
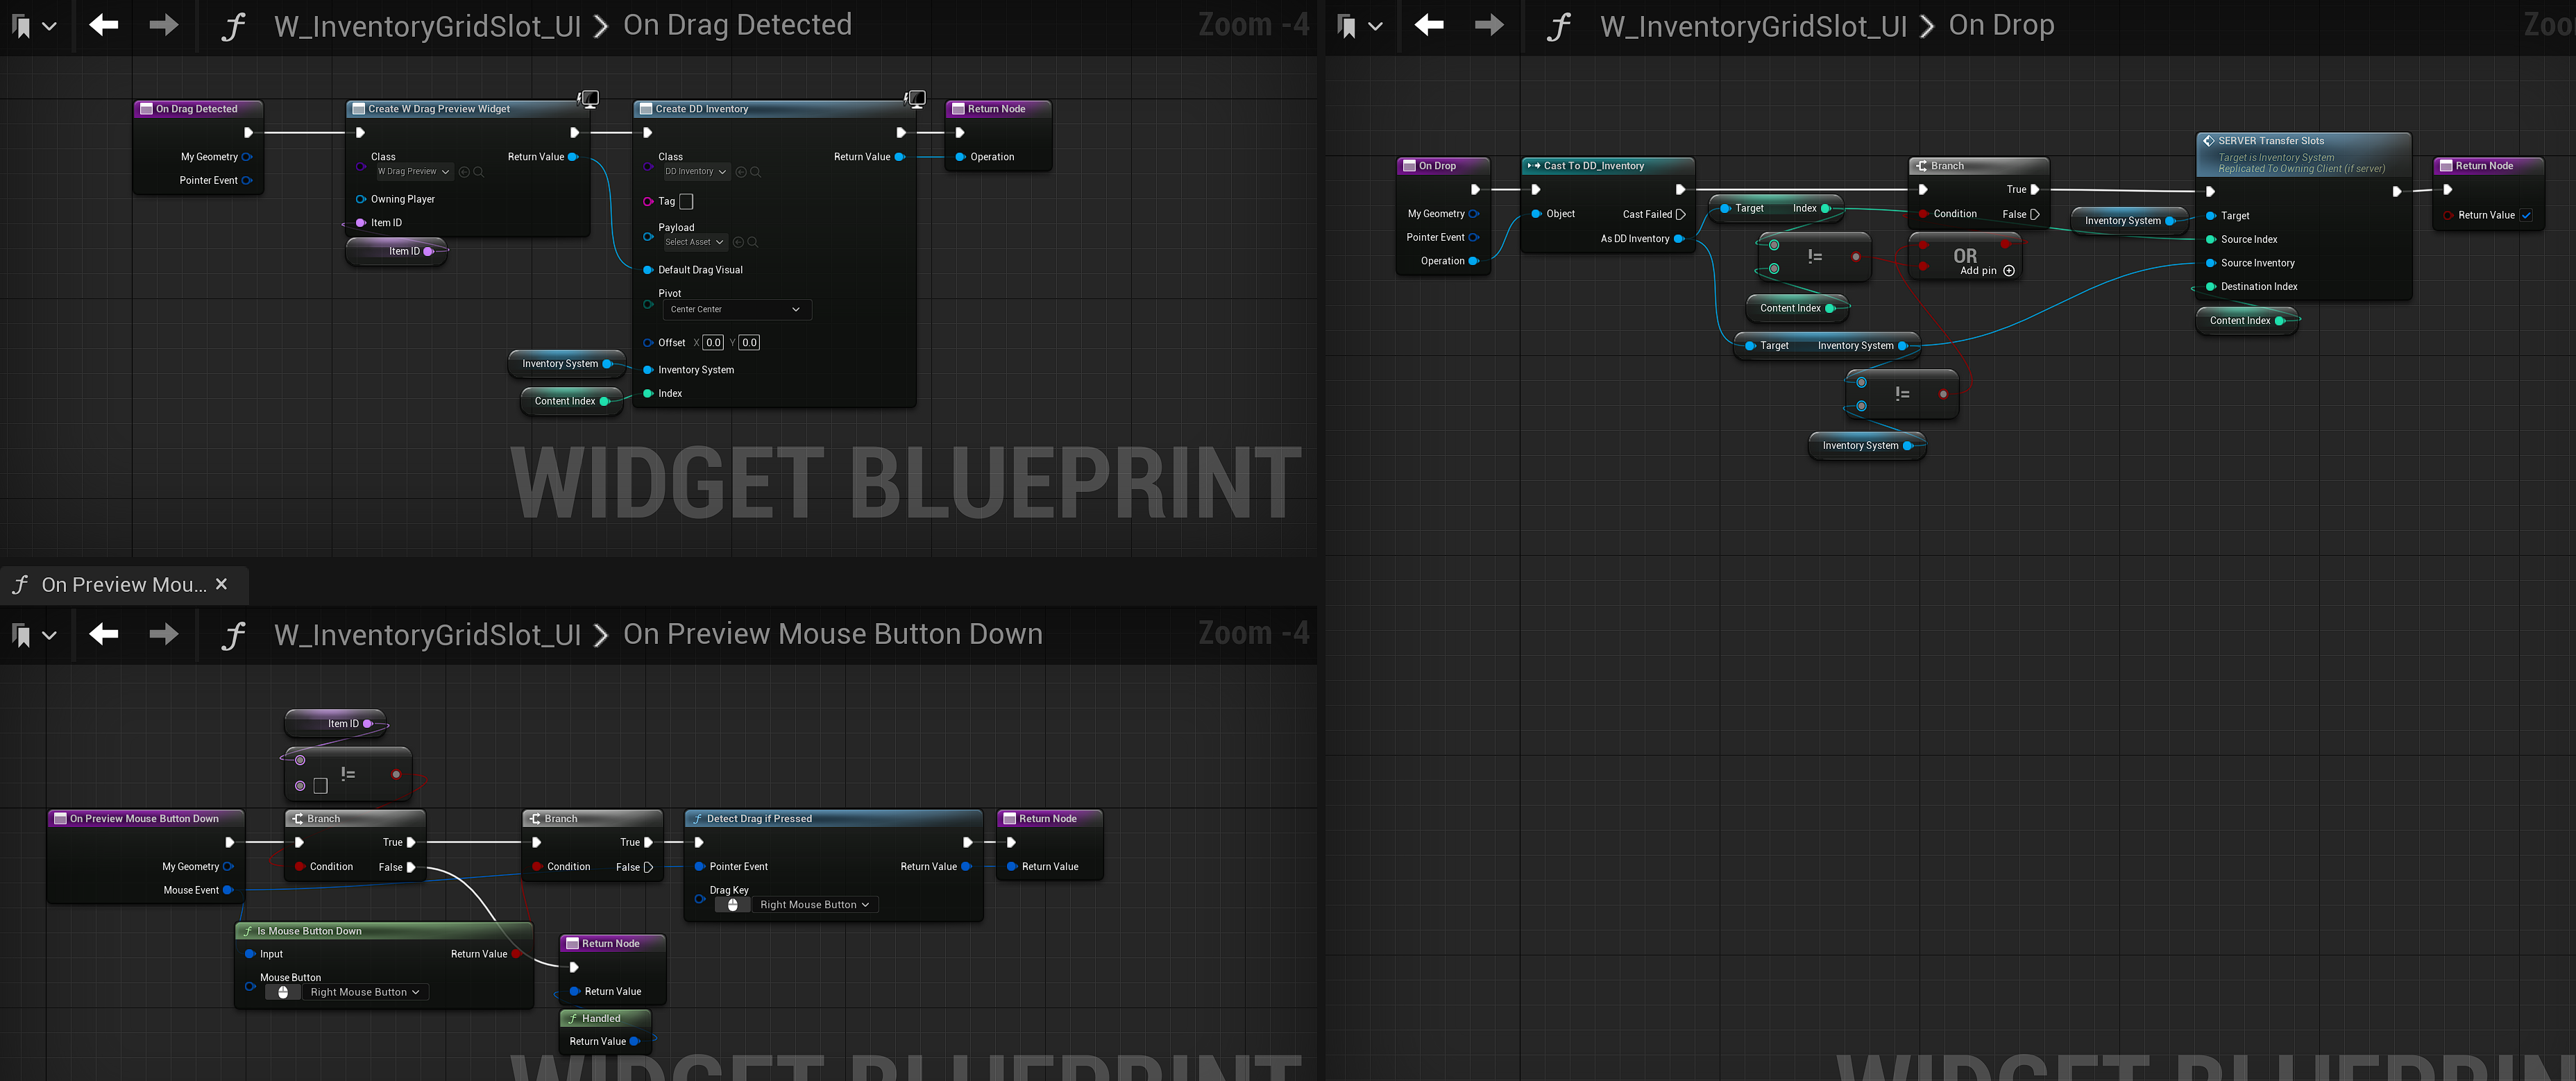
As the previous project was a console only game, there was no need for such a feature, as this game would be on PC, being able to drag inventory items into other slots or other inventories would be necessary.
There are still a few things that I would like to improve with this, for one, the quantities of the items seem update even if they are not being interacted with, which makes their quantity flash slightly. Secondly I also need to work out how to have a drag dead zone, as at the moment I am having to activate the drag functions with the right mouse button as even the slightest mouse movement will trigger the drag function, cancelling the stationary click effect if they are on the same mouse button, though going forward I will swap these two buttons just as dragging feels more natural using the left mouse button, and opening a list menu with right click is what is normal on a computer as standard.
The below Blueprints control the drag and drop functionality.
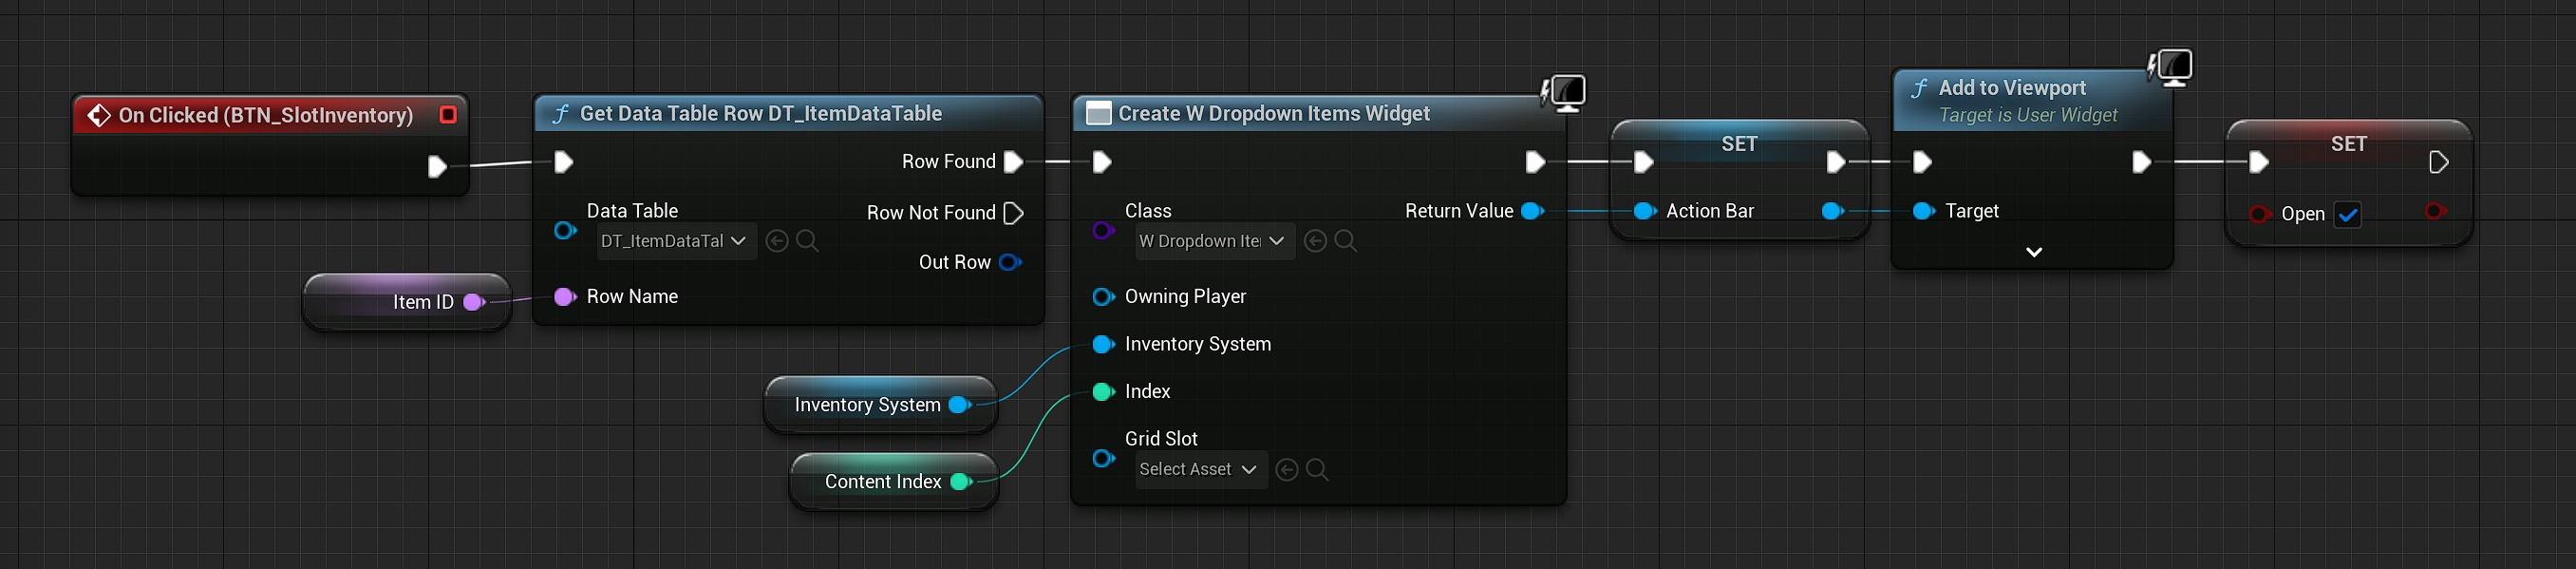
Ability to increase inventory capacity
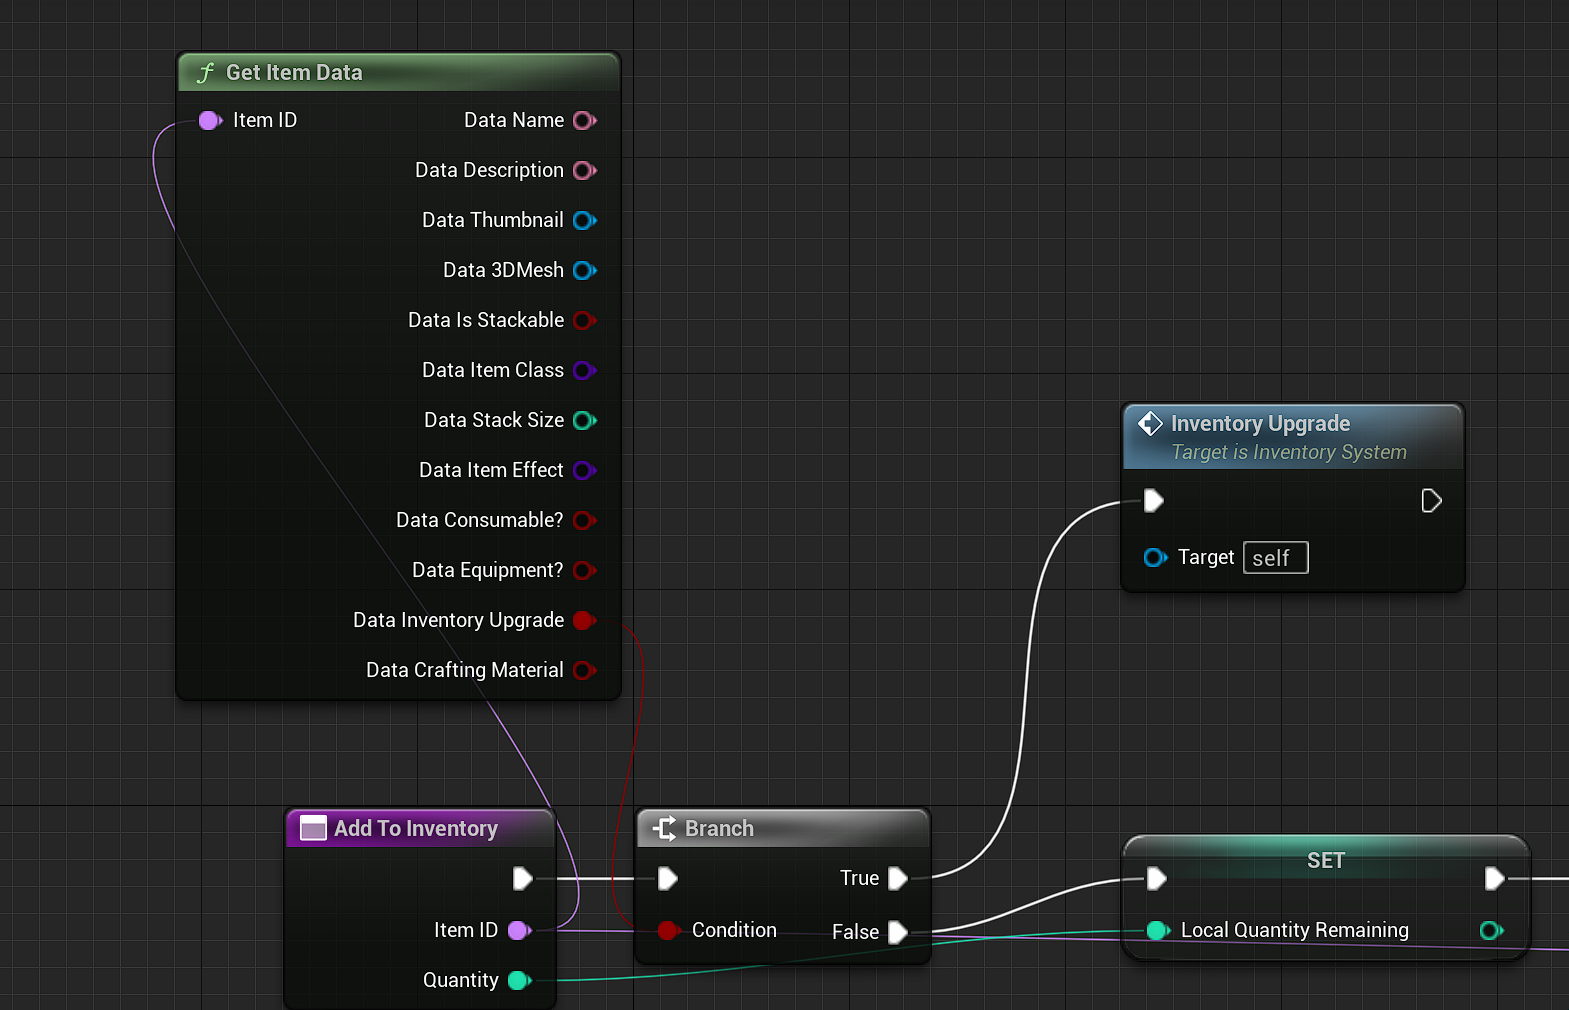
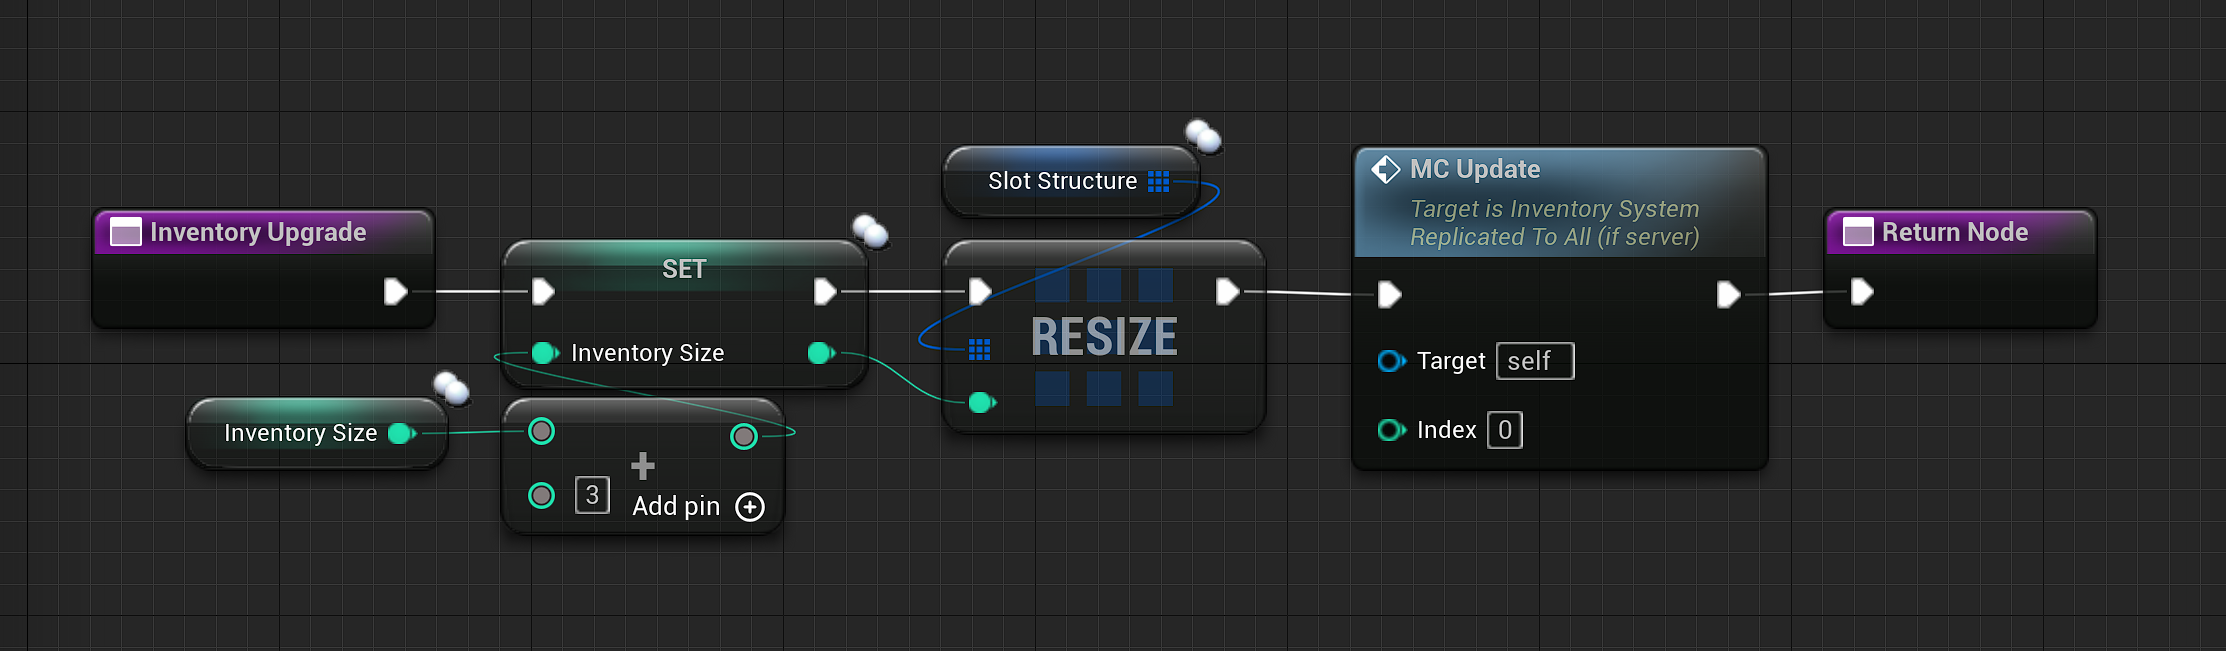
I thought it would be a cool idea to be able to upgrade the player’s inventory. To set this up was fairly simple and is repeatable indefinitely and chose to represent the item as a backpack. Obviously being able to update inventory space indefinitely would cause issues, however the backpack upgrade will be rare and in short supply on the island, they cannot be crafted. If the backpack WERE plentiful, the inventory size could be limited with a integer clamp to prevent it being expanded past a certain point.
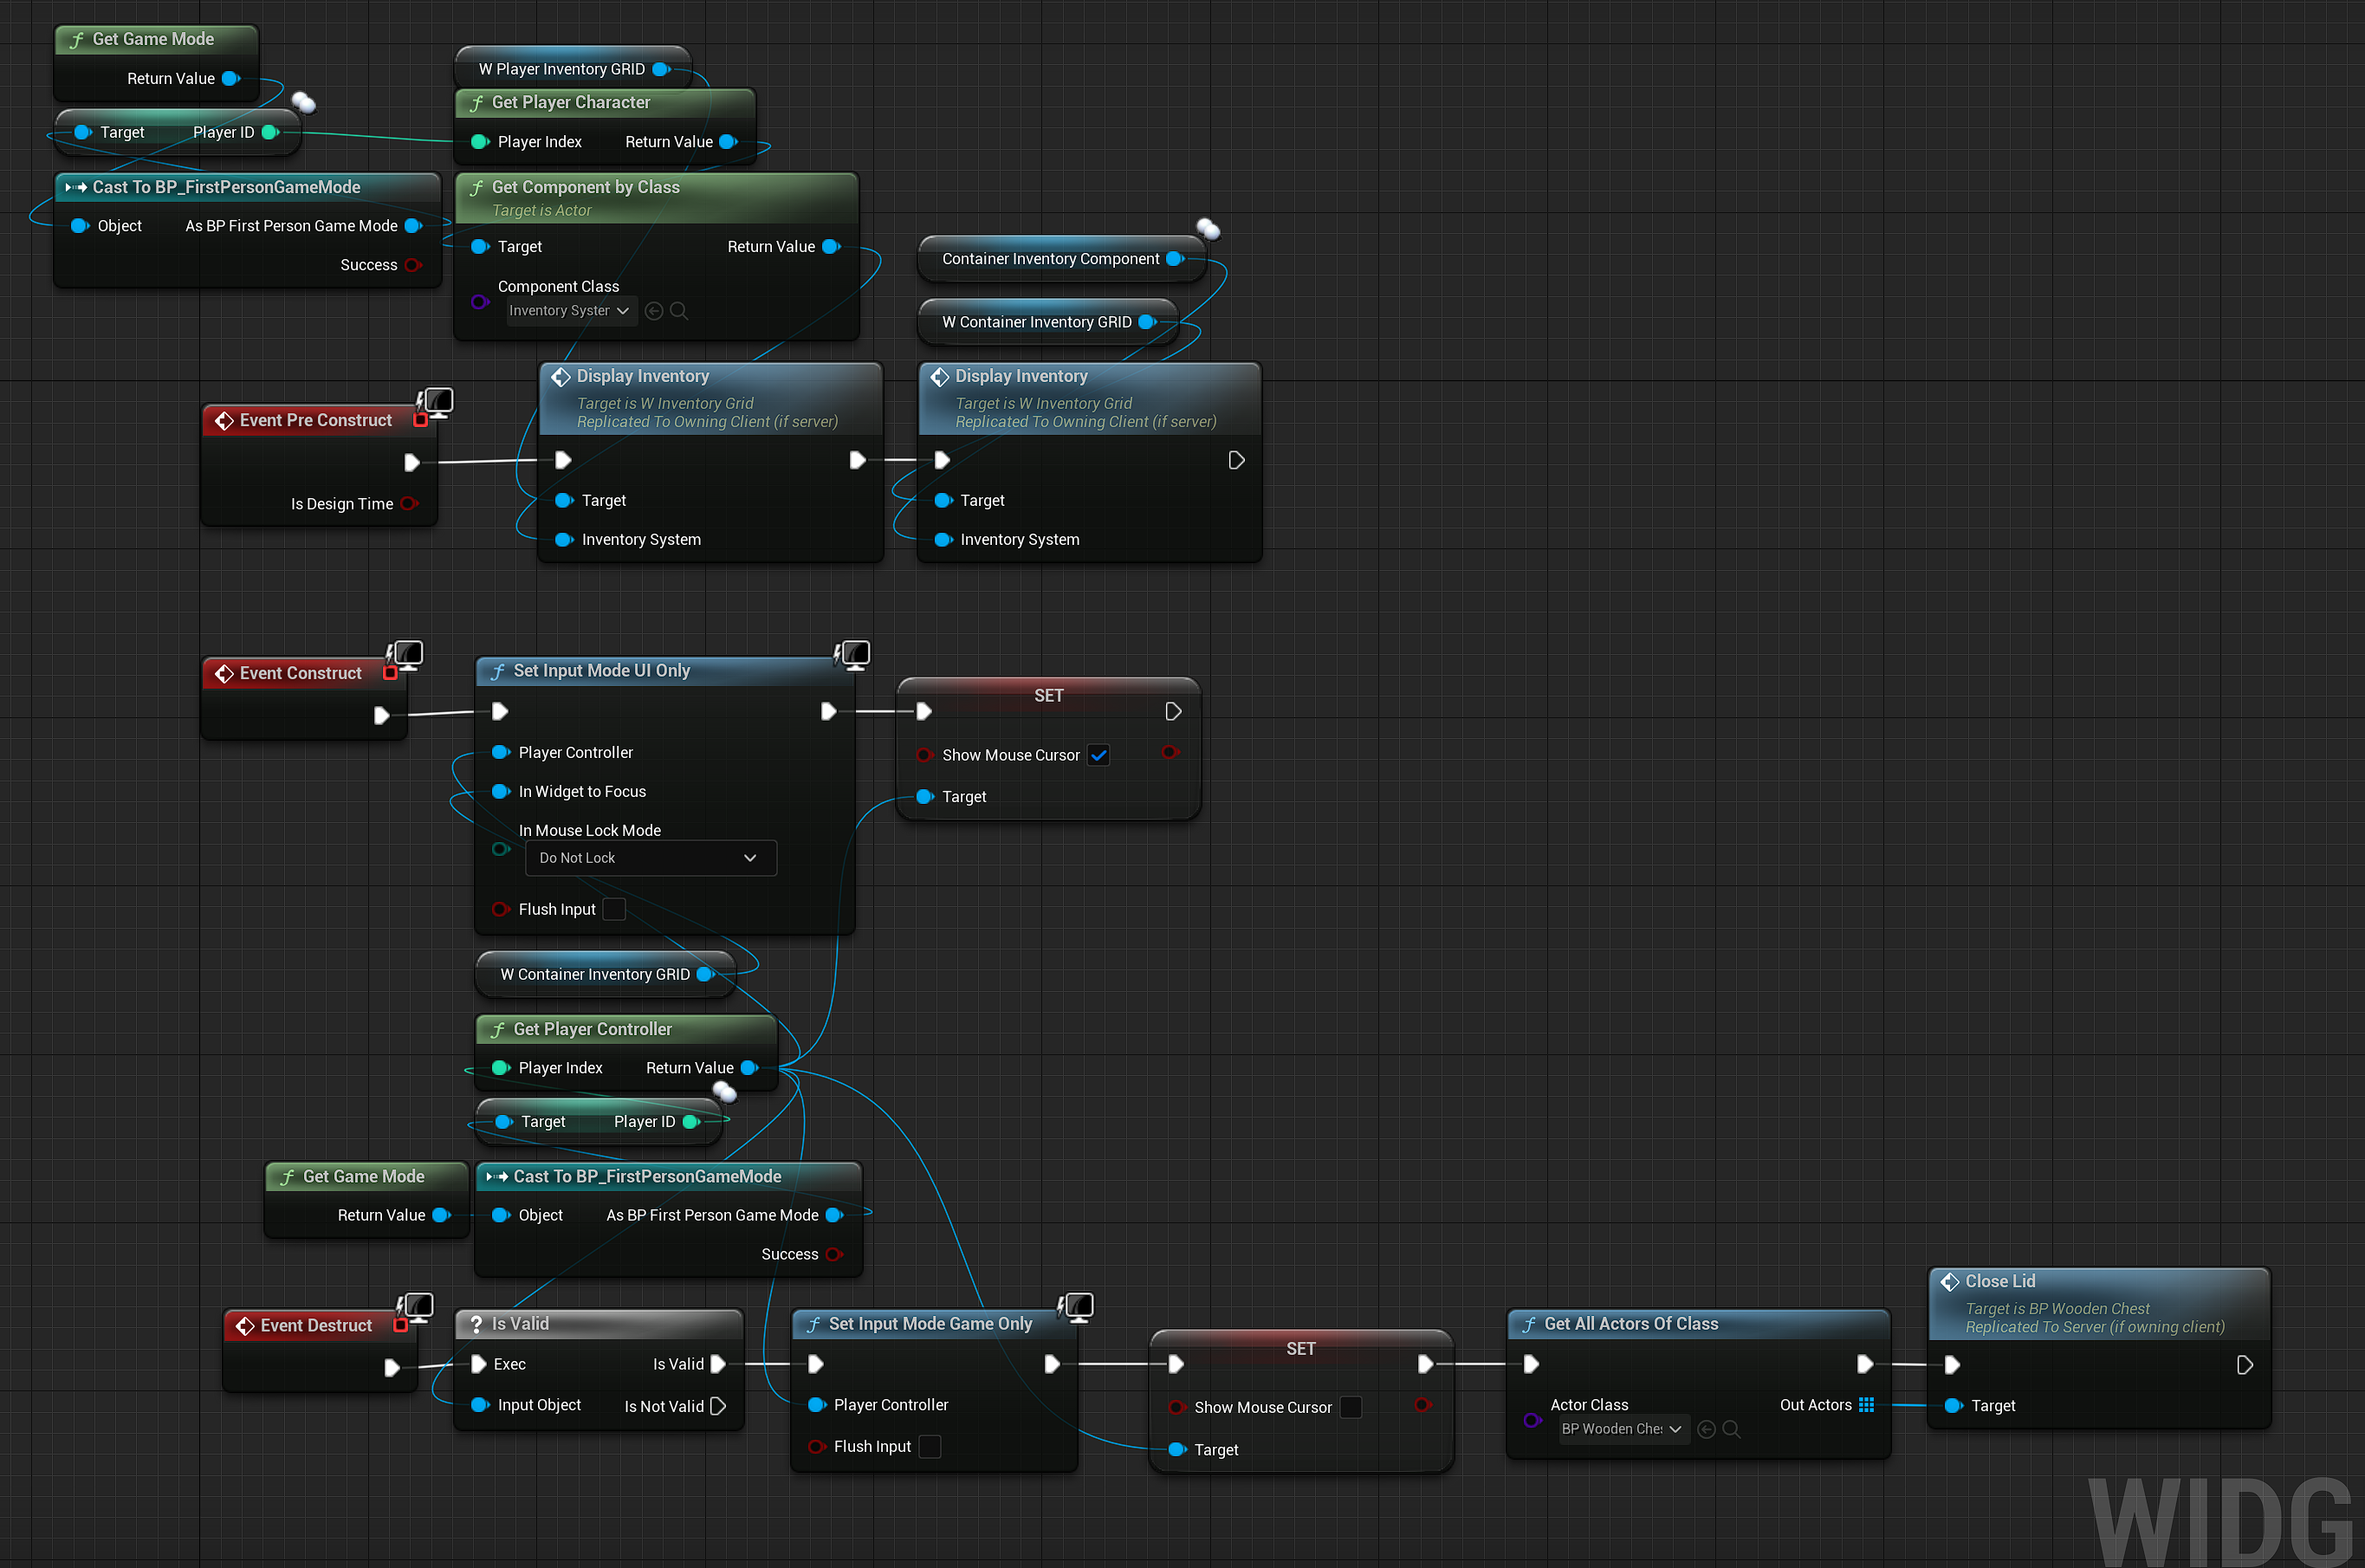
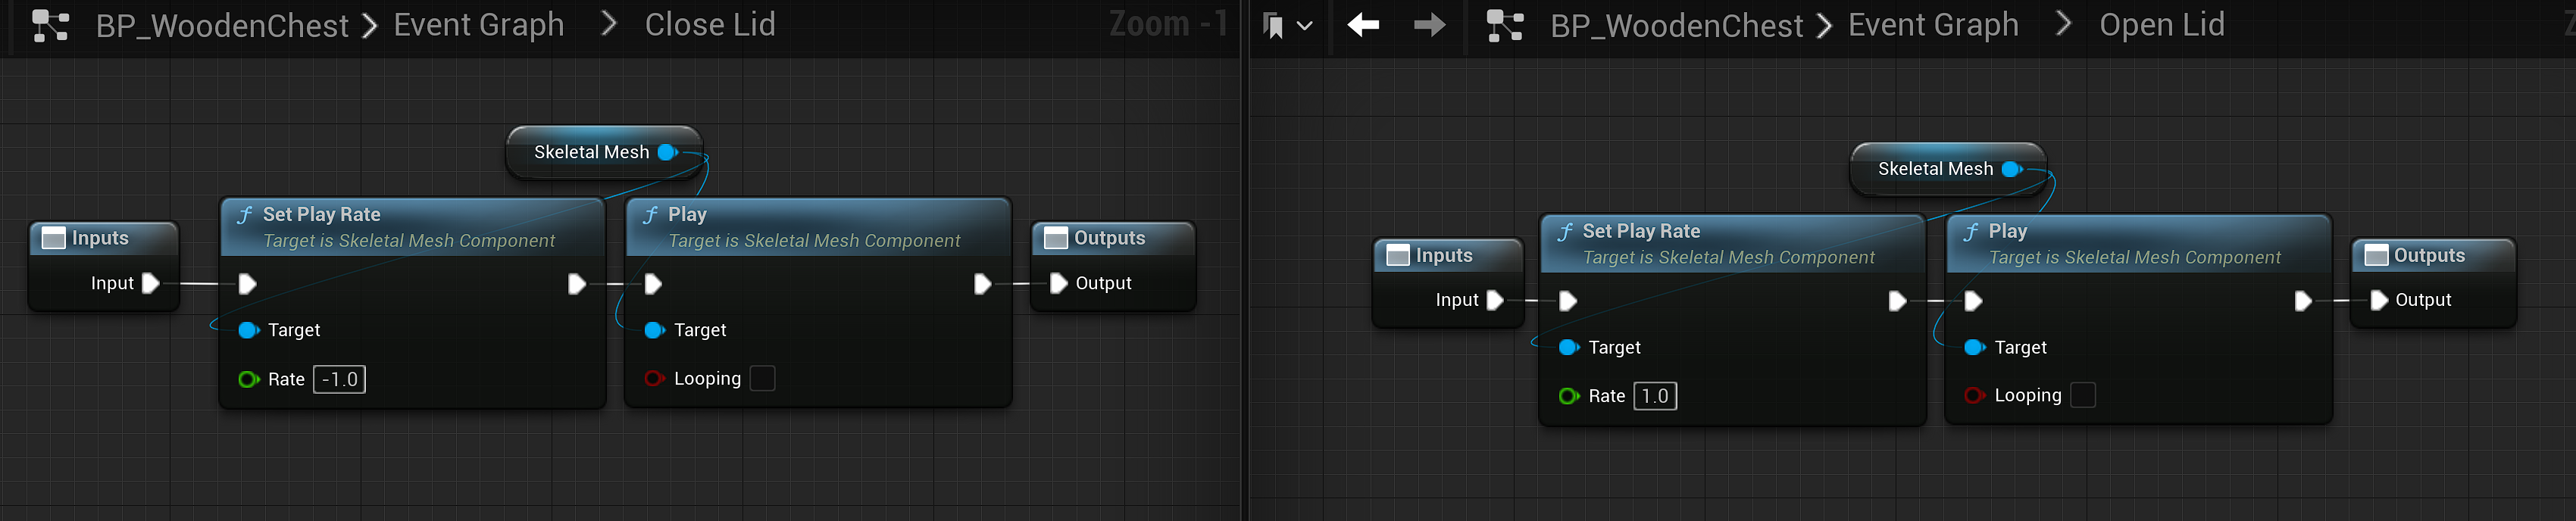
Storage chest inventory
An important part of any survival game is the ability to store items to avoid being unable to loot stuff due to a full inventory, or just the ability to keep useful materials and items close to places relevant for them, for example, keeping all Wood and metal near the crafting/building areas, or sets of armour and weapons near the exit of your base for easy access.
Each storage chest will have it’s own separate inventory and will have the same limits as the player inventory in terms of stack size as it uses the same Struct and data table to pull the information from, if I wanted to change whether chests could only contain specific items or have bigger stack size maximums, I would just need to make a new data table to pull the information from, however I feels it’s fine for this project to have the same stack size. The storage chest’s inventory size is easily editable so it would also be easy to just replicate the actor, change the mesh to a bigger chest if you wanted multiple different sizes available.
I will only show the blueprints for the animation and the opening on the inventory below as it uses the same inventory system blueprints as the player.
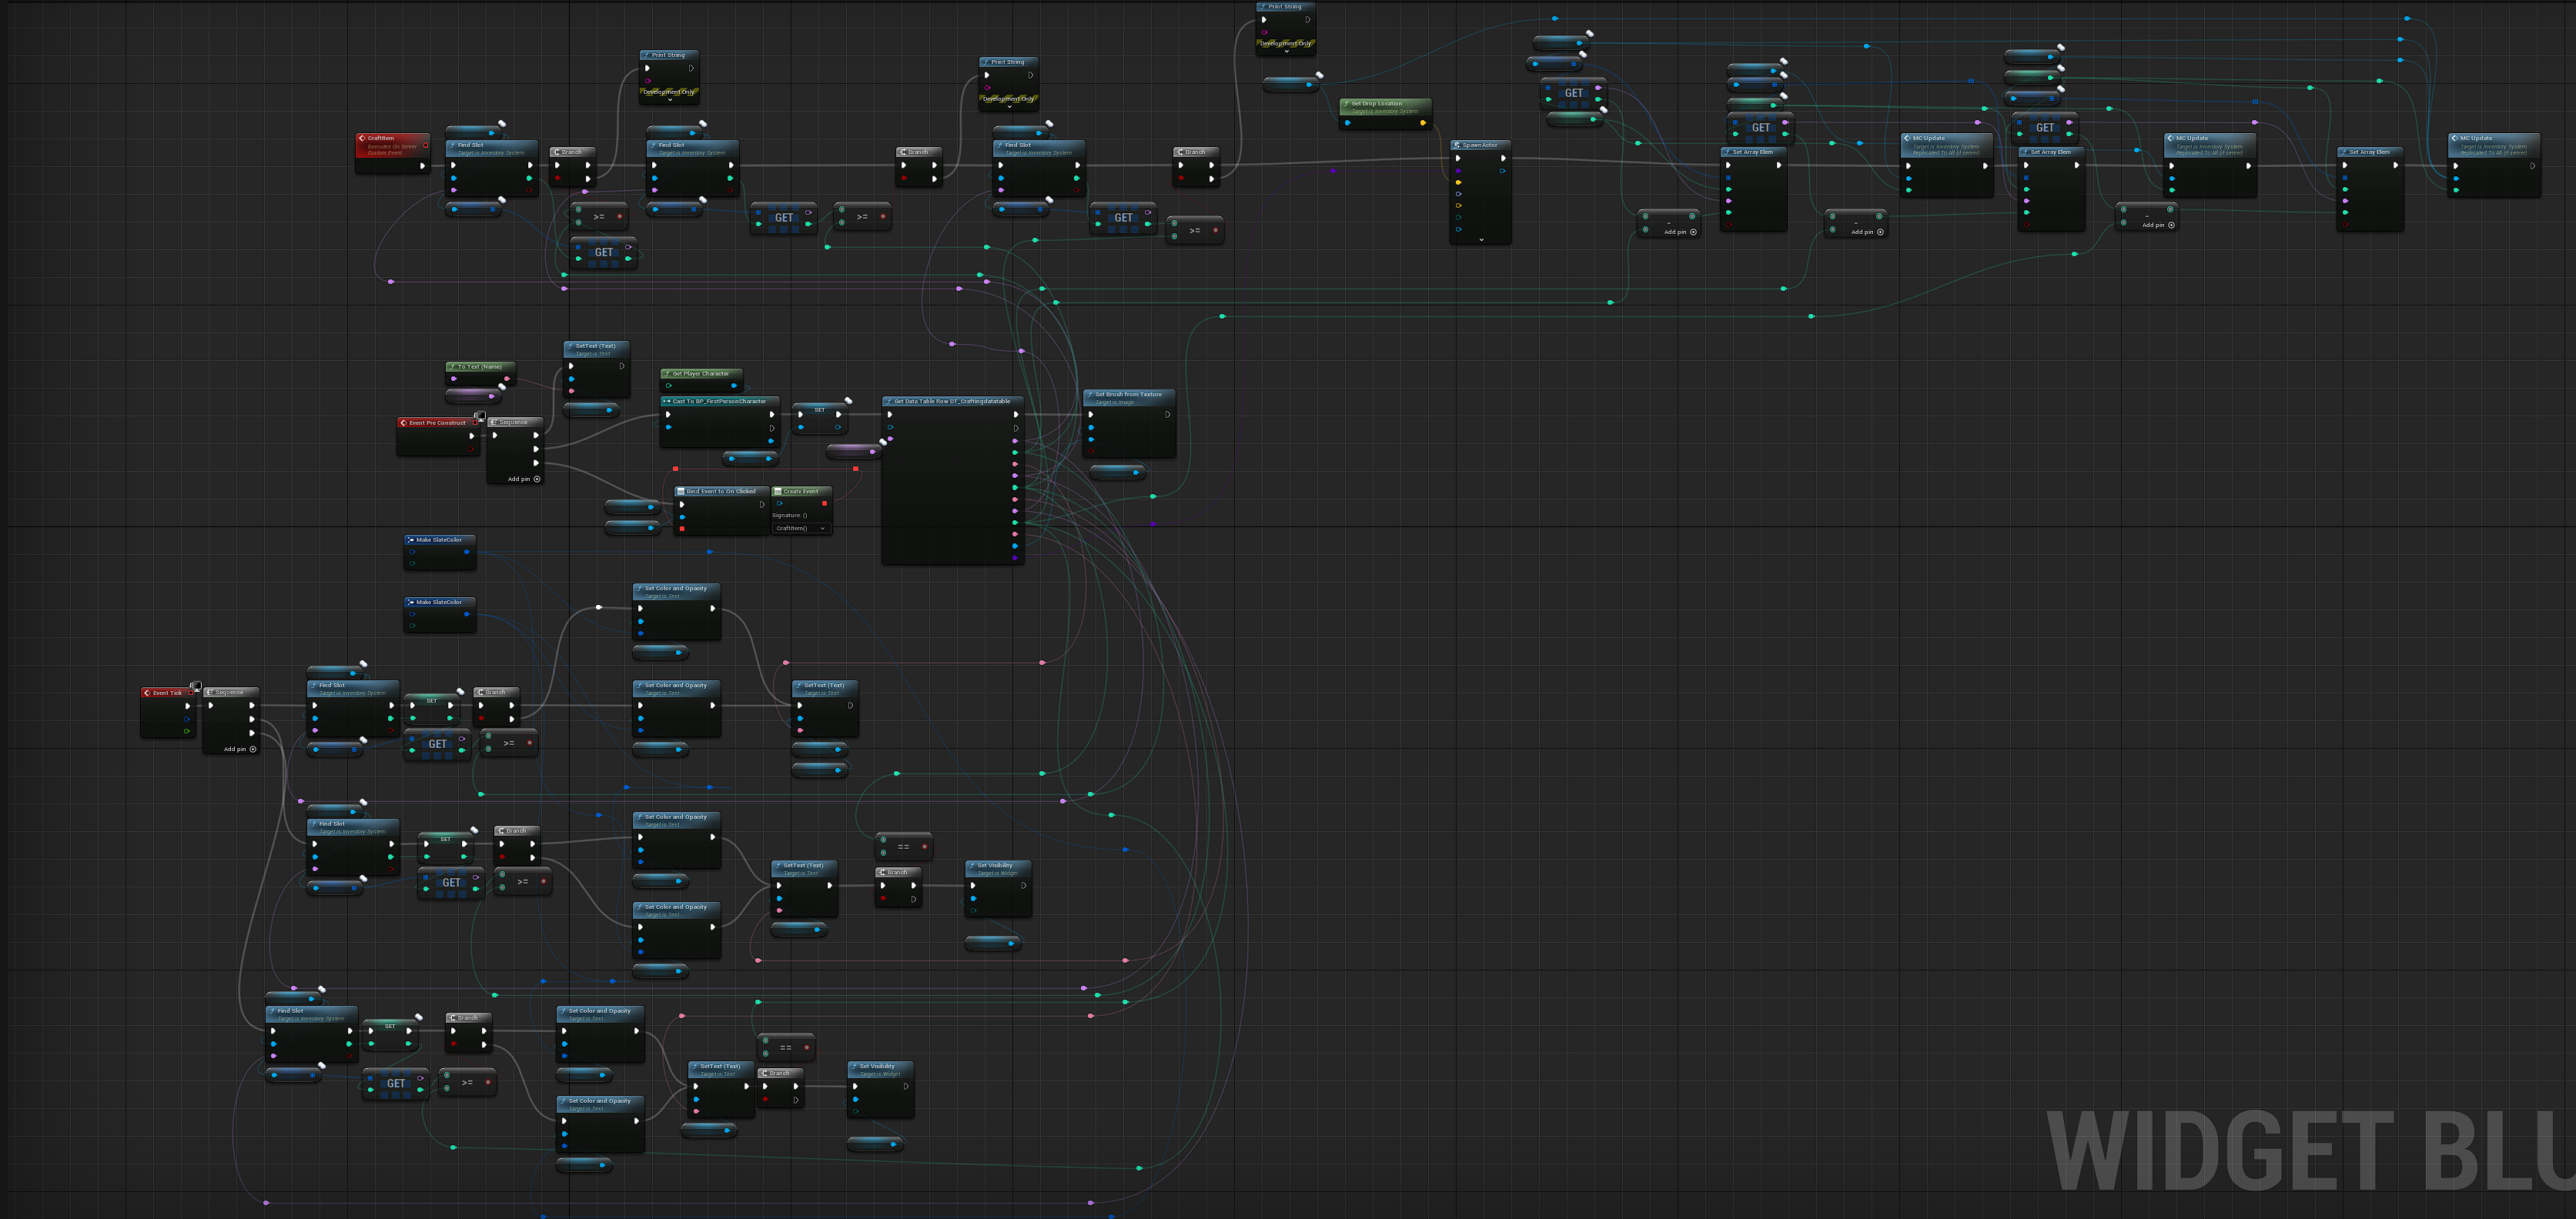
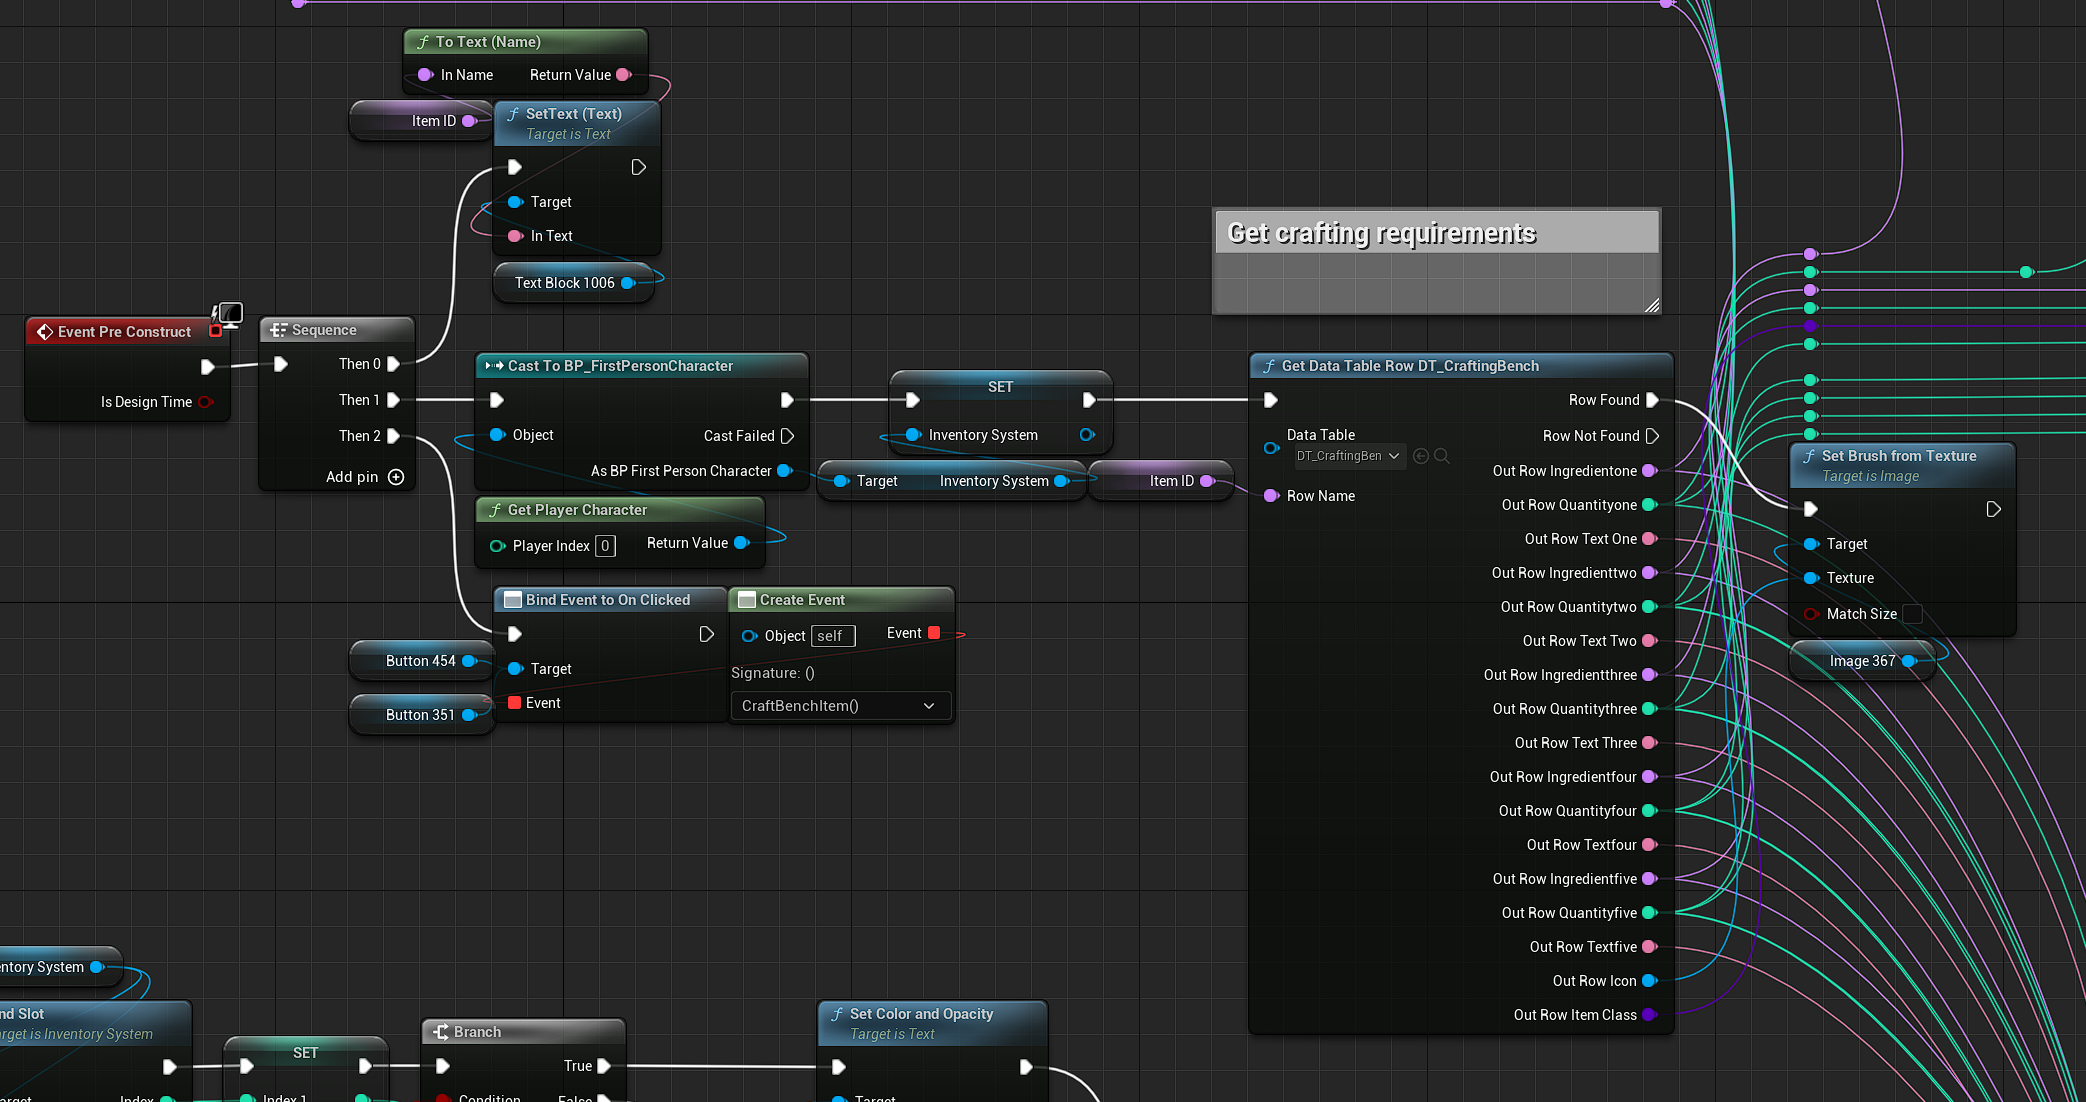
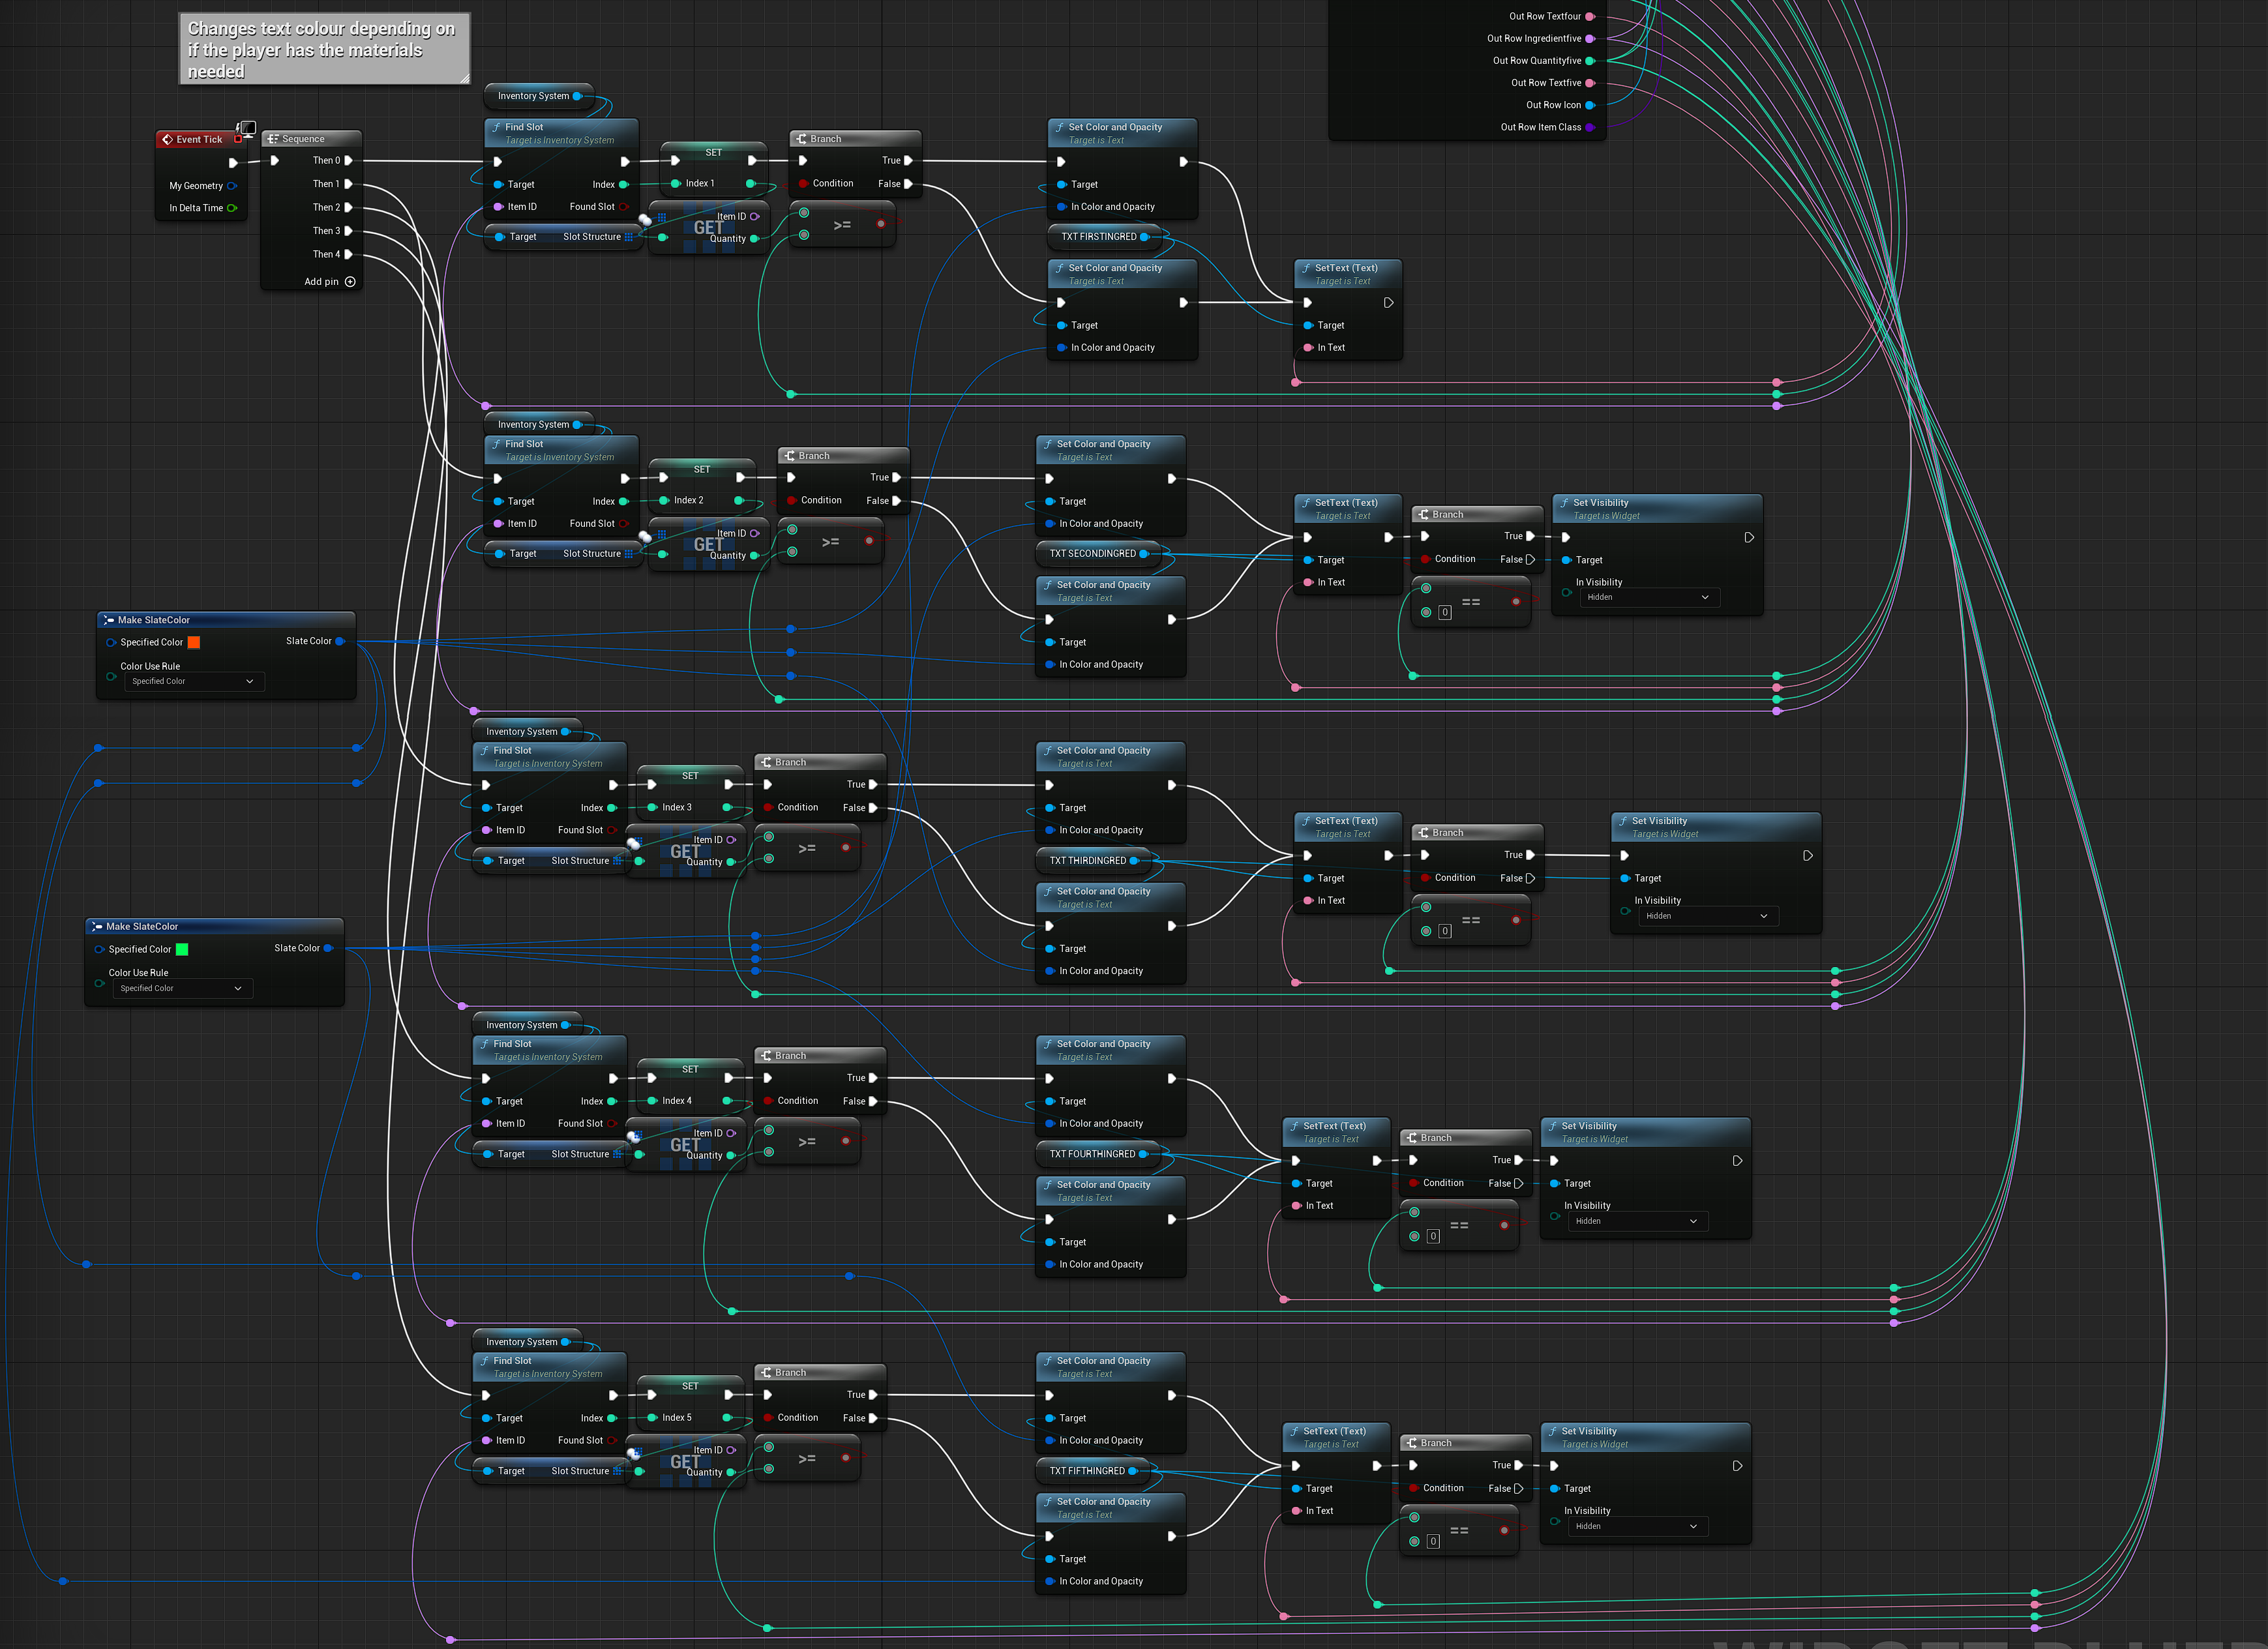
Crafting system
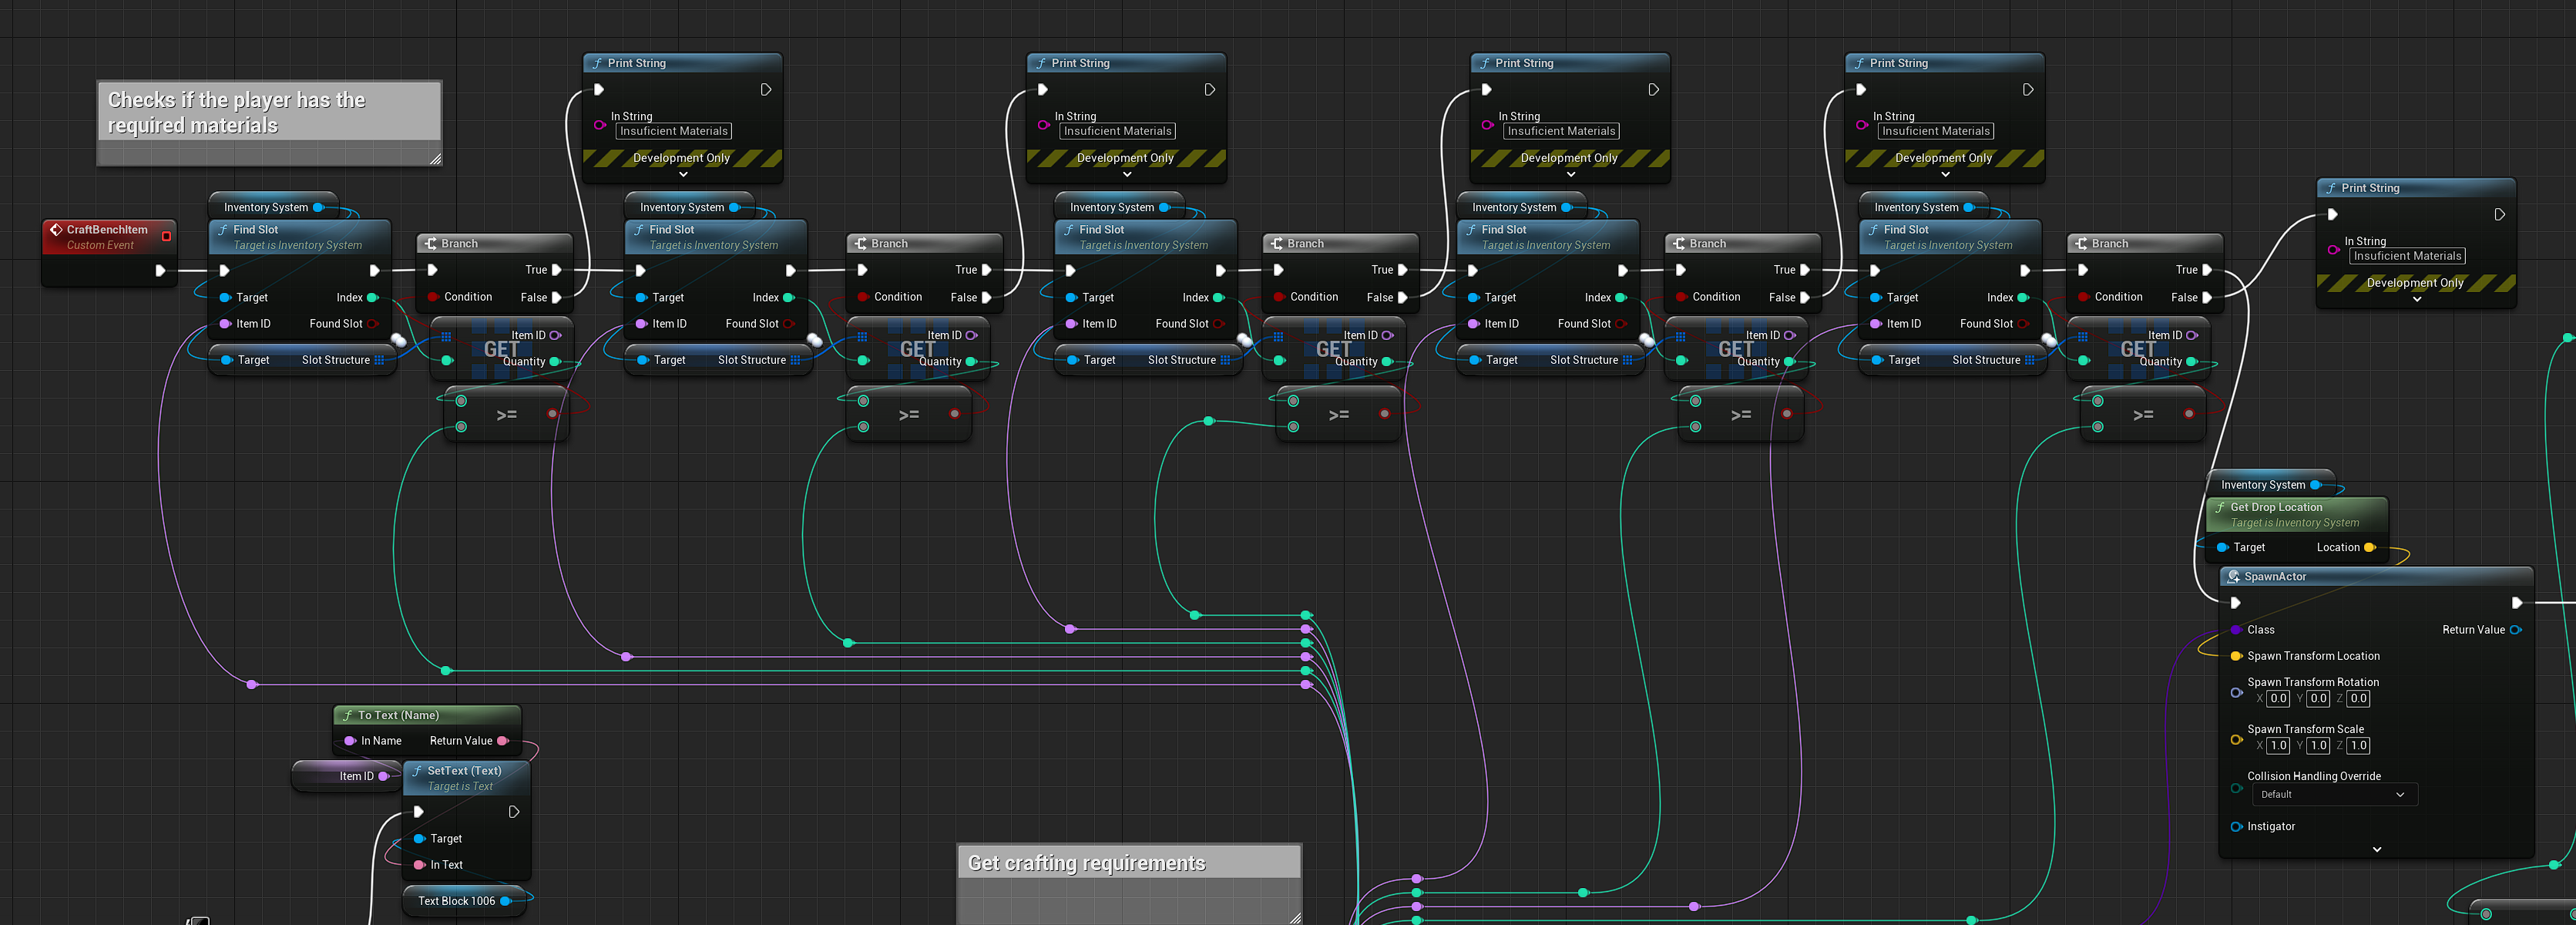
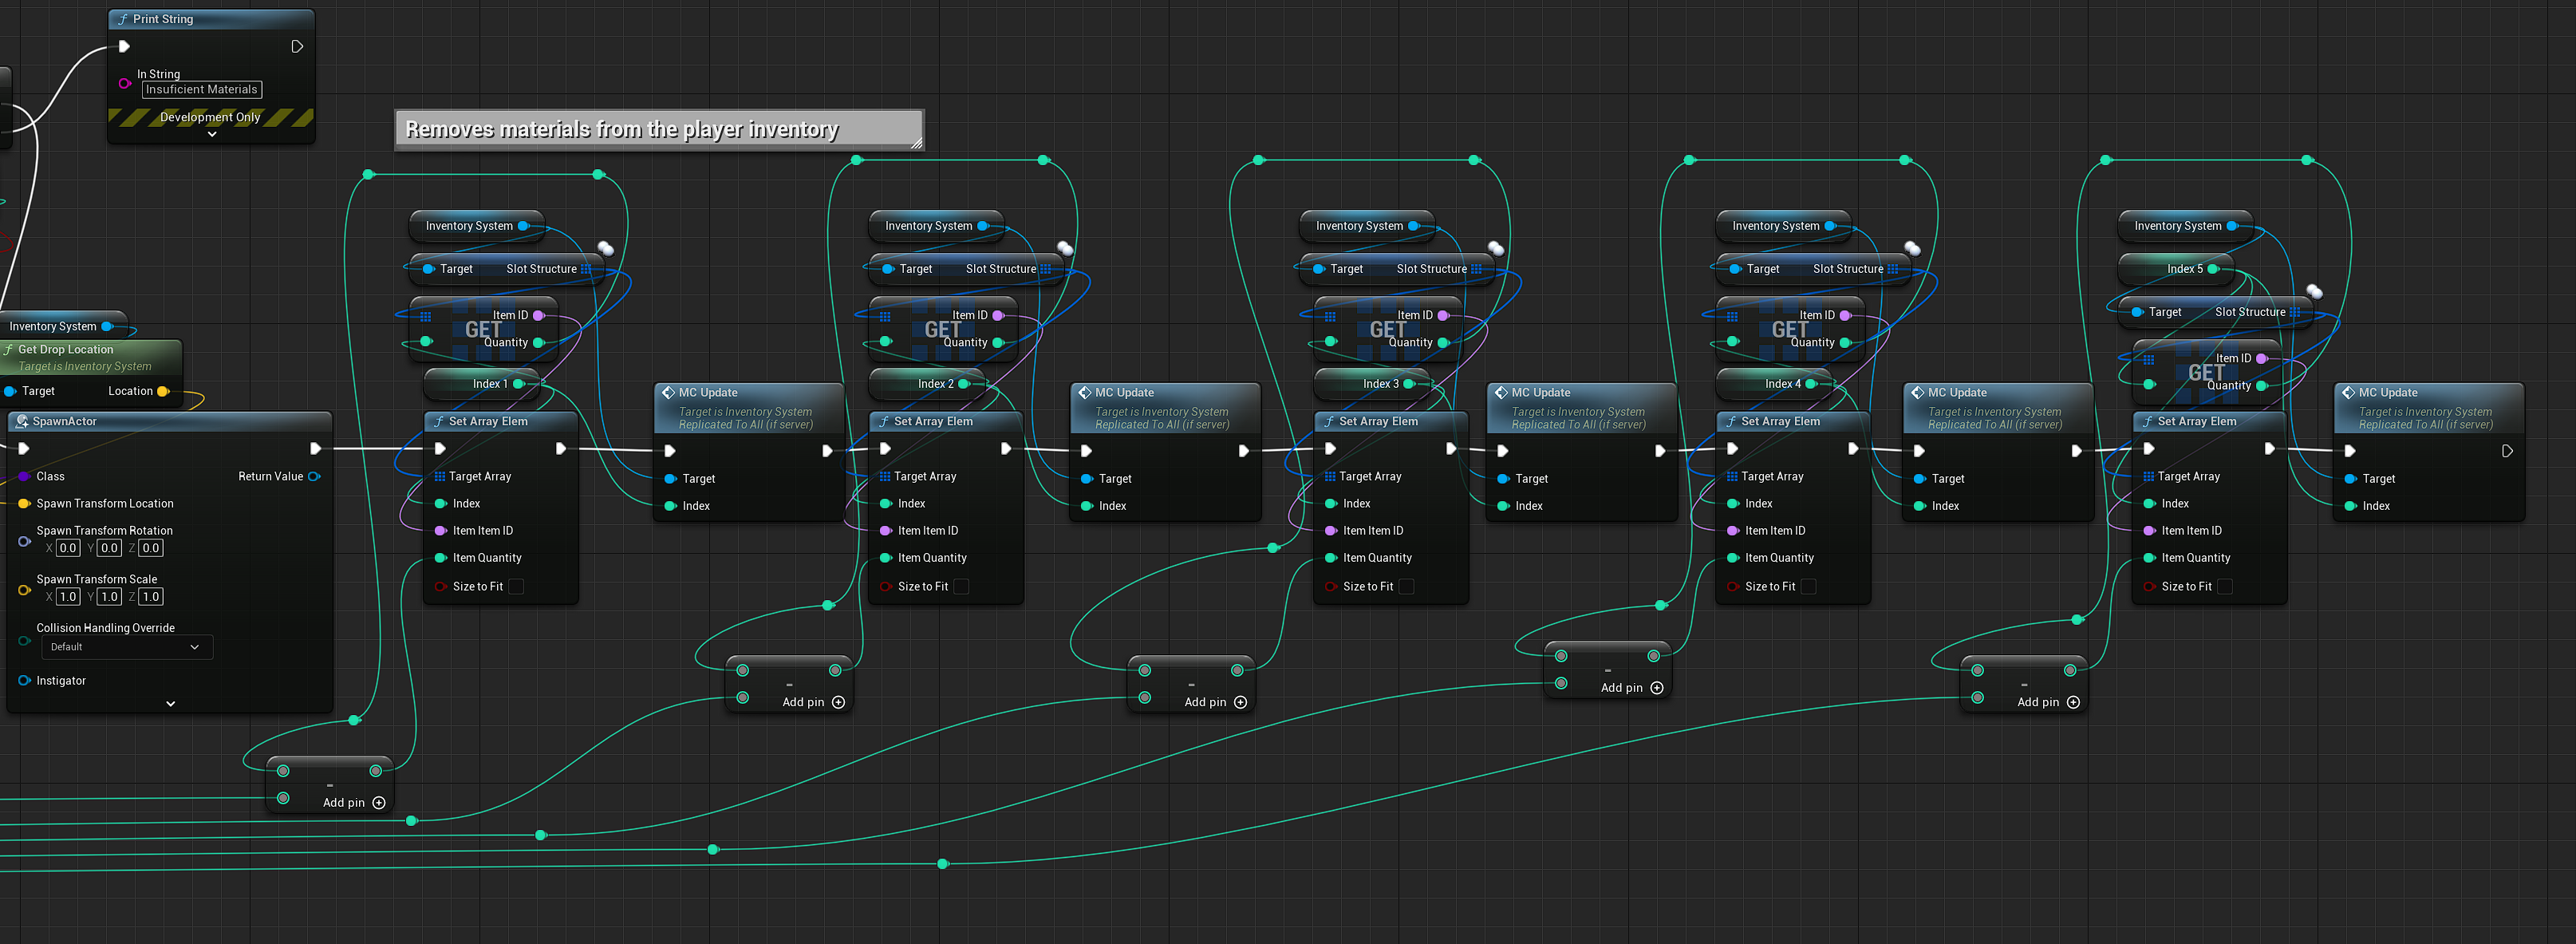
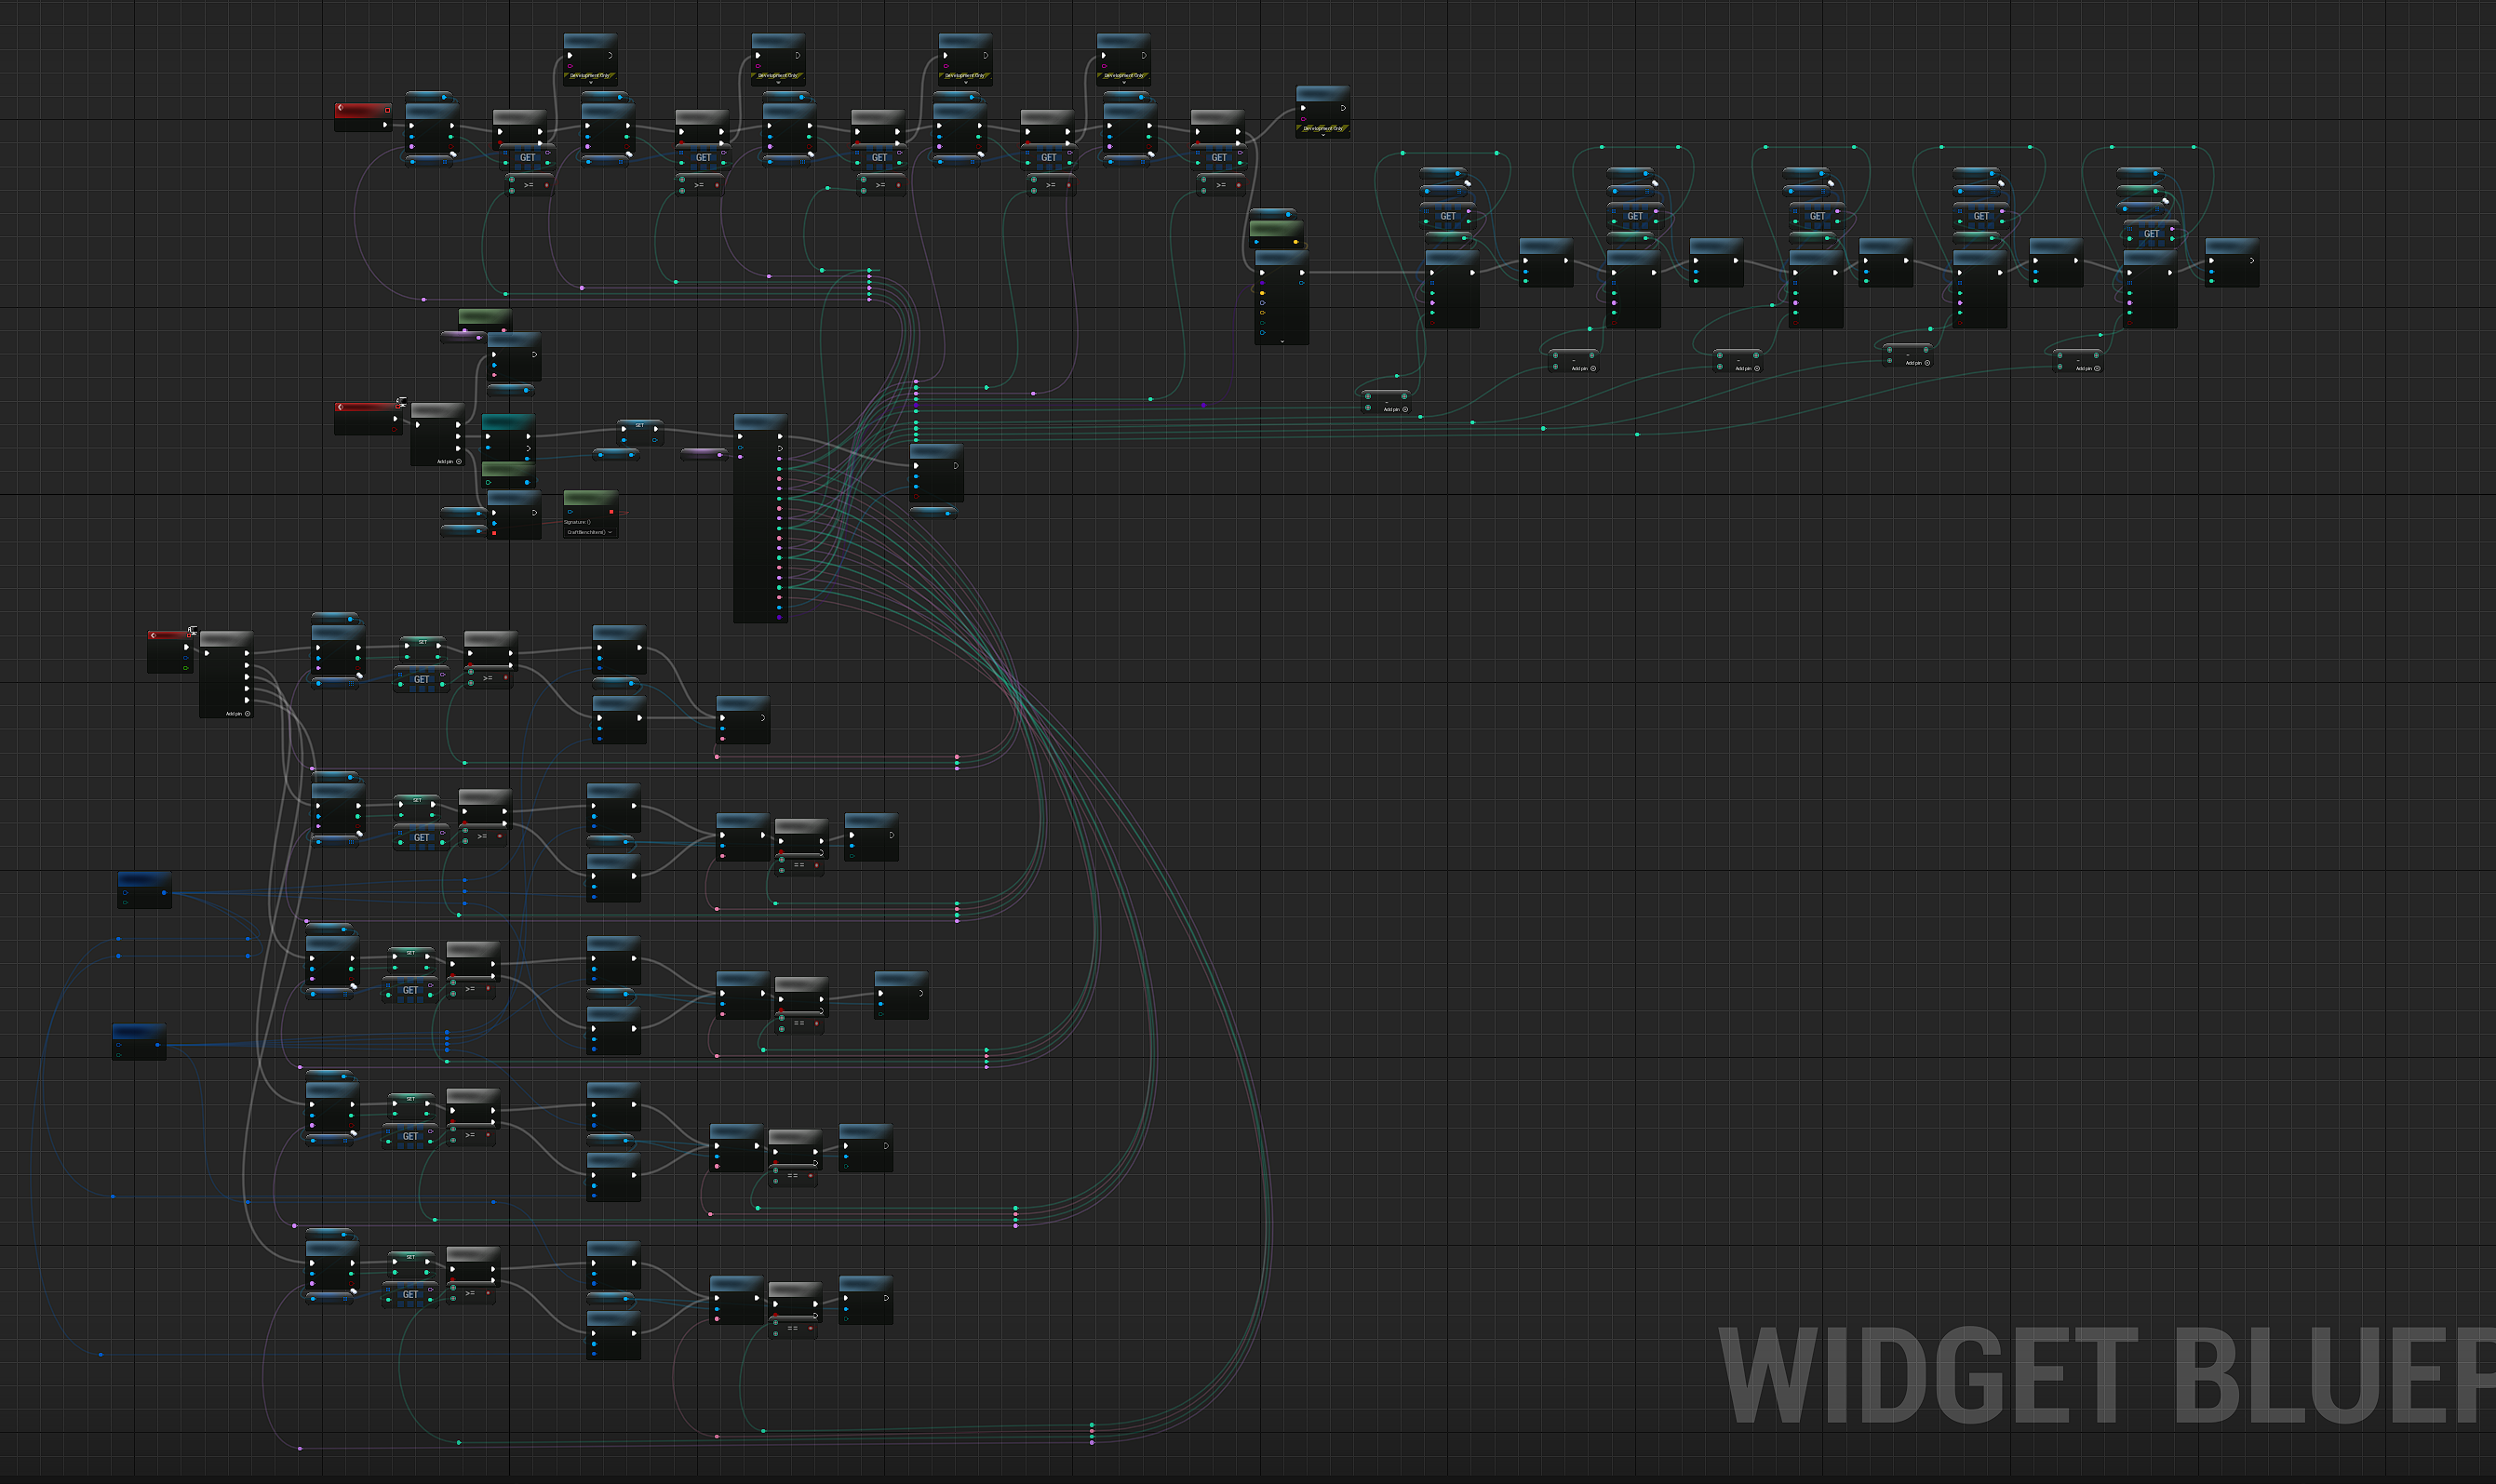
Another large part of survival based games is the ability to craft weapons, tools and other useful items that help the player survive. The player will be able to craft basic items from their own personal crafting menu(these recipes have a max of 3 different materials), for more complex or larger items, the player must use a crafting bench that can be crafted from their personal menu (recipes in the crafting bench can have up to 5 different materials).
The below blueprints show the process of crafting, I have only broken down the crafting bench blueprint as the personal crafting menu blueprint is the same, just with less material requirements/checks.
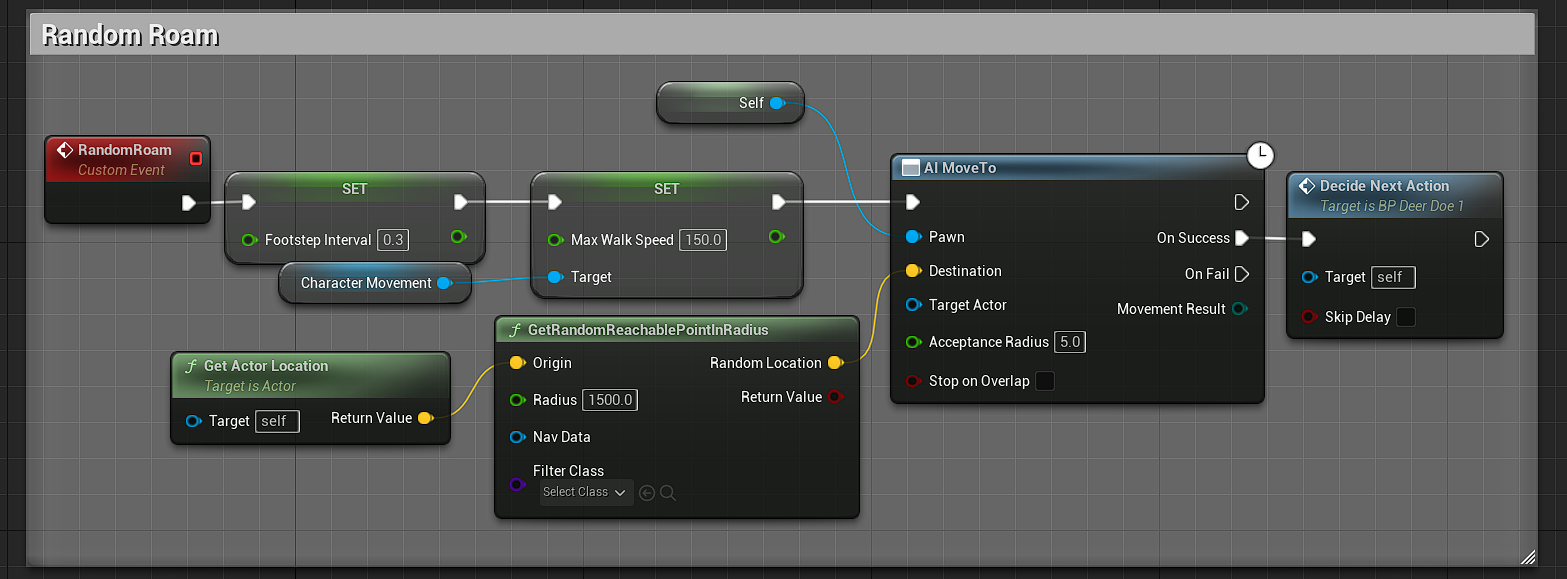
Animal Ai
Basic animal action
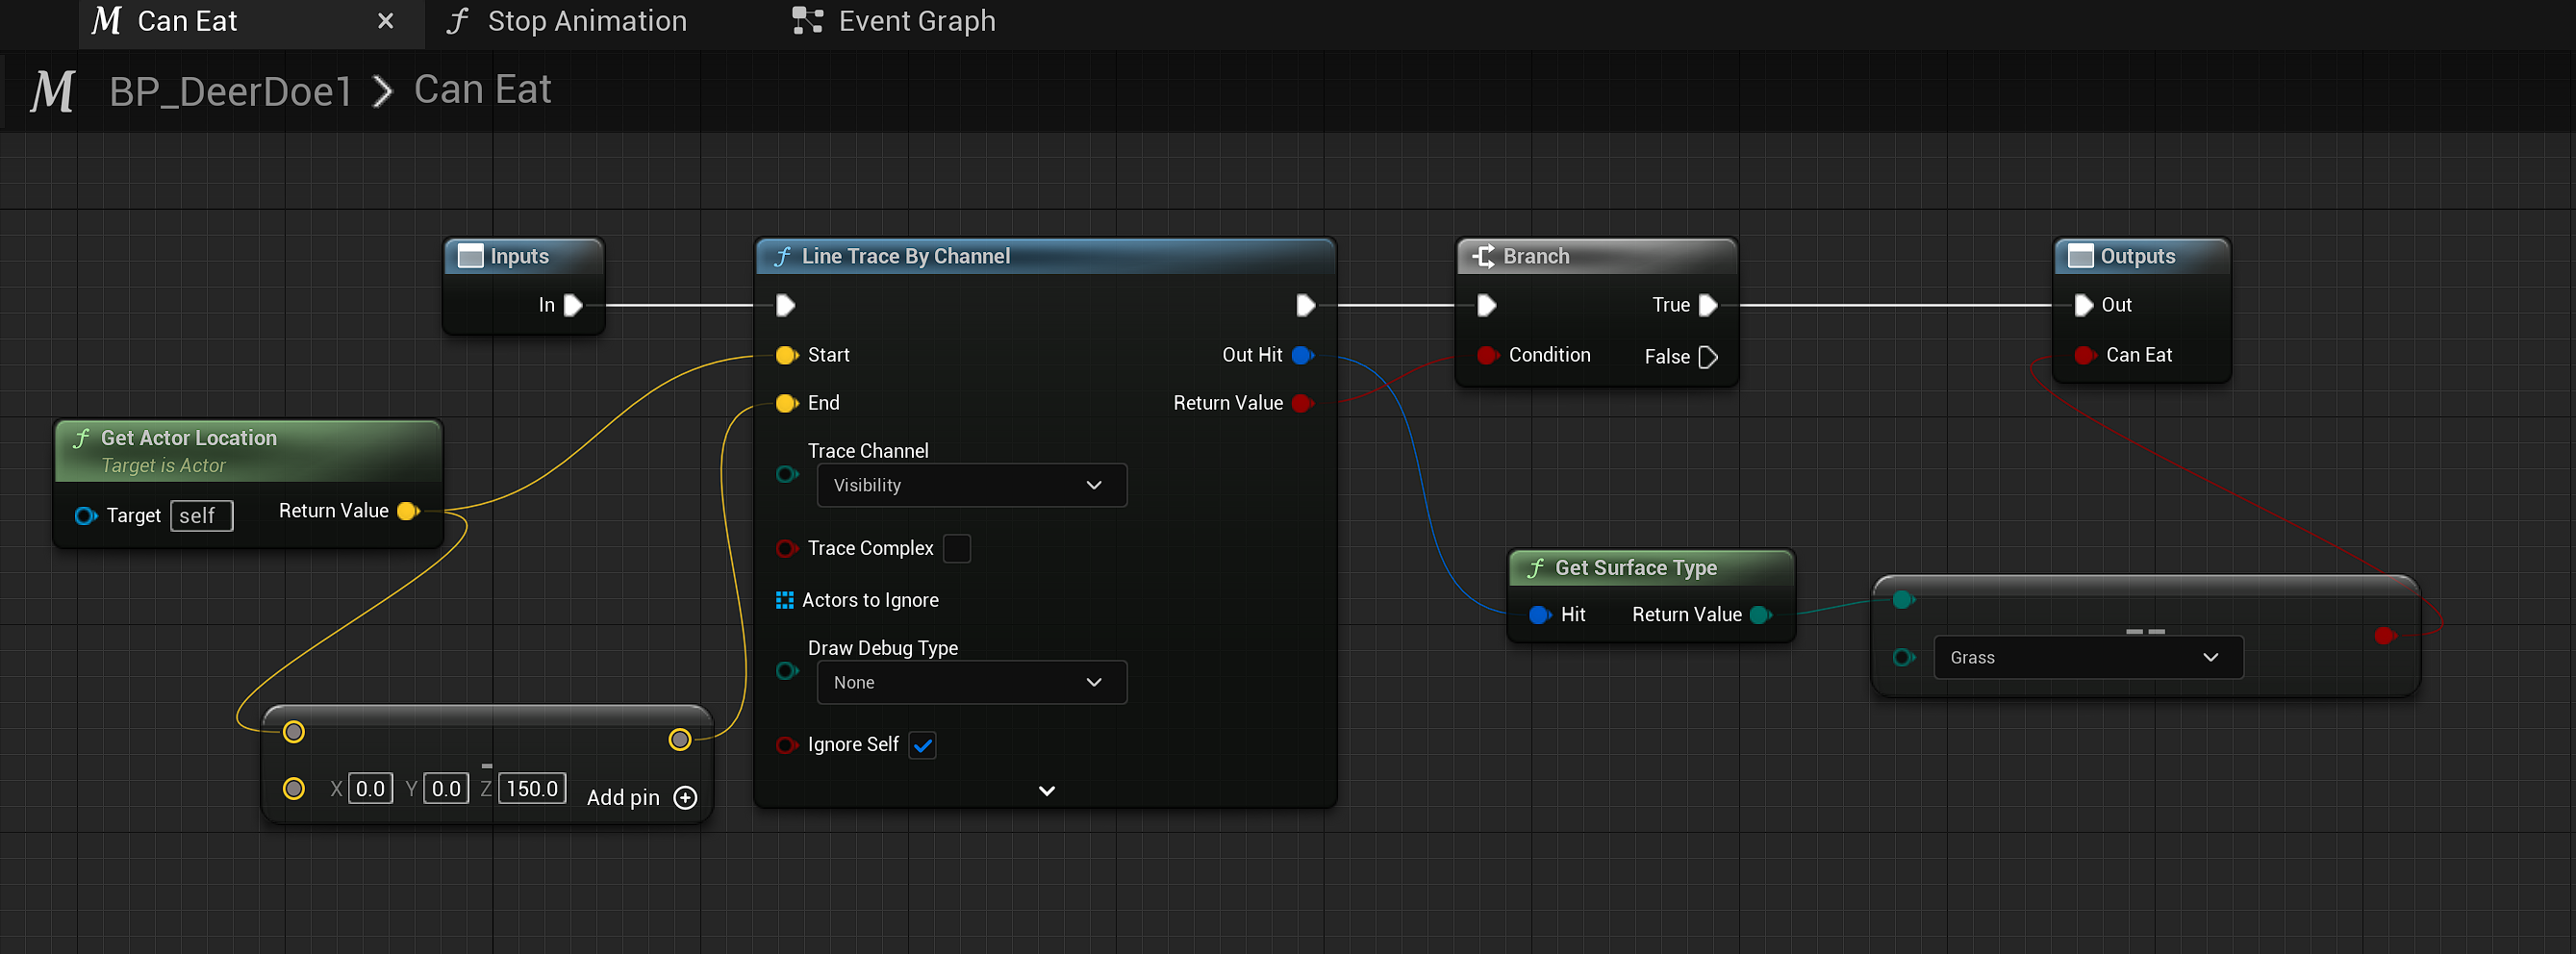
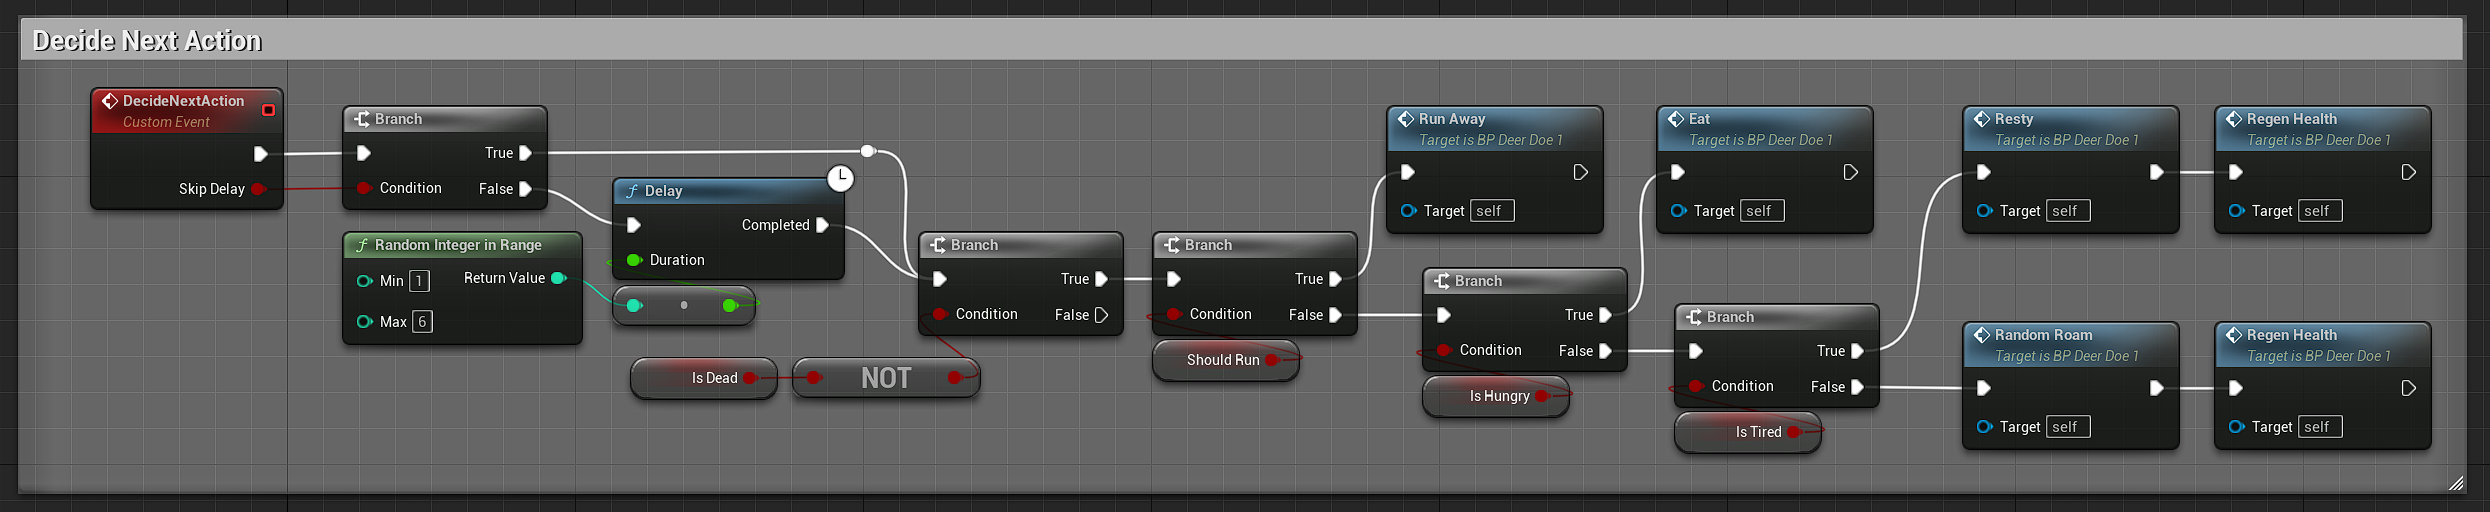
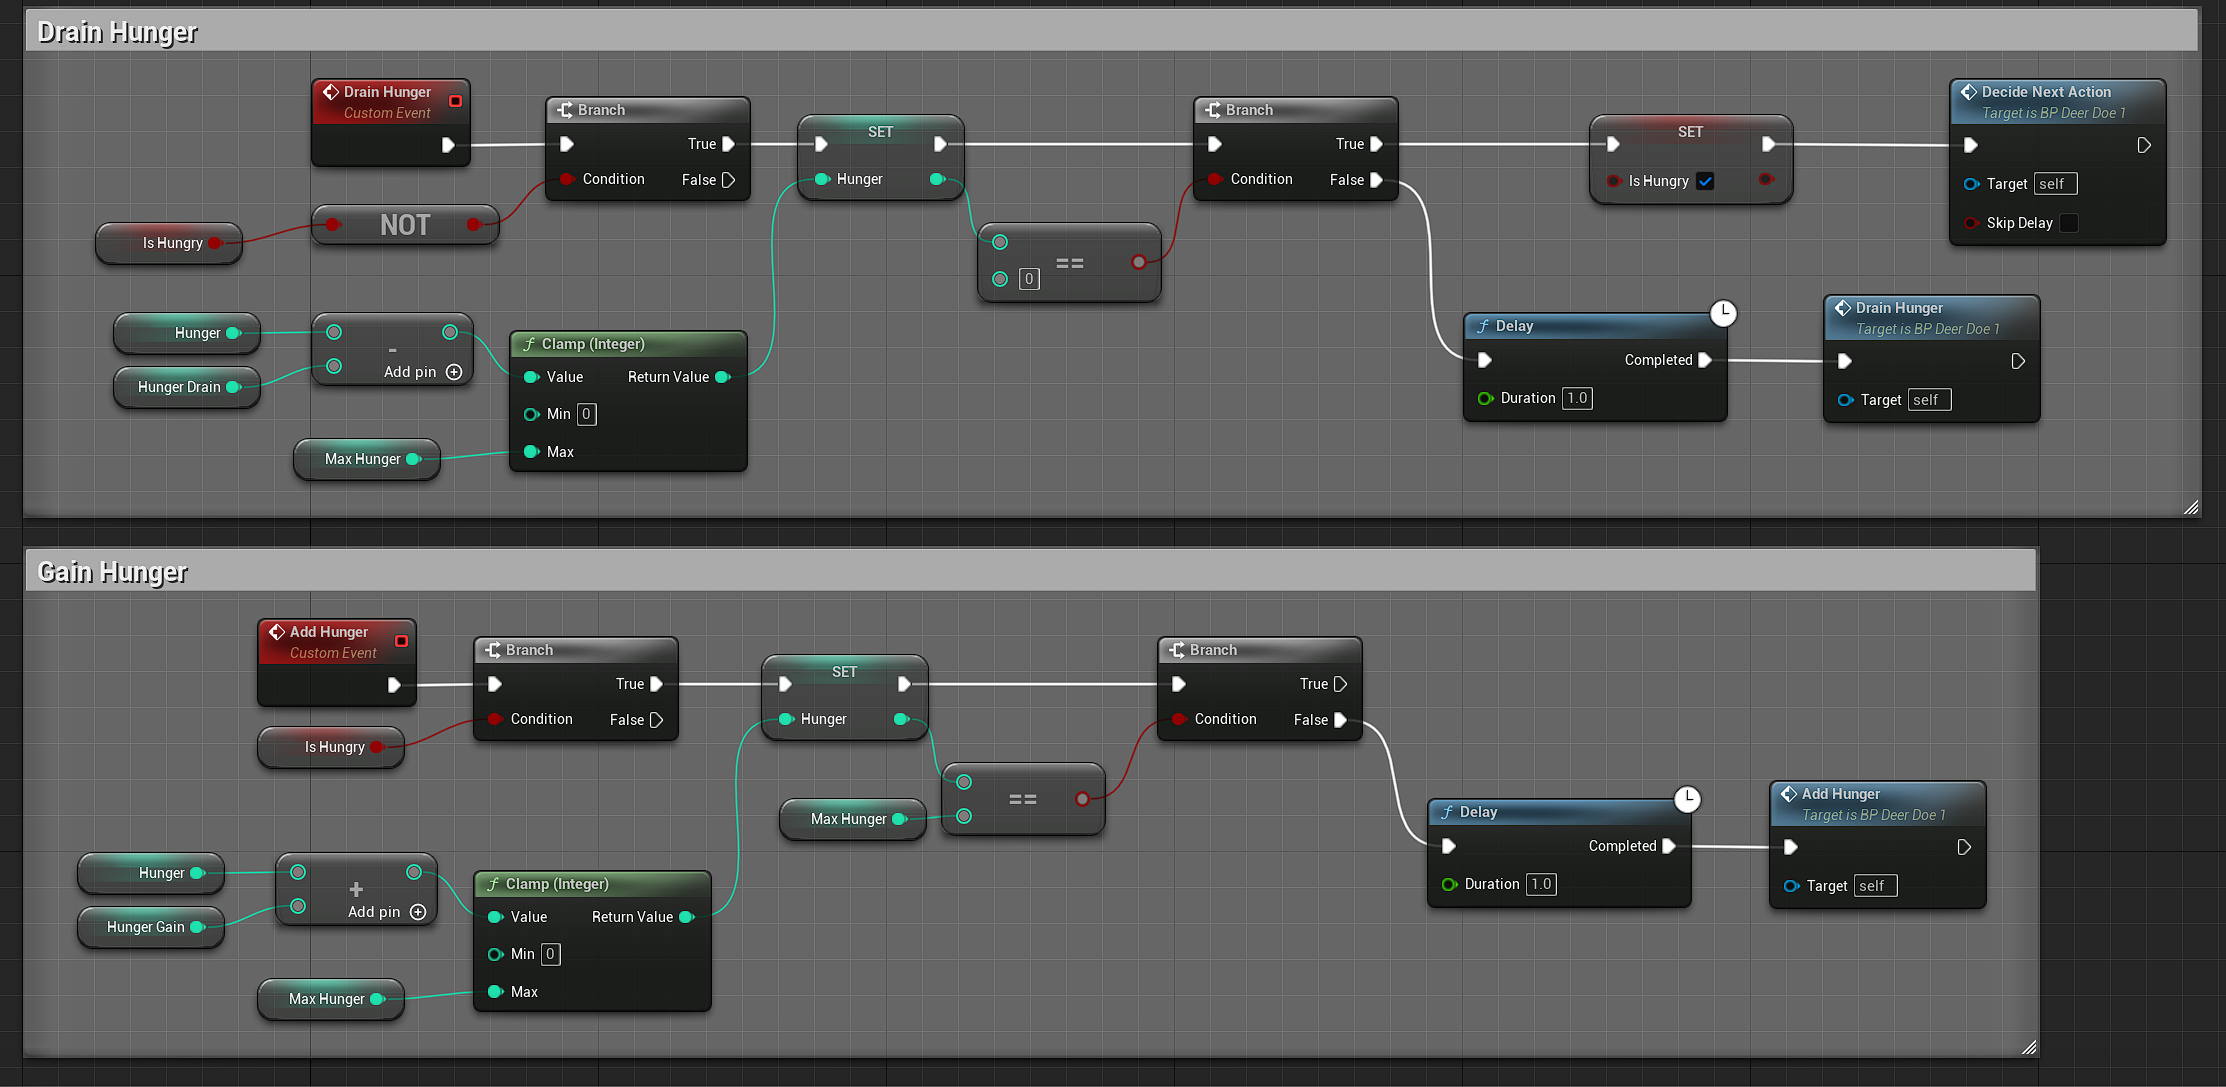
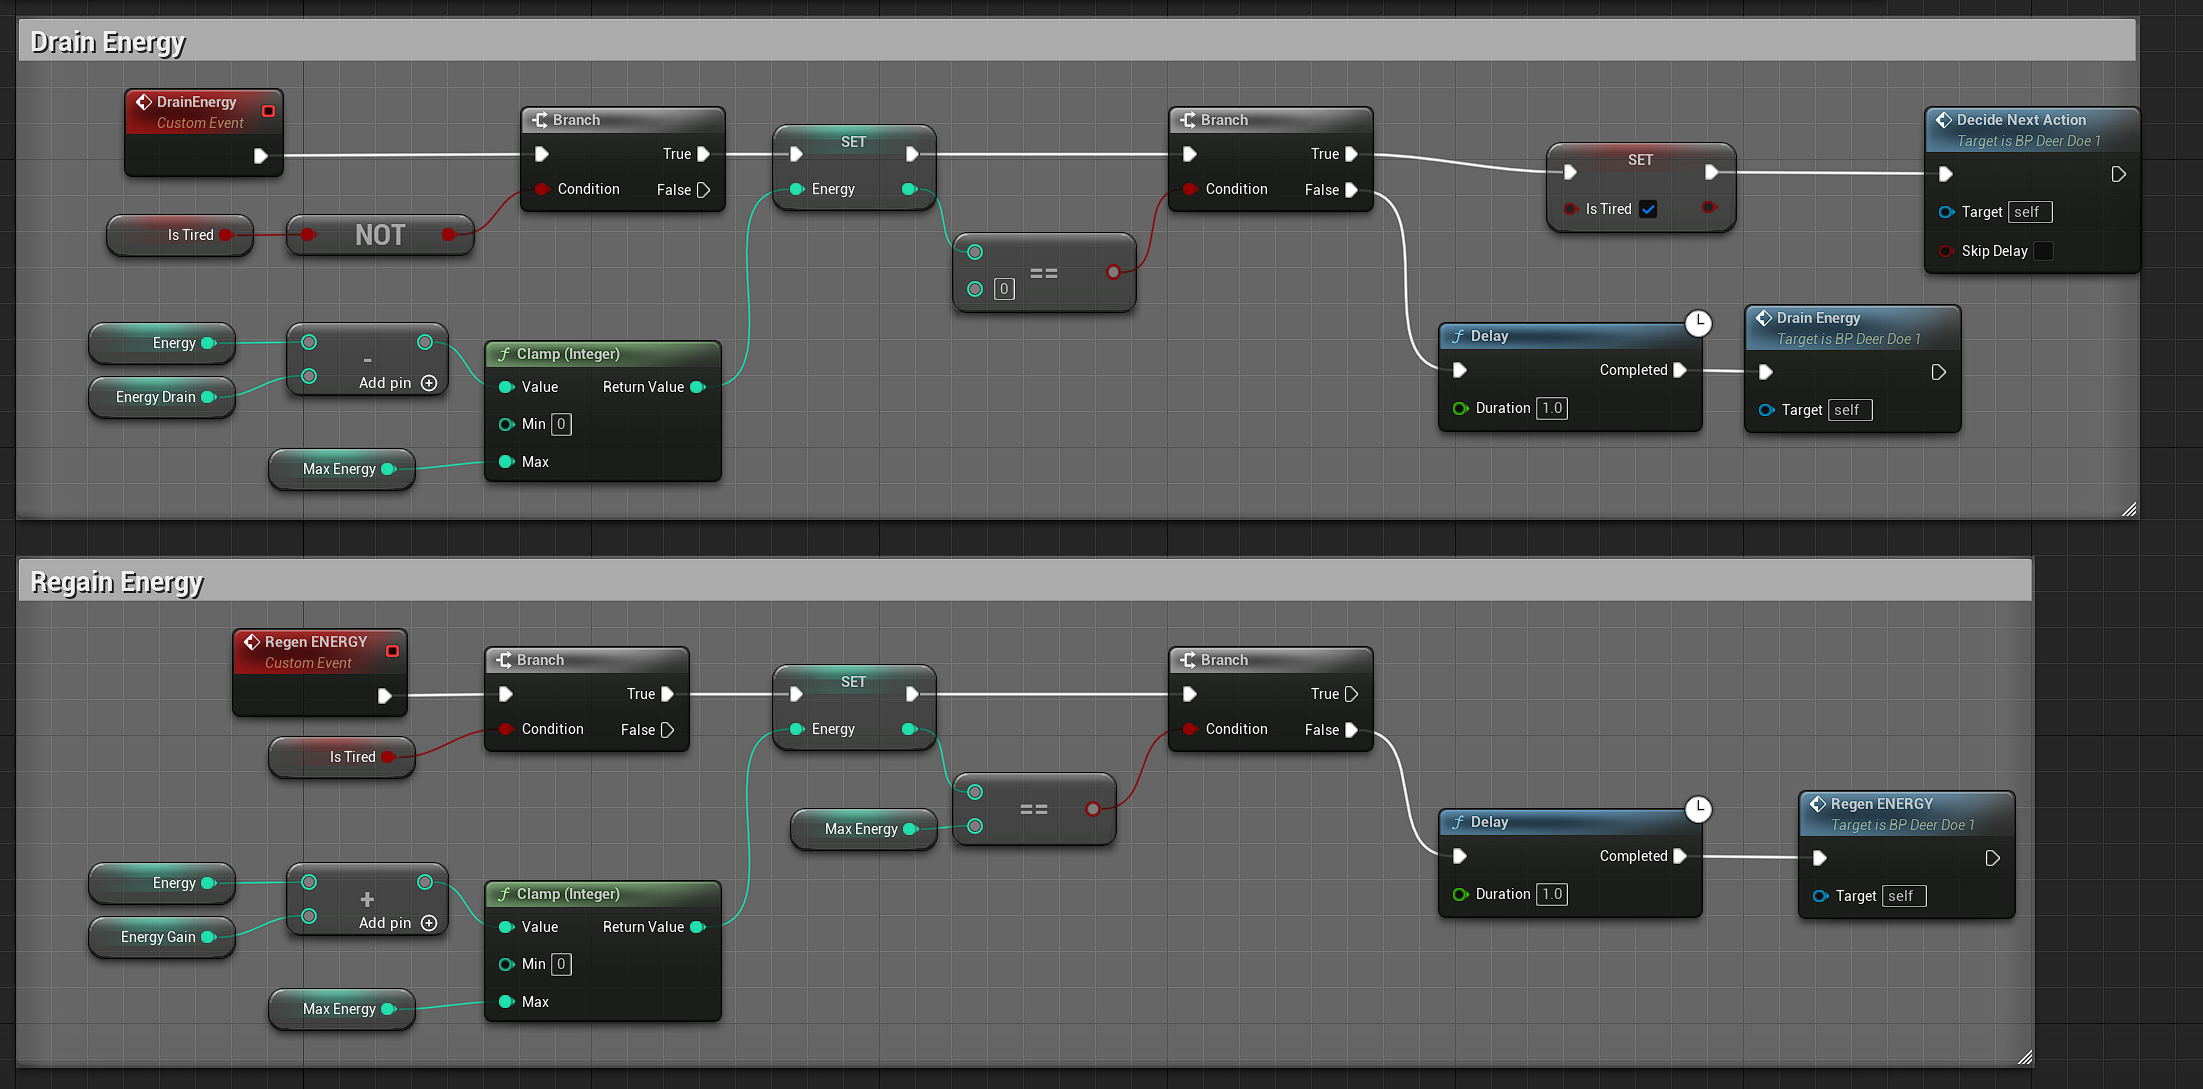
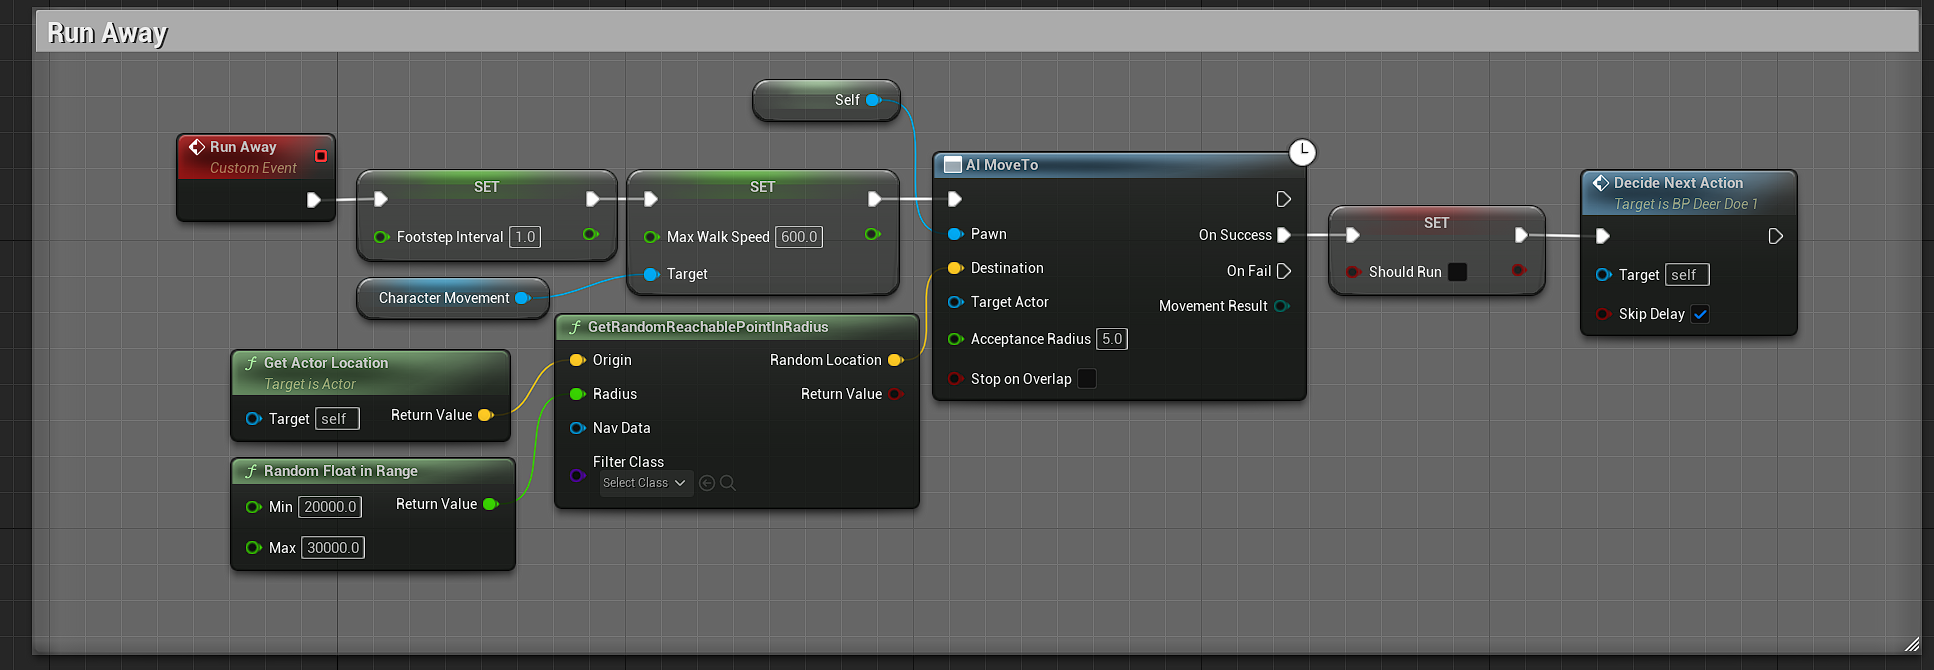
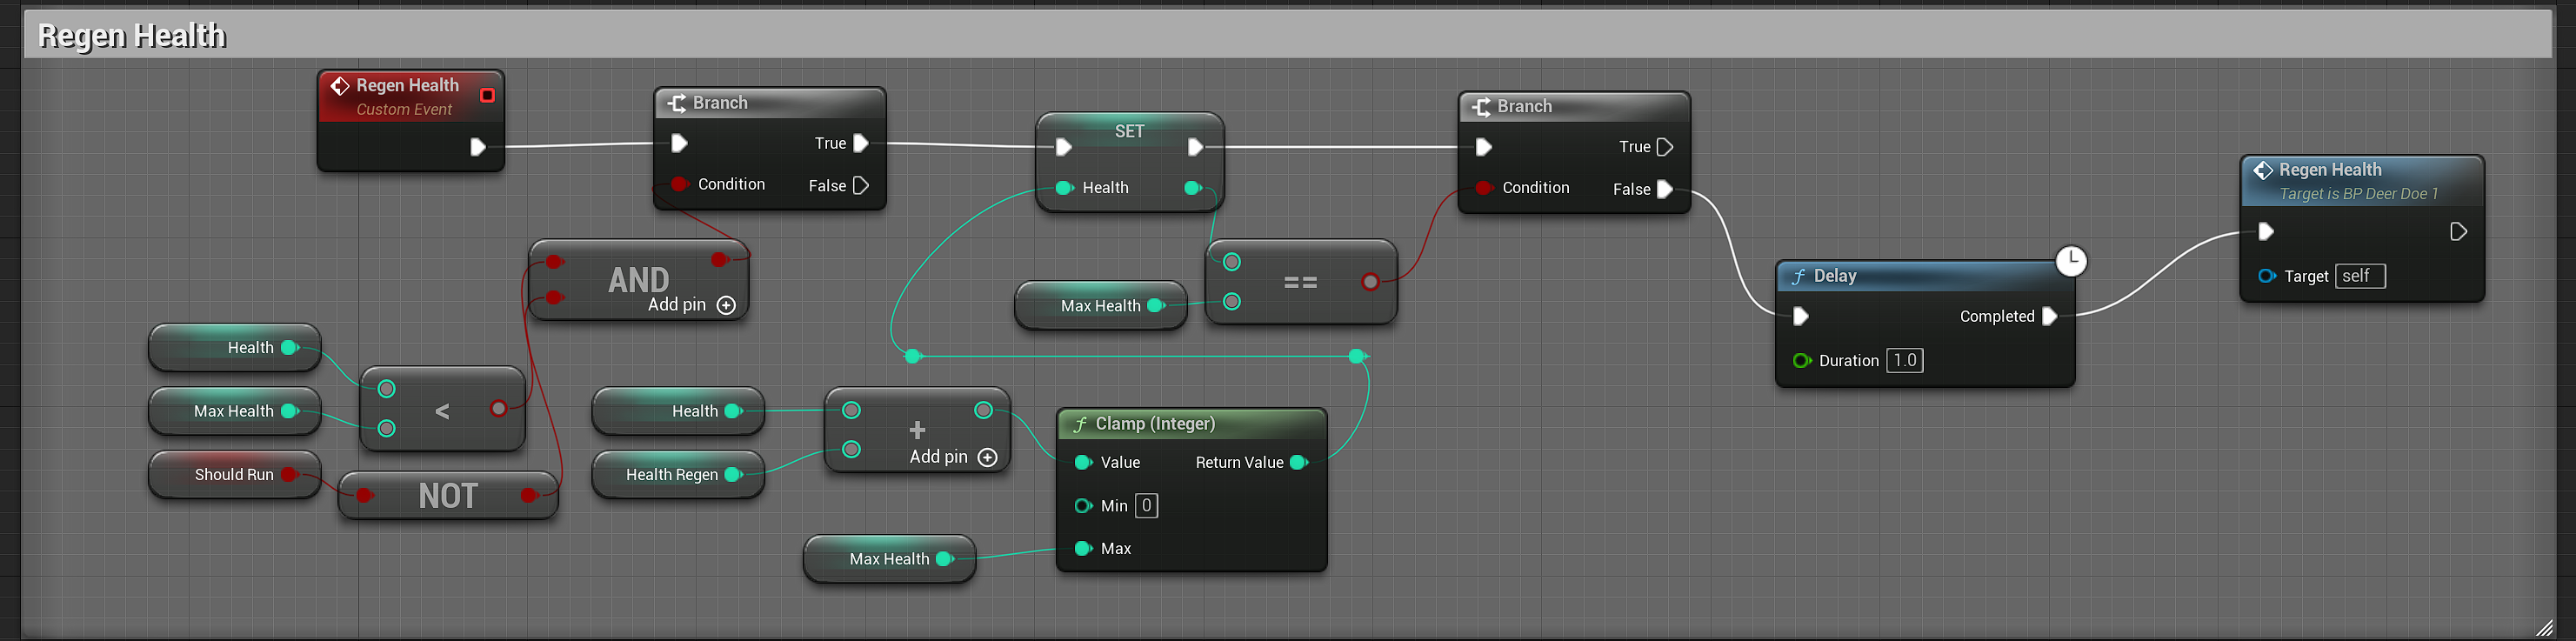
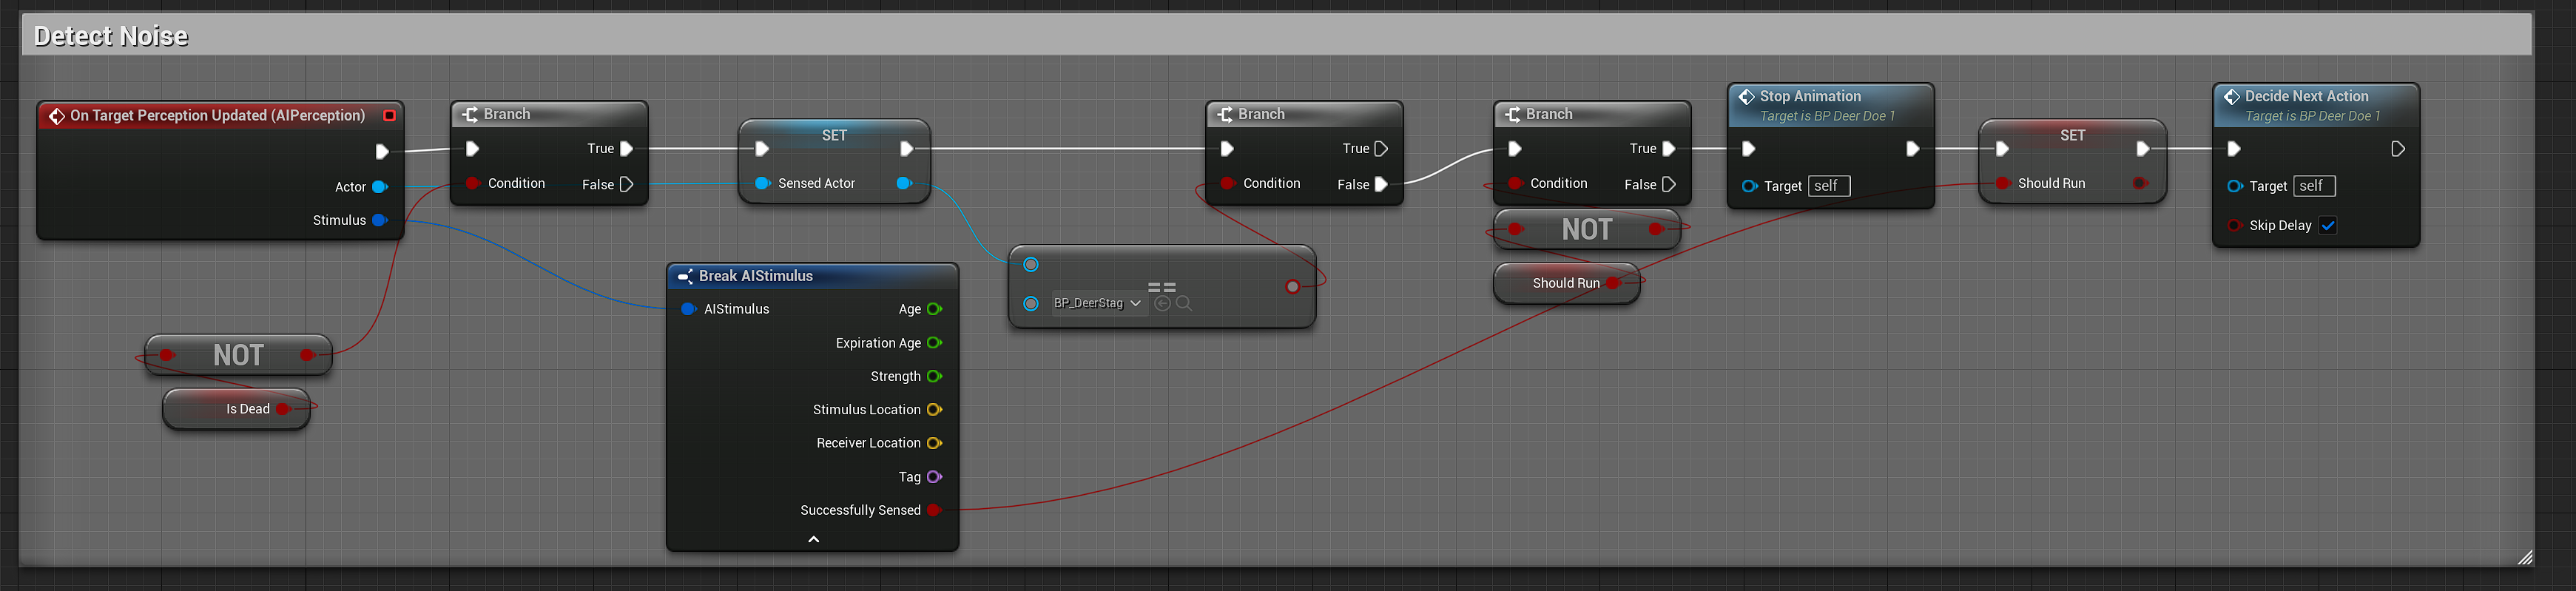
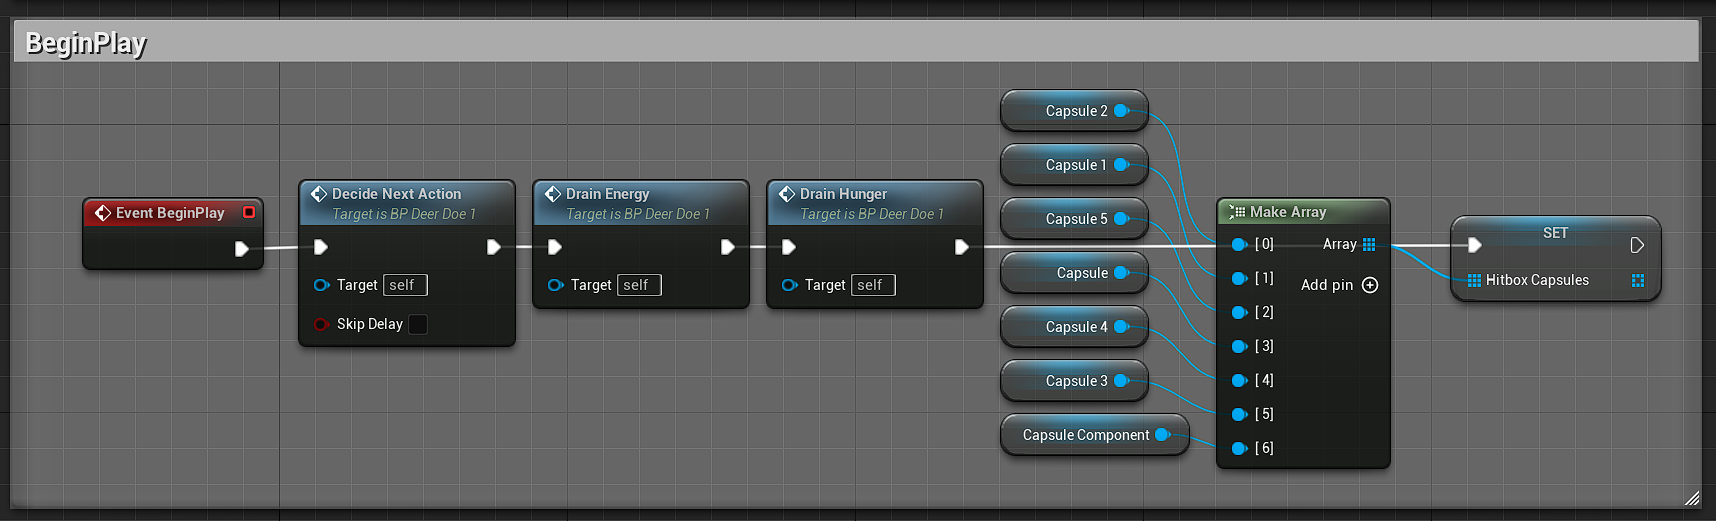
These blueprints control the basic animal actions that all of them will contain, this includes random wandering; an energy and hunger system where the animal will rest if their energy reaches zero or graze if their hunger reaches zero (as long as the animal is a grazing animal and it detects grass underneath); AI sensor capabilities which cause the animal to run away if timid or will chase the sensed actor if aggressive.
Animal Actor and animations
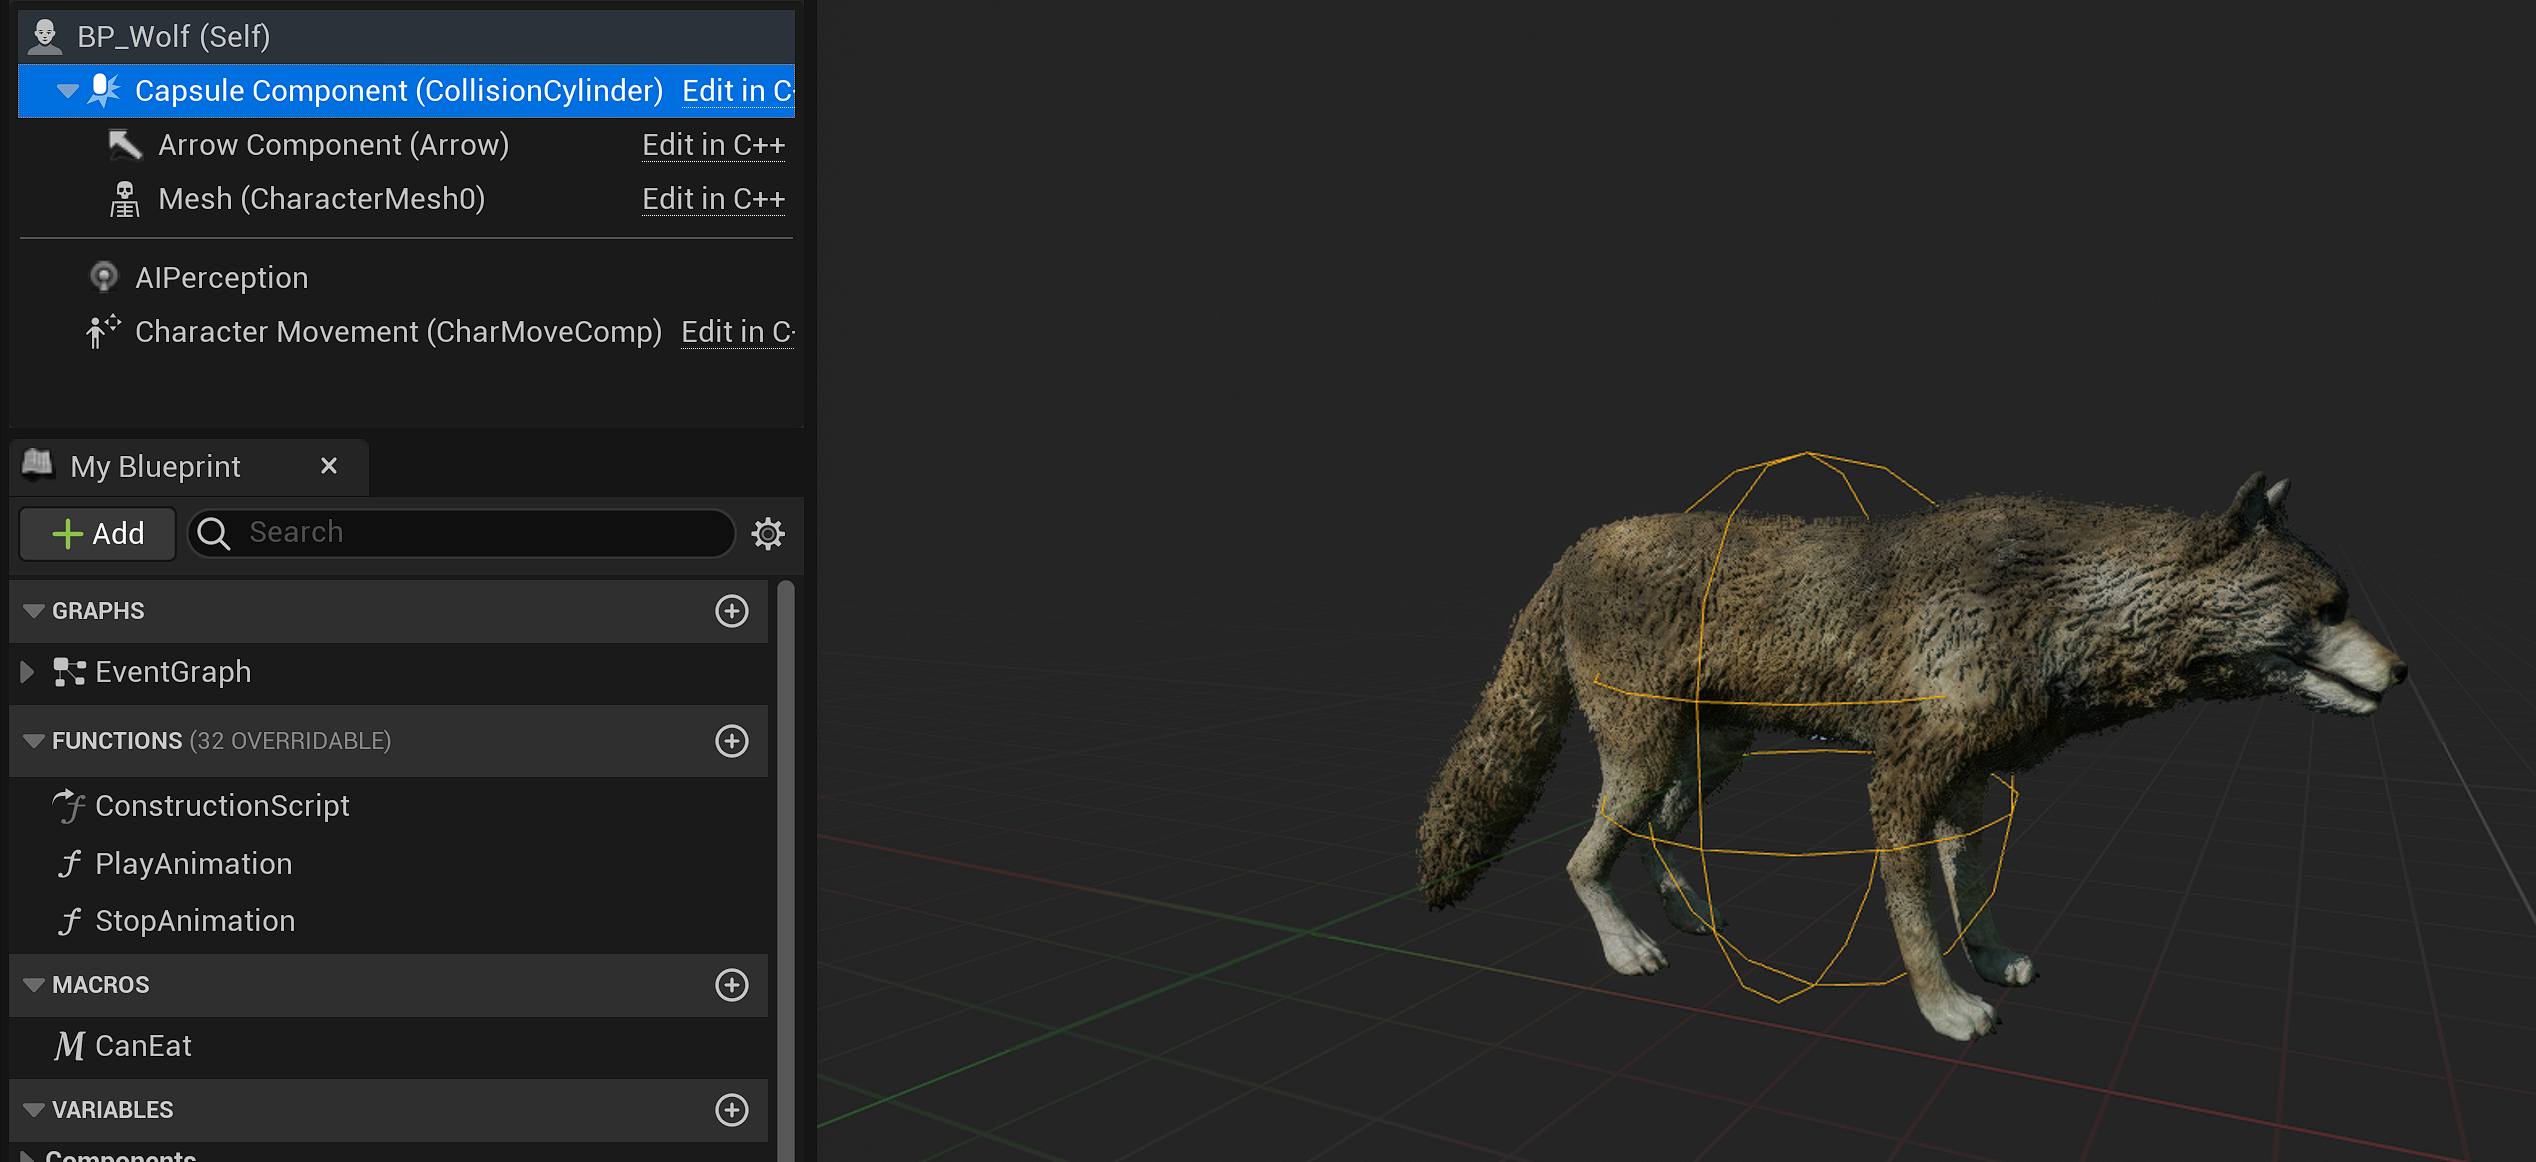
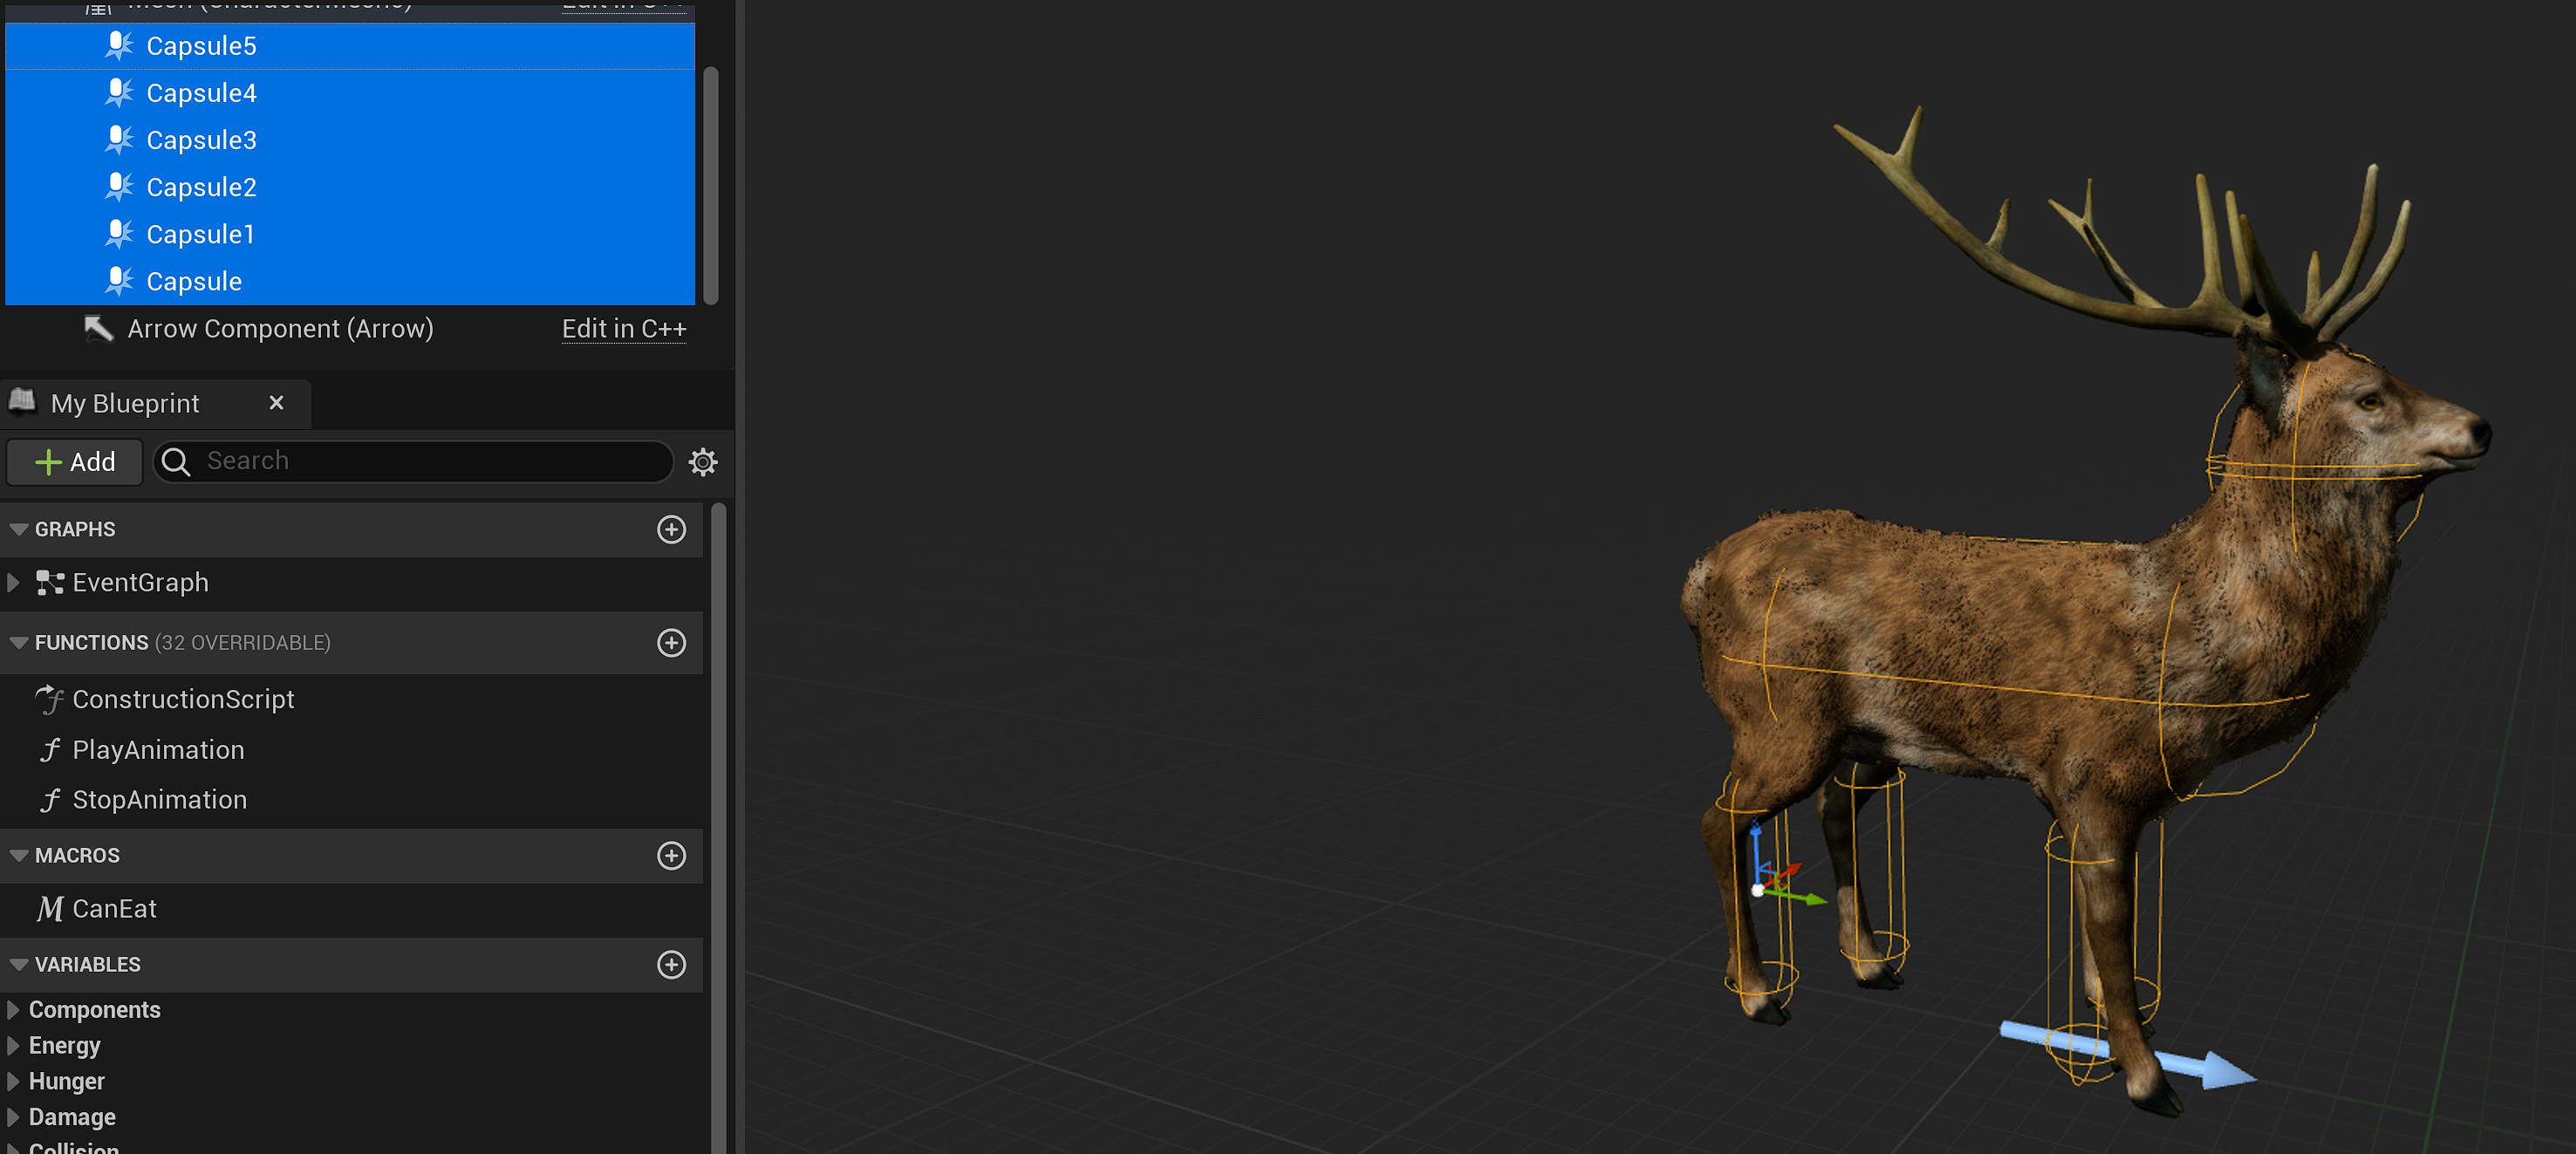
When creating the animals (models and animations are part of a free asset kit on the Unreal Engine market board found here) I created a basic hitbox to test damage triggers and created a simple animation blueprint for the animals movement which changes depending on speed and direction. I later upgraded the hitbox a bit to better emulate the animal’s shape but didn’t go too far as this was just a test for animation triggers.

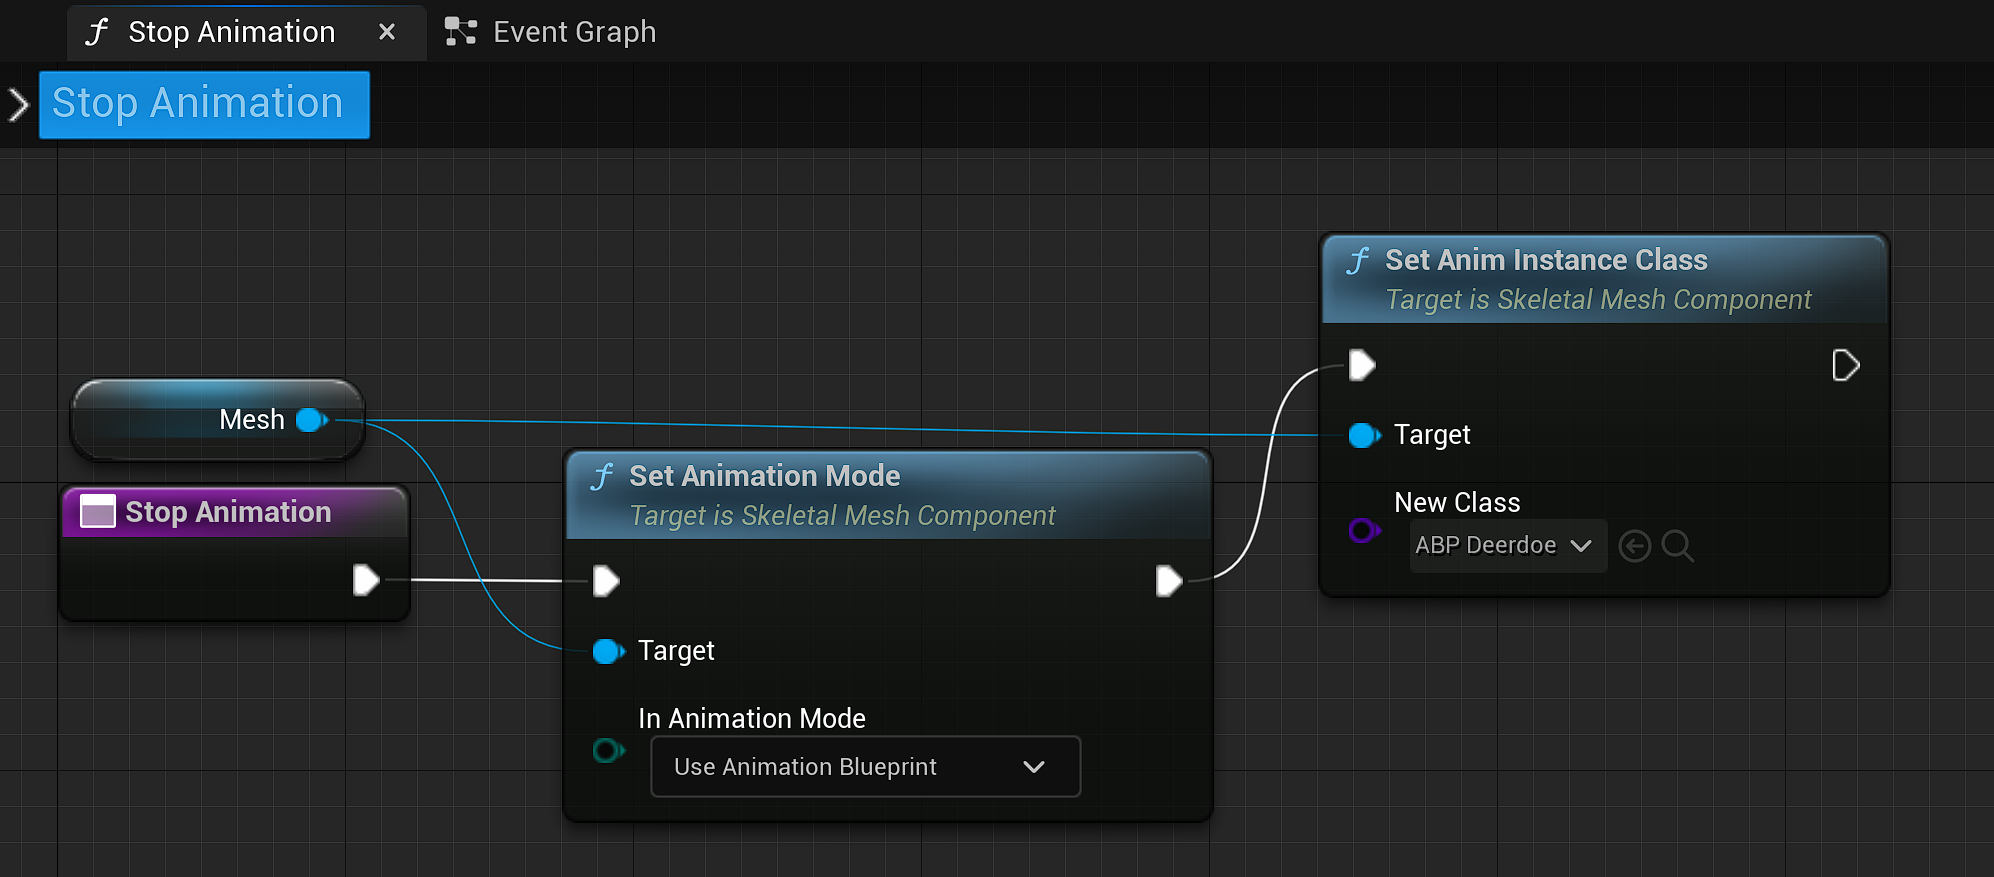
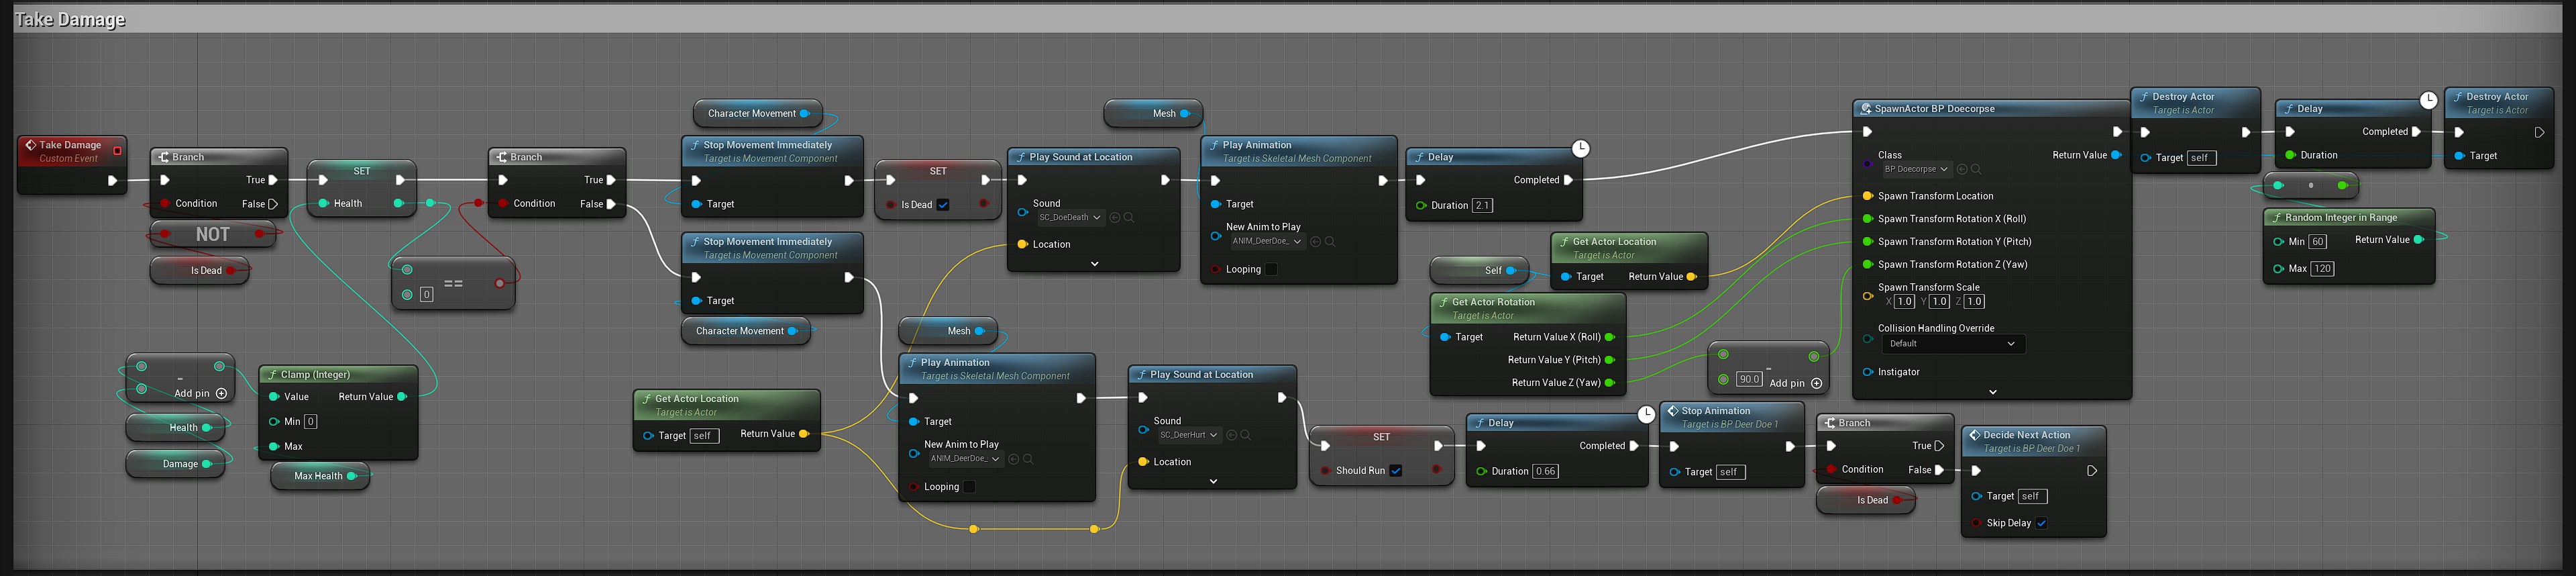
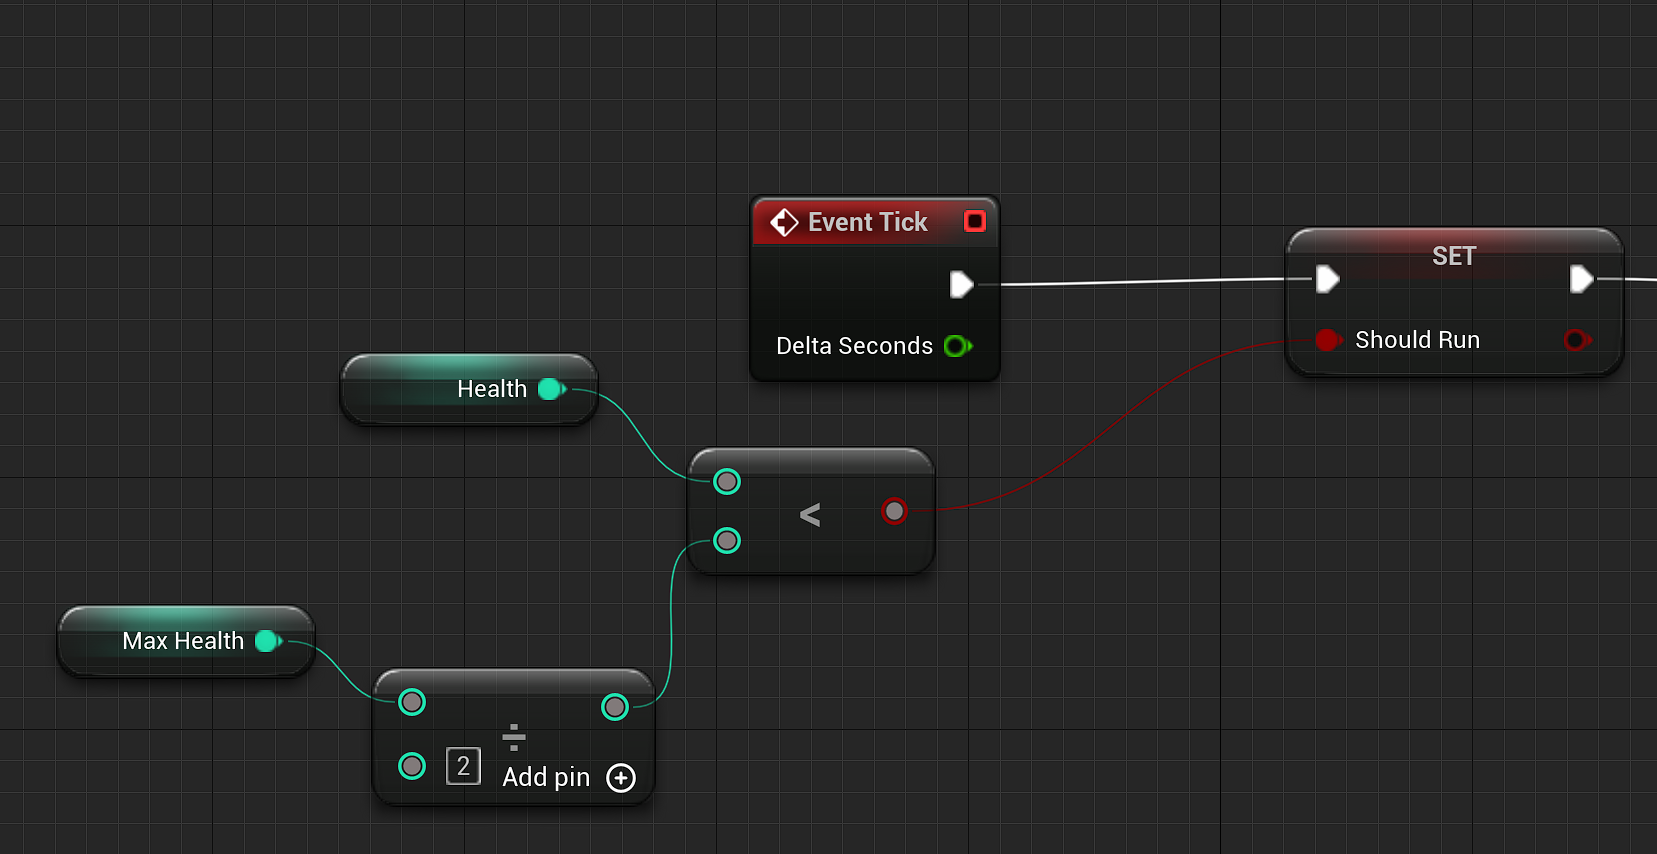
Next I had to code the different animation instances, for example when the animal becomes damaged or when the animal rests or eats. These can be found below alongside the ‘Stop animation’ function which is to reset the animation back to basic movements and prevent an issue where the animal slides around after an animation is played.
In both cases of resting and eating, the animation plays, then there is a delay to hold that position for however long it will take for the energy/hunger to reach full, then play another animation to stand-up/stop-eating, then return to movement animation blueprint. Each action has a ‘check if animal is dead’ branch at the beginning as I was finding times where the animal would continue actions after being killed by the player… not very realistic.


If the player kills the animal, the death animation will play, the body will then be replaced with a separate actor that can be looted by the player for meat, I found this to be a nice quick way for the player to be able to loot the animal without the possibility of the animals AI to continue running which could cause bugs or unnecessarily using system resources. If I wanted random loot, or multiple items, I could attach the inventory blueprint to the actor to create a container system like the storage chest which would hold the items for the player to drag and drop from.
Wolf/Aggressive animal AI
Aggressive animals will need some extra code to make them chase and attack the sensed Actor instead of running away from it. At the moment, there is only the animation of attacking as the other game developer on the team is dealing with the player characters so this will be built in once my blueprints are merged into their side. The animal will also decide to run away from the player if it goes below half health, I feel this is a bit more realistic than an animal without a sense of preservation.

.
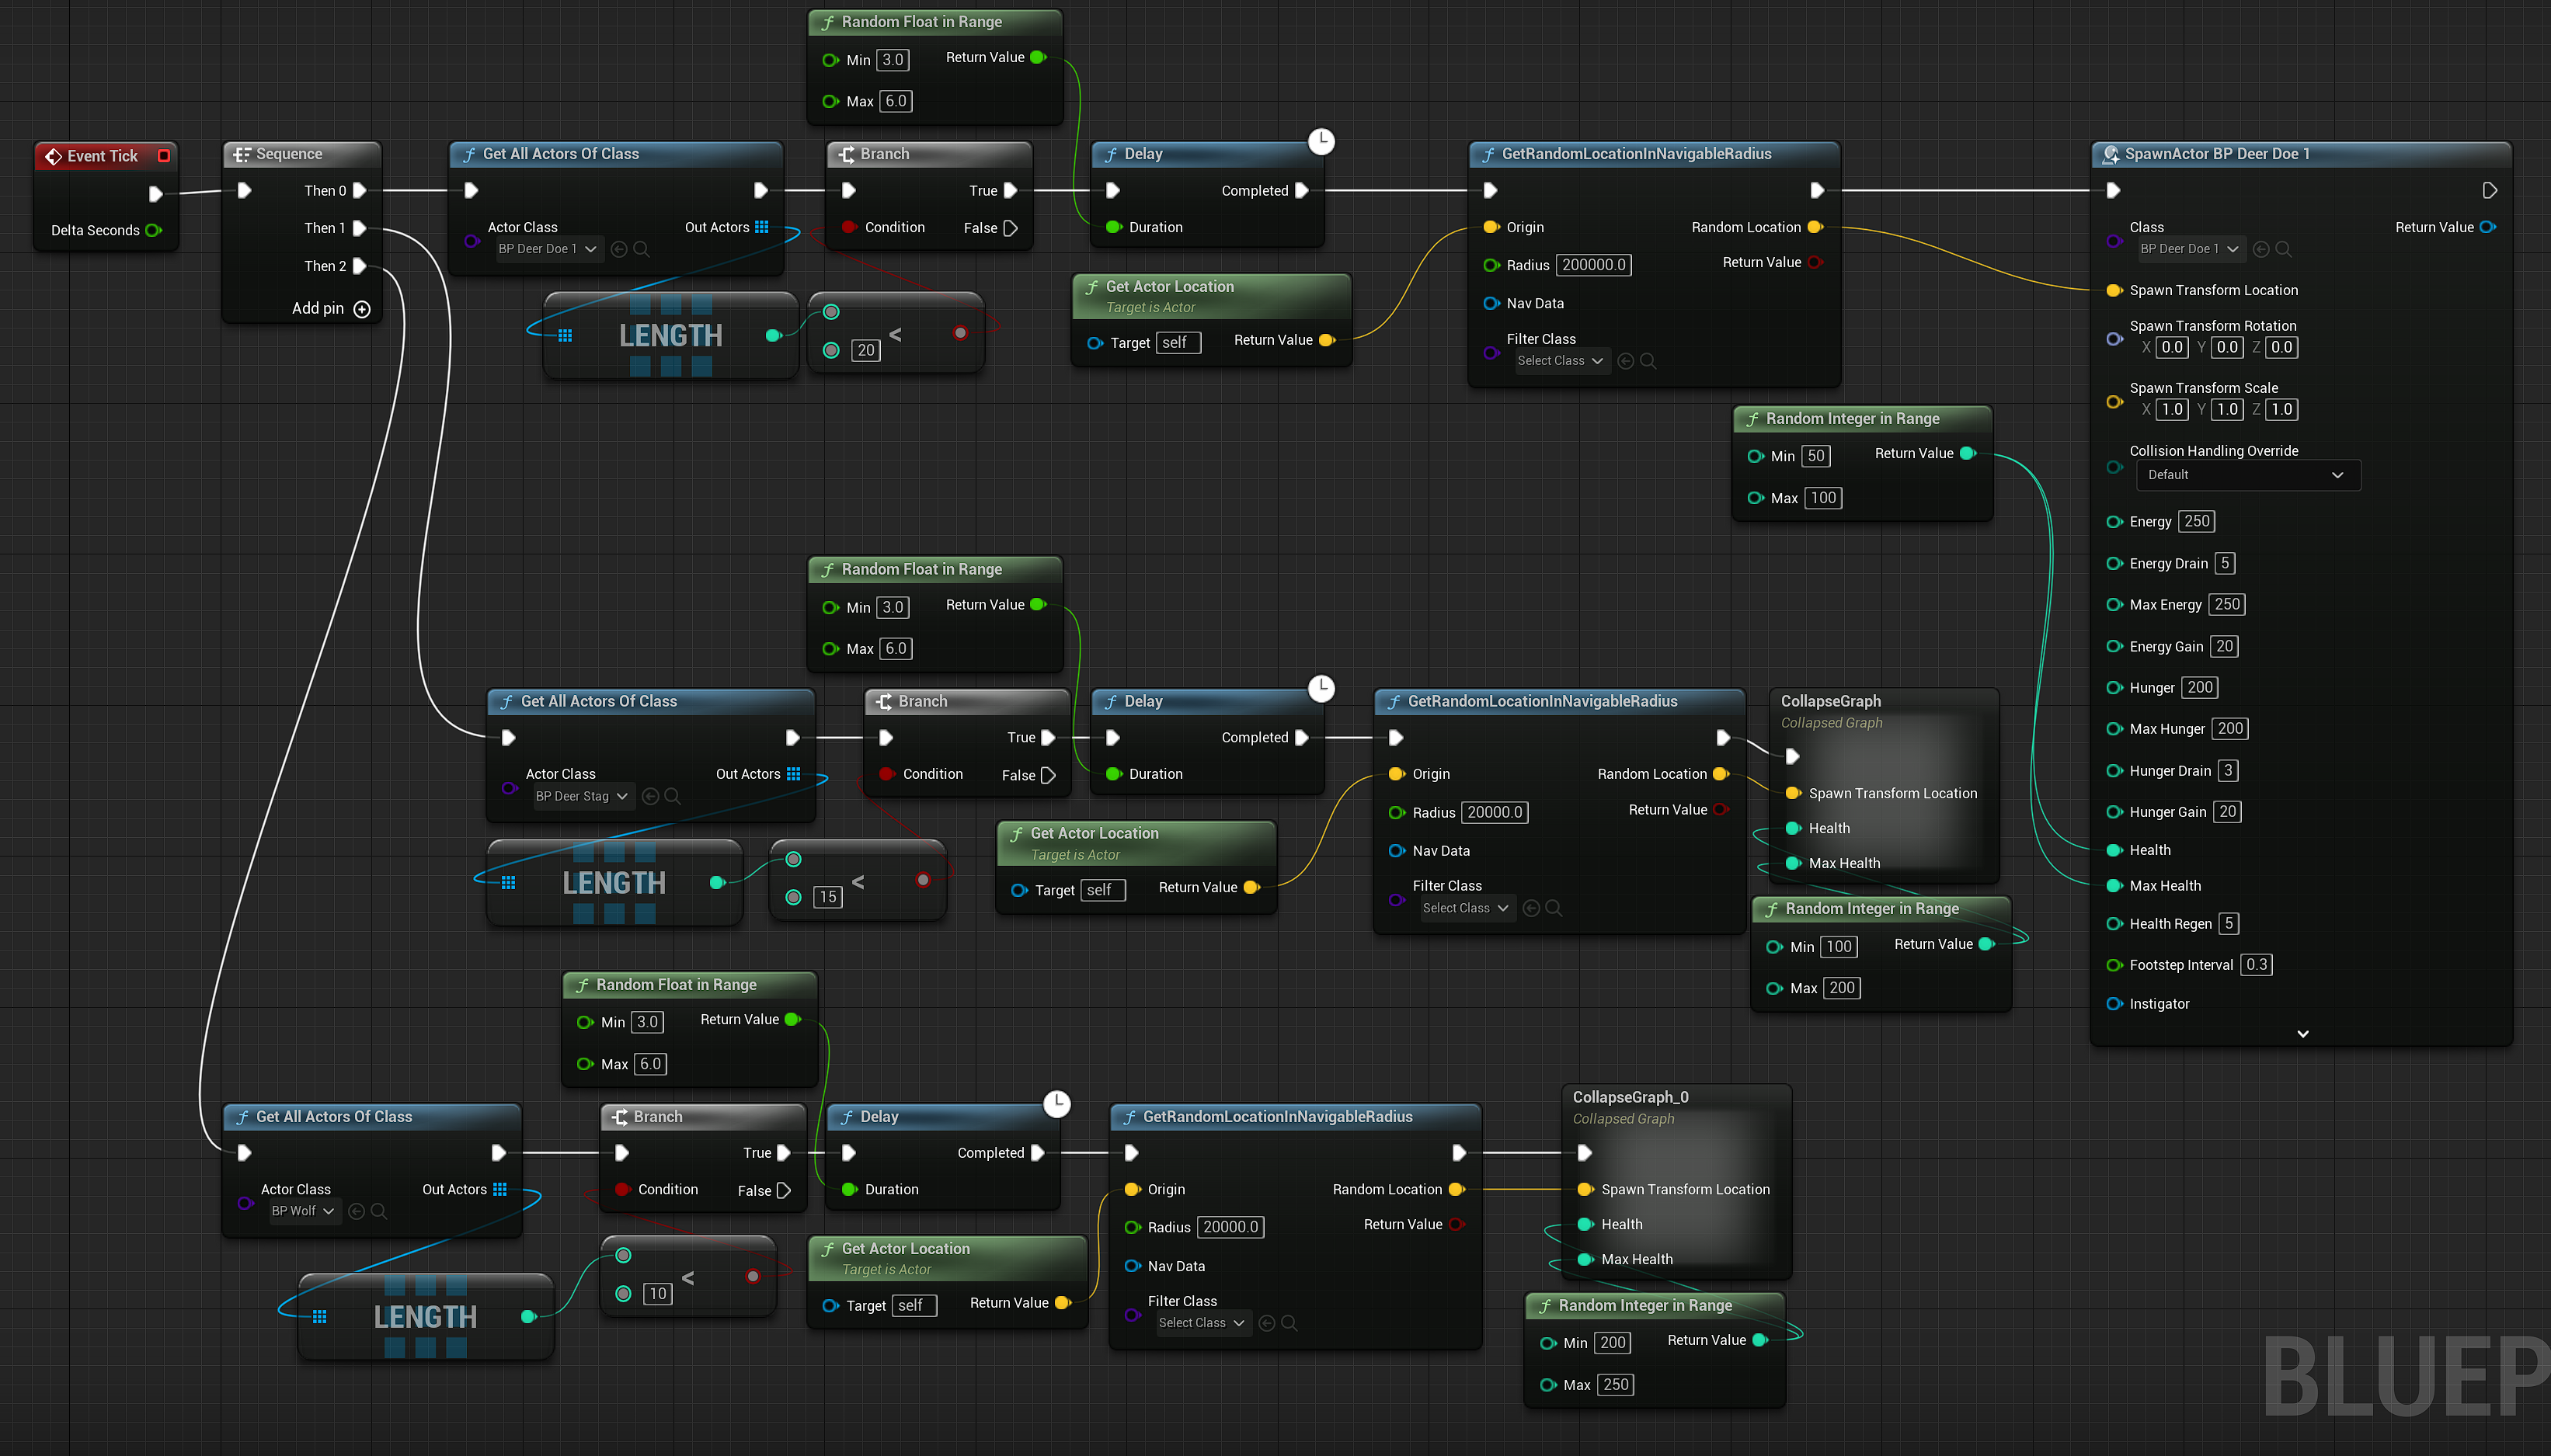
AI Spawner
Instead of building a feature where animals respawn themselves after their death and manually placing the actors on the level, I decided to build an AI spawner to do this automatically and control the maximum amount spawned to avoid overcrowding/performance issues. The code tracks how many of each type of animal is currently active, then if it is below a certain number it will spawn one in a random navigable location every x-y seconds, the code also sets a random health within a range. All the animal stats are able to be edited through here if necessary. Just to note, the animal meshes in the above video have been scaled up a lot to make them visible from a distance, this is why they appear to move very slowly.
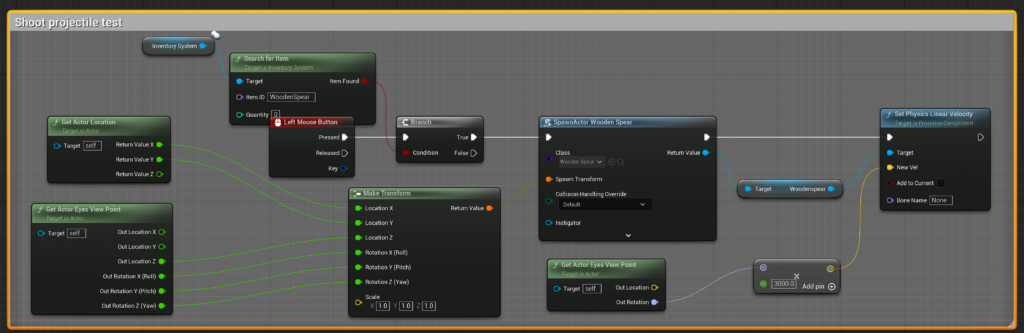
Janky damage test
As I needed to test damage hitboxes and animations, I created this quick spear throw code which requires the wooden spear to be in the player’s inventory. I kind of like how bad it looks, below are the blueprints.

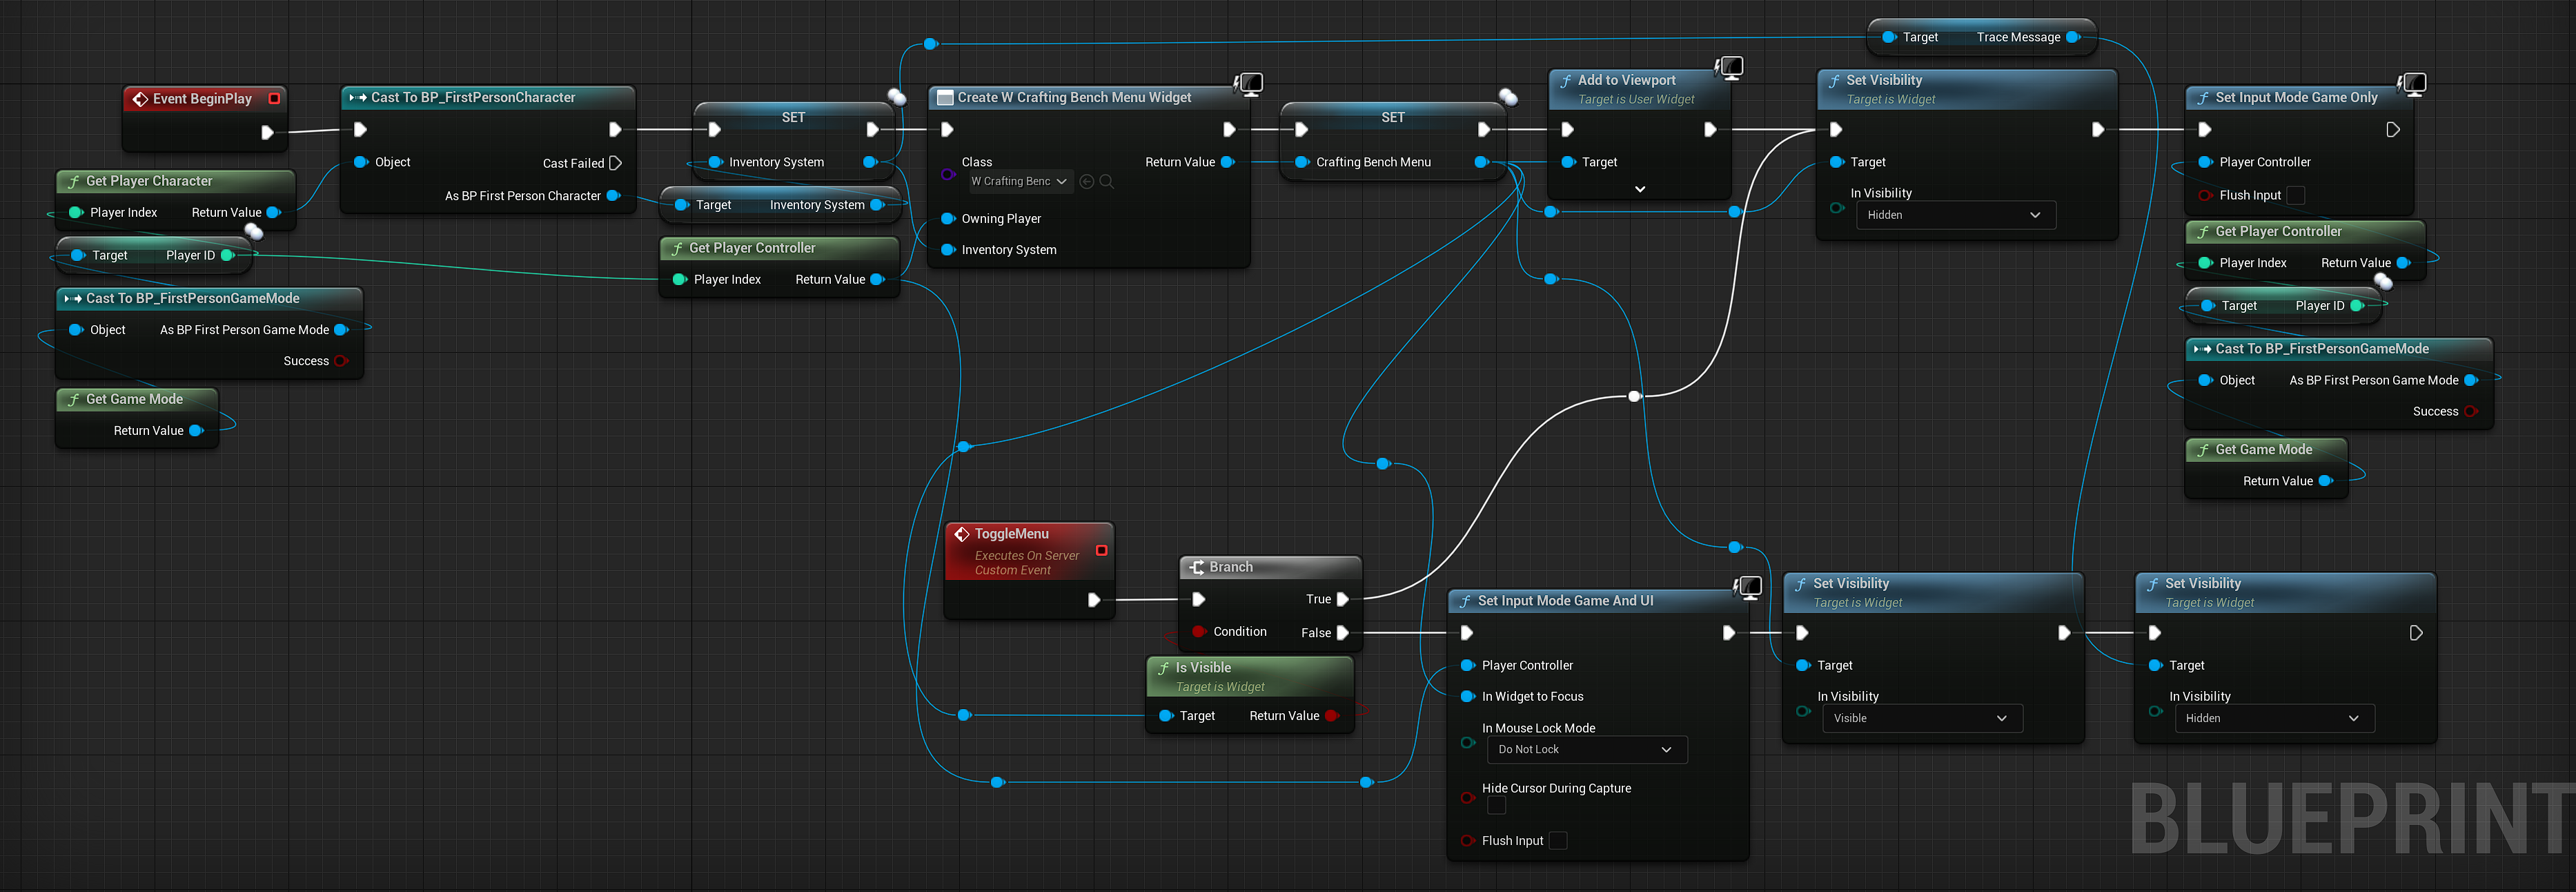
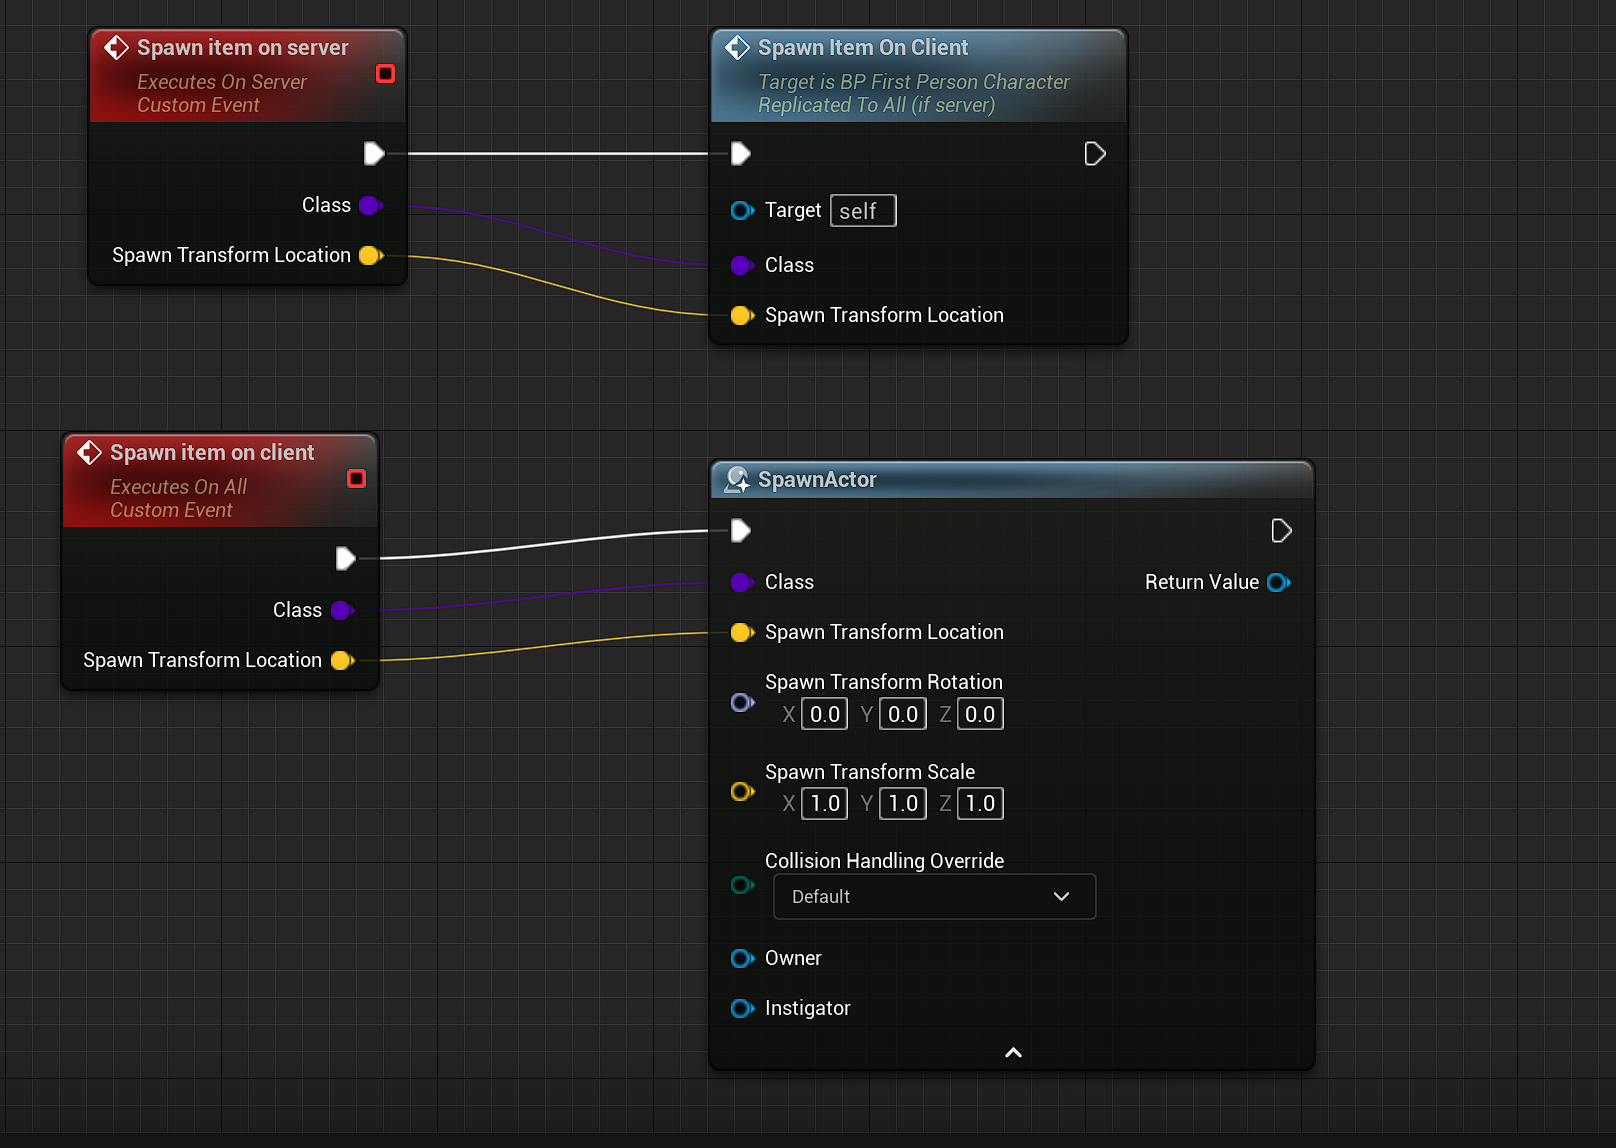
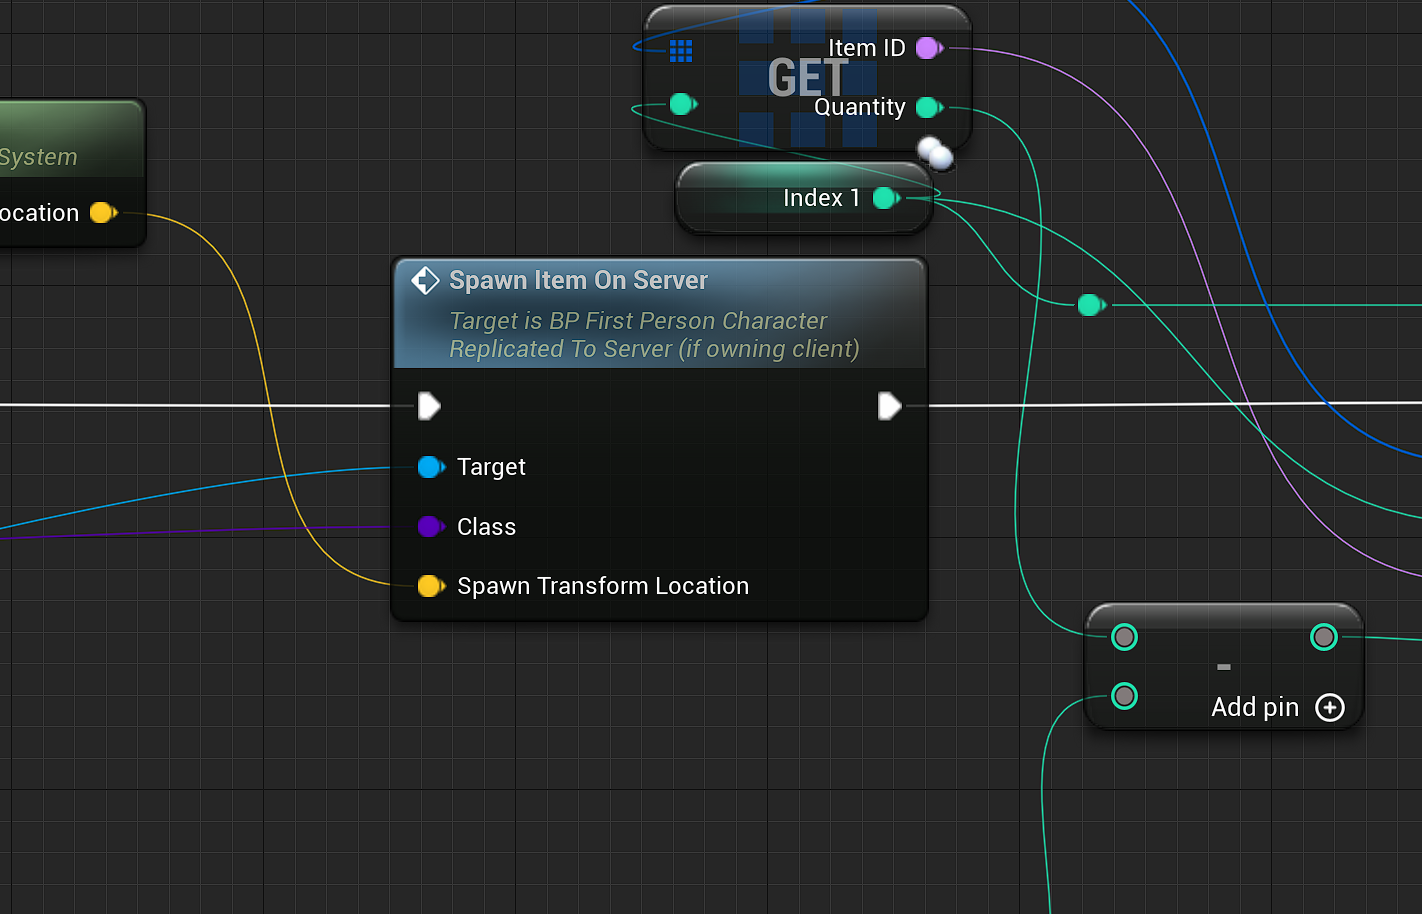
Replication
This is being added last minute as I had to make some changes to the blueprints to cause issues with them working on a server, I found out after a LOT of banging my head against a wall that widgets cannot cast to server, it must be done from an actor. I created a spawn actor function on the player character which the widget pulls from, this change was done to both the menu crafting and the crafting bench. I also had to modify the Item Data component so the players are able to use the chest and crafting table on a server, this also fixed an issue where picking up items was not possible if the item was spawned after the game starts.

Conclusion
I am pleased with the results of my work on this project. I had a lot of fun creating the mechanics that were assigned to me. Areas I still need to work on are I need to improve my understanding of the ‘casting’ functions in Unreal engine, I’ll have to watch a few videos regarding this as I just can’t seem to get it to make sense in my head for some reason so I often have to rely on trial and error to get it to work properly which is wasted time and I’m sure I could achieve more if I had a better grasp. I would also like to improve my UI design skills and learn how to make a full settings screen, next year I am planning to make a full game which will need both.
In our check-up presentations over the semester our lecturers were pleased with the progress we were making which was relayed back to the client. We have not received any criticism back due to the workload of the client which is understandable, real business comes first as people’s jobs depend on it. We hope to talk to the client at the Transmedia event which is after this submission date.
If I were to change anything I did in this project would be working out how replication works first and prebuilding it into every blueprint, instead of having to go back and edit code to work in multiplayer, it’s incredibly inefficient and again, requires a lot of trial and error that could have been avoided.
One of the skills I wanted to learn was animation blueprinting, this project helped me learn at least the very basics when it comes to animation blueprinting and how to trigger and set different animations depending on movement/triggers, I would have eventually had to learn these skills but doing so on a project is much more rewarding in my opinion.
Social Media Campaign
Aim
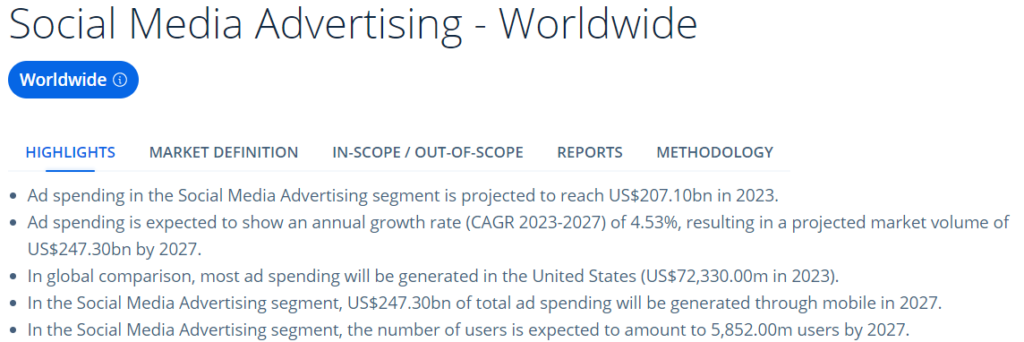
Social media has become an absolute powerhouse when it comes to marketing and PR in the last decade and is still looking to grow even further as seen in the screenshot of the Worldwide social media figure from Statista (Fig 1) below. As such, in the industries we will be going into, it is important for us to have an online presence for networking opportunities and also to market our selves as a brand. The aim is to create a social media presence as either yourself or as a brand, create posts and interact with the community to increase engagement.
Choice of social media
For the campaign, we had to use two different social media platforms, on of which must be LinkedIn, which is a social media site like Facebook but for business and employment, with a focus on networking with people in the same industry, you can also look for work and be scouted through their recruitment pages, making it a very valuable website when looking for work as employees can look directly at your experiences without you having to even apply by having your profile set to ‘Looking for work’.
For the second social media platform, we had free reign on what we could use. I had two different platforms in mind, YouTube, as I have had an account for a long time which I have been casually uploading video game content to and am familiar with the interface and analytics; my second option was Instagram, as again I already had a personal account which I also had been casually using. Though I had less experience using Instagram, it seemed like the more logical choice due to the content I would be posting, which would be images and short videos which is exactly what Instagram is used for.
Branding
As I am planning to create games by myself, at least in the beginning, I felt it necessary to try and create a brand for myself for business purposes. The name came fairly easily as I just combined my online name with my real name, Yatakian. There is nothing really deep about the name Yatak, it’s just a name I chose when I was around 12 because there was a character in an anime I watched at the time with a similar name and it has stuck for over 20 years, so why not carry it on?
After the name, I wanted to create a logo for the brand, something simplistic but logical, as a complex icon may just appear messy or not be able to have the viewer recognise the brand as soon as they see it. I decided to go with a symbol that contained ‘Yatakian’ inside it whilst also just being a symbol and I felt I did the best I could with my current artistic ability (you just need a bit of imagination for the ‘K’ and the ‘N’). This is something I would like to improve going forwards, I’m happy with the design, it just needs a lot of time put into it to make sure it’s fully symmetrical and that gaps between spaces are the same distance as there are some parts that don’t look quite right when the logo is as big as it is below, obviously these do not show up when it is in an icon form. The symbol also will look like it is too low in the image and isn’t central. This is done on purpose so the logo appears centred in a circular space, like on Instagram or Youtube, I found if I made it fit the square, it would crop it weirdly and cut out part of the symbol. I also created a banner using the symbol as a word separator for any sites that allow a banner.

Content
I decided to release my content in the form of small videos (called Reels on Instagram), these would be posted on both forms of social media. The content would comprise of game mechanic demos of my current projects and ‘code cleaning’ (tidying up messy code to make it easier to navigate by eye and edit in the future), both of these will enable me to continue creating content as long as I’m working on something, which I intend to be doing, I will also not need a lot of video editing, only cropping and cutting, which will reduce time impact on the actual projects. I also chose reels for Instagram as while they used to be a pronominally picture based platform, with the rise of TikTok, the head of Instagram released a video here declaring that ” We’re no longer just a square photo-sharing app.
At Instagram we’re always trying to build new features that help you get the most out of your experience. Right now we’re focused on four key areas: Creators, Video, Shopping and Messaging.“
Instagram Content
My first load of content was mostly previous work, I hadn’t really done much research in terms of what aspect ratio was best and didn’t know yet that adding music to a video as it was still early days (“Music is a must” is the number 1 tip according to tugagency who tested the affect of music on their engagement). These posts saw little engagement though I did receive a few followers who were not from my social circle.
I unfortunately did not grab a screenshot of my march progress so i have greyed out the content posted in April (March content is the middle row). You can see I didn’t change to the 1:1 ratio which is preferred on the platform until the third video. As my content involved a whole screen’s worth of space, I got around this by cropping out any unrelated areas like task bars then fitting it to the screen size, I then duplicated the video track and increased the size by 400% to cover any black areas, I then added a blur filter so the background footage was not distracting.
The software used for this was Clipchamp which is a part of the Windows suite.
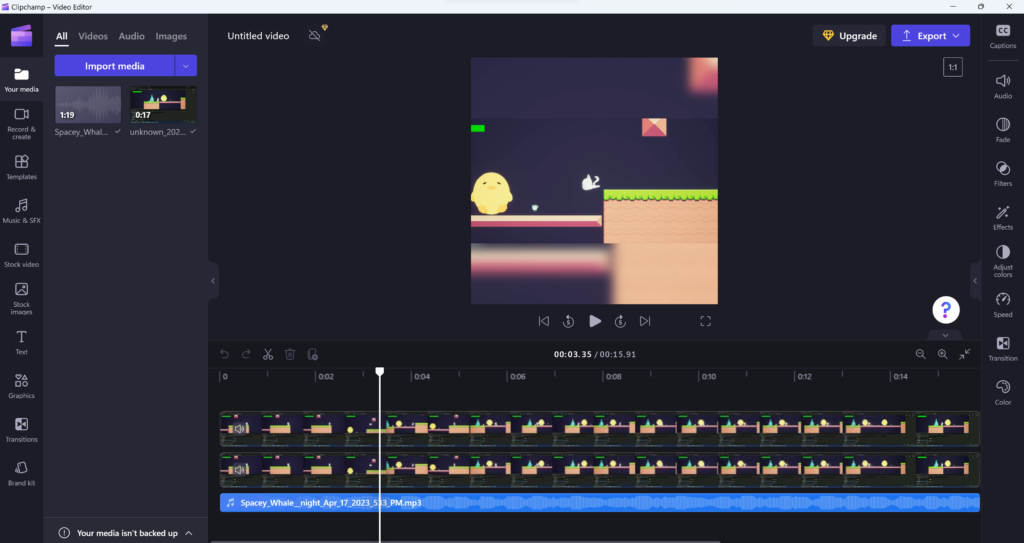
I found this created a good effect that, because both footages were synced and contained the same image, was not harsh on the eyes like a solid colour would, and would not distract from the content in the middle. Music was not added to this video as there are sound effects, although I would not do the same now. The spikes in the engagement seem to last a tad longer with the video I edited the aspect ratio on, however the data size is so small it’s hard to see trends, it is clear though that engagement is highest immediately after posting the content.
For the content I posted in April, I continued with the 1:1 aspect ratio method and I also started introducing music to the videos. Instead of getting down the road with potential copyright issues using available music out there, I decided to use the app ‘Bandlab’ as it has a feature to generate music by selecting genres you would like, you are then able to edit the tracks. There is also the ability to generate songs from scratch using digital instruments.
As you can see from the above analytics graph, this seems to have increased engagement a fair bit with over 100 accounts reached and I’m up to 49 followers (50 at time of writing) which is where I set my KPI’s for this project so I’m happy I was able to achieve this.
LinkedIn Content
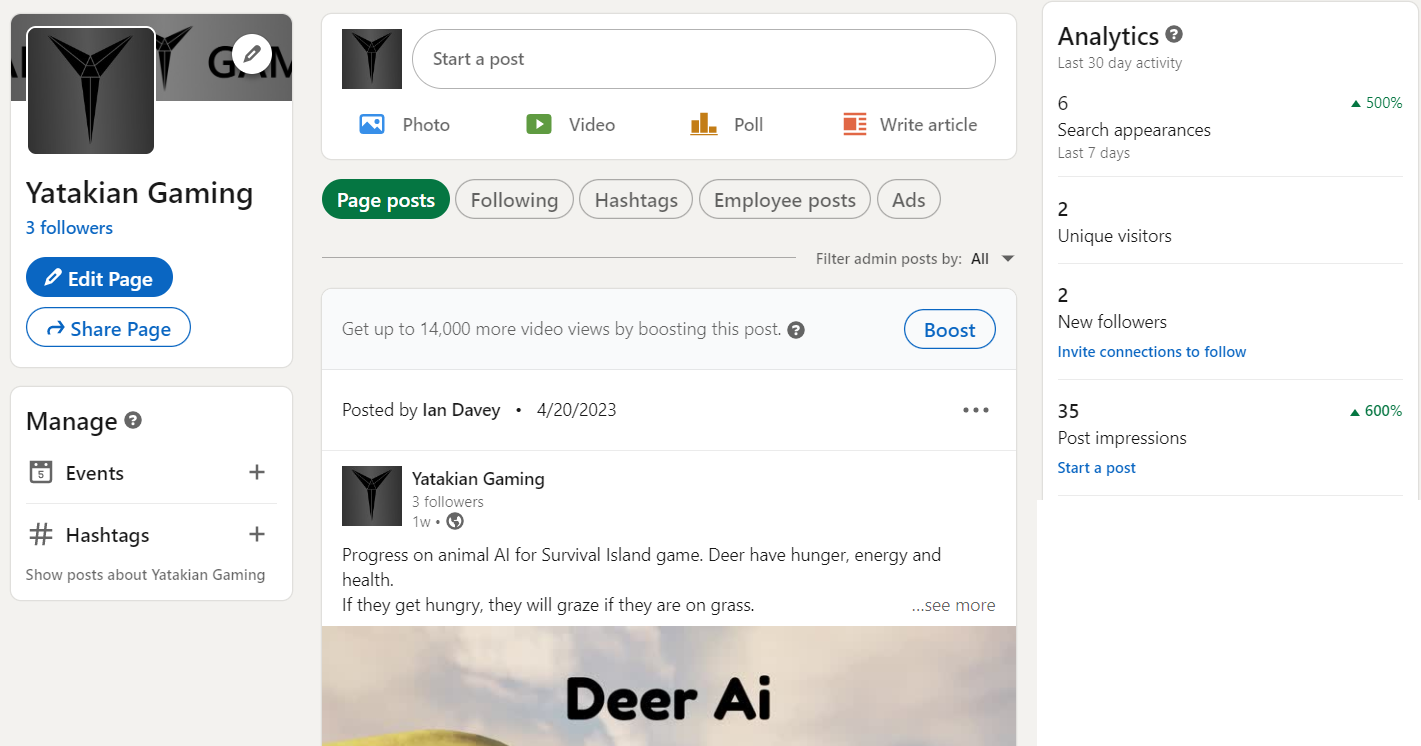
The content I used for LinkedIn is the same as on my Instagram account, so I will not go into the specifics there. As I already have a LinkedIn account from my previous careers, I decided to continue using this and not create a new one. I did however create a page for the brand. I would post the content here, then repost it from my personal account
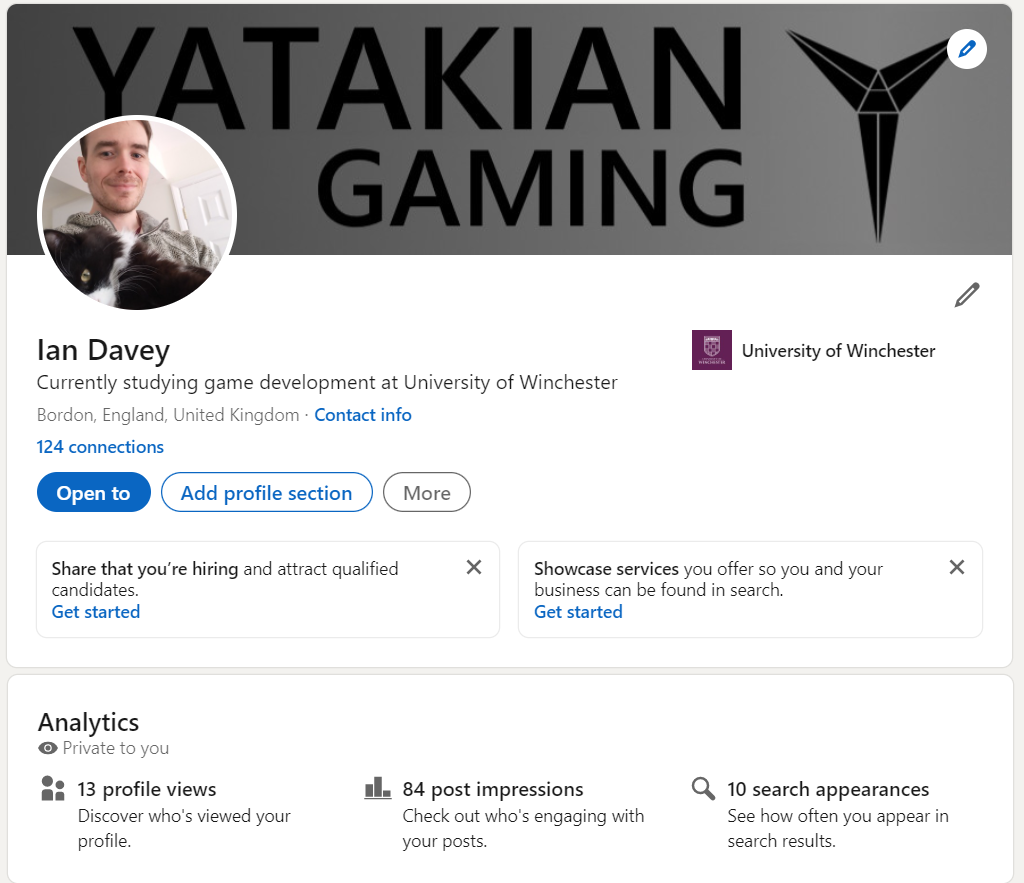
At the end of the project I have gained 19 new connections to my original 105 which had been static for over 5 years, i have gained 3 followers on my brand page, however reposting from my personal account doesn’t seem to push much traffic to the brand page, going forwards I will most likely only post finished projects on the brand page as a show of complete work and save milestone updates to my personal page.
Final thoughts
As someone who previously rejected the majority of social media, as it’s just not an interest of mine, I always knew the power that it held for marketing and networking, I have friends who are in video game marketing who have run campaigns with celebrities and organisations like LadBible, so this was often pointed out to me. However I didn’t really appreciate how big it was until I delved into it for myself, it’s its own world with its own rules where if you don’t roll with the times and what’s popular, you won’t get far. You need to research what content is relevant for each platform, how to title or describe the content, what hashtags (or equivalent) to use to maximise engagement and followership.
I’m definitely going to continue to use Instagram in the same way, posting updates and mechanics on current projects, though I will likely save big updates for LinkedIn like milestones or project completion. I will also continue to use LinkedIn as what I used to use it for in my old career, a valuable networking tool ideal for finding clients, commission potentials, like-minded individuals, industry experts and more.
Transmedia Game
The Transmedia exhibition is a yearly event held by the University of Winchester digital media courses to show off the latest work done by the different years. Year 2 has the duty of planning and running the event and create media to be used to facilitate and market it. Myself and another video game developer student were tasked with creating a video game that could be played on a mobile device, the game would be a simple platformer which will contain assets that refer back to the courses in the digital media umbrella.
The plan
We decided to go with a 2D pixel style platformer as these are incredibly low impact in terms of storage space and system load, we don’t want to end up with a huge game file that prevents people from downloading it, we also want the game to be able to be played on all devices. I was in charge of controls, animations, npc and one type of enemy. Doing a bit of research I found out about the Paper2D plugin on Unreal Engine I would use the flipbook and sprite functions from this as this seems perfect for what we need.
Controls
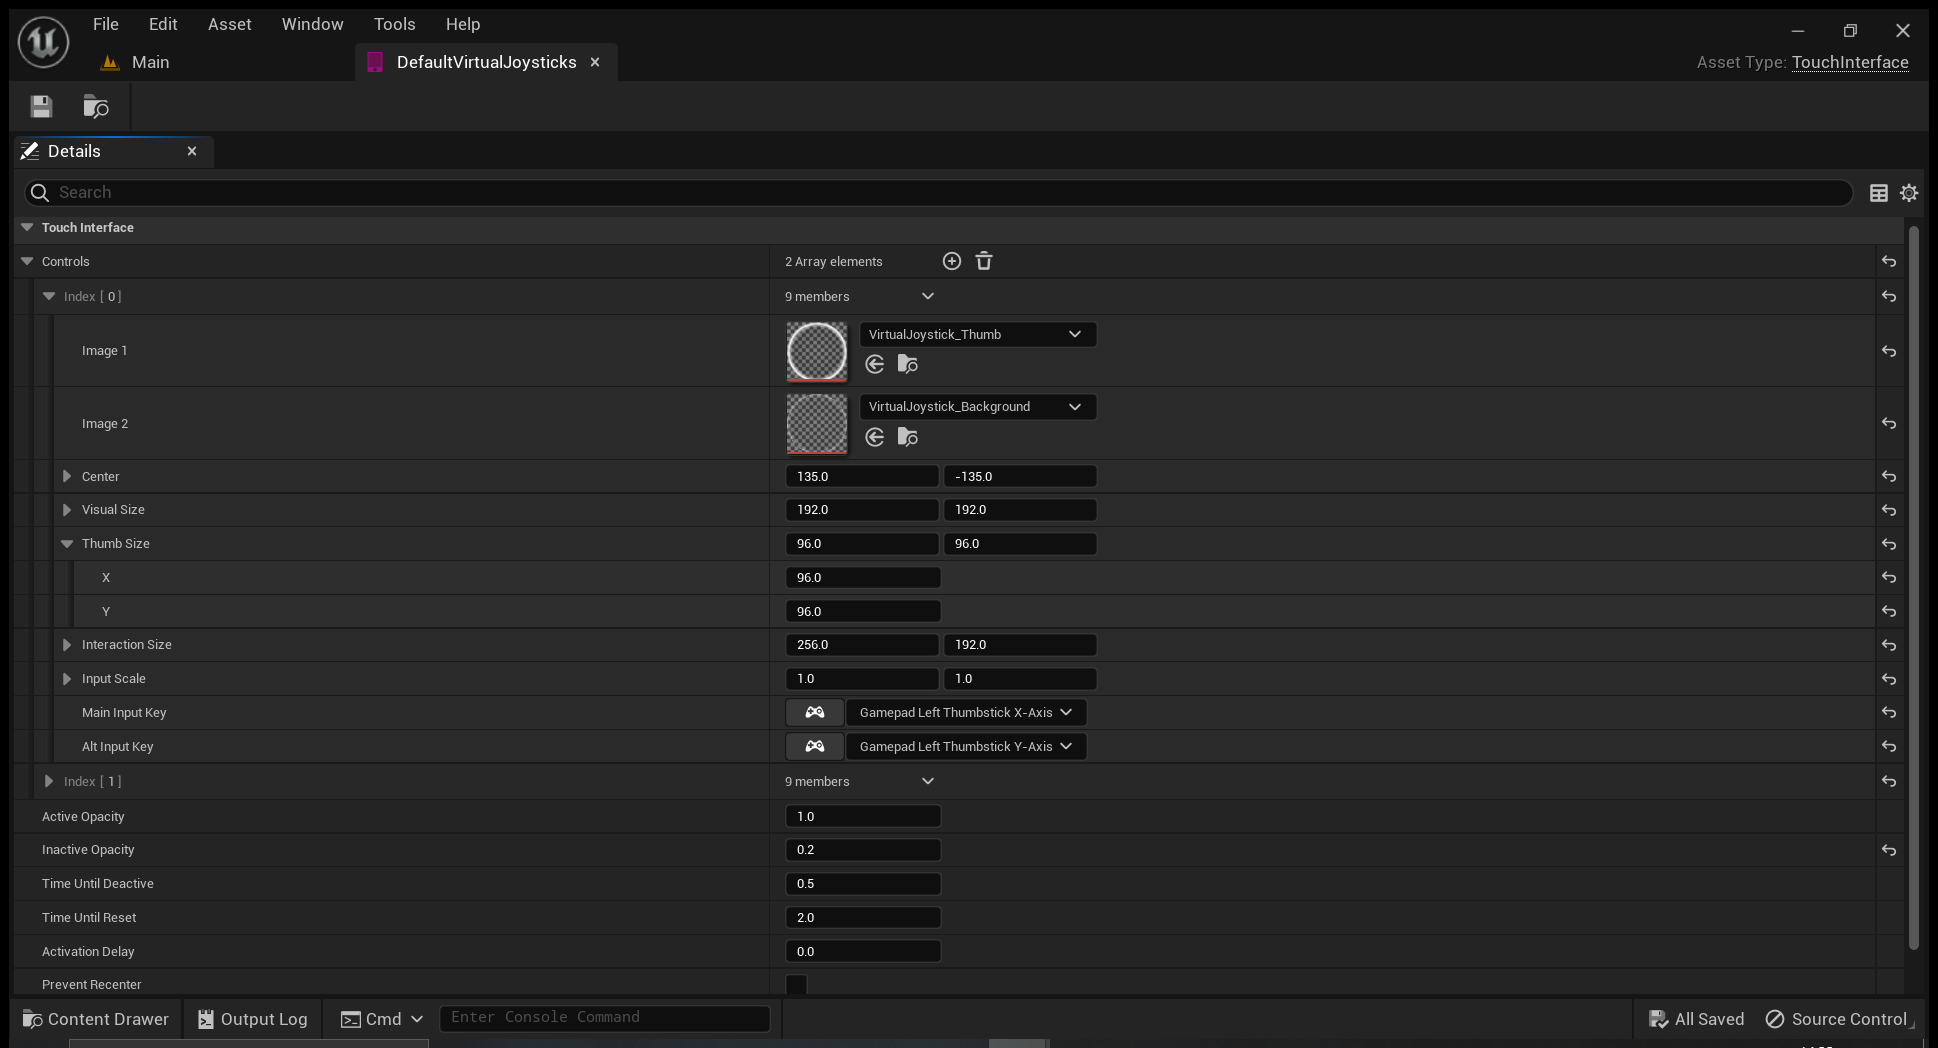
Player Control
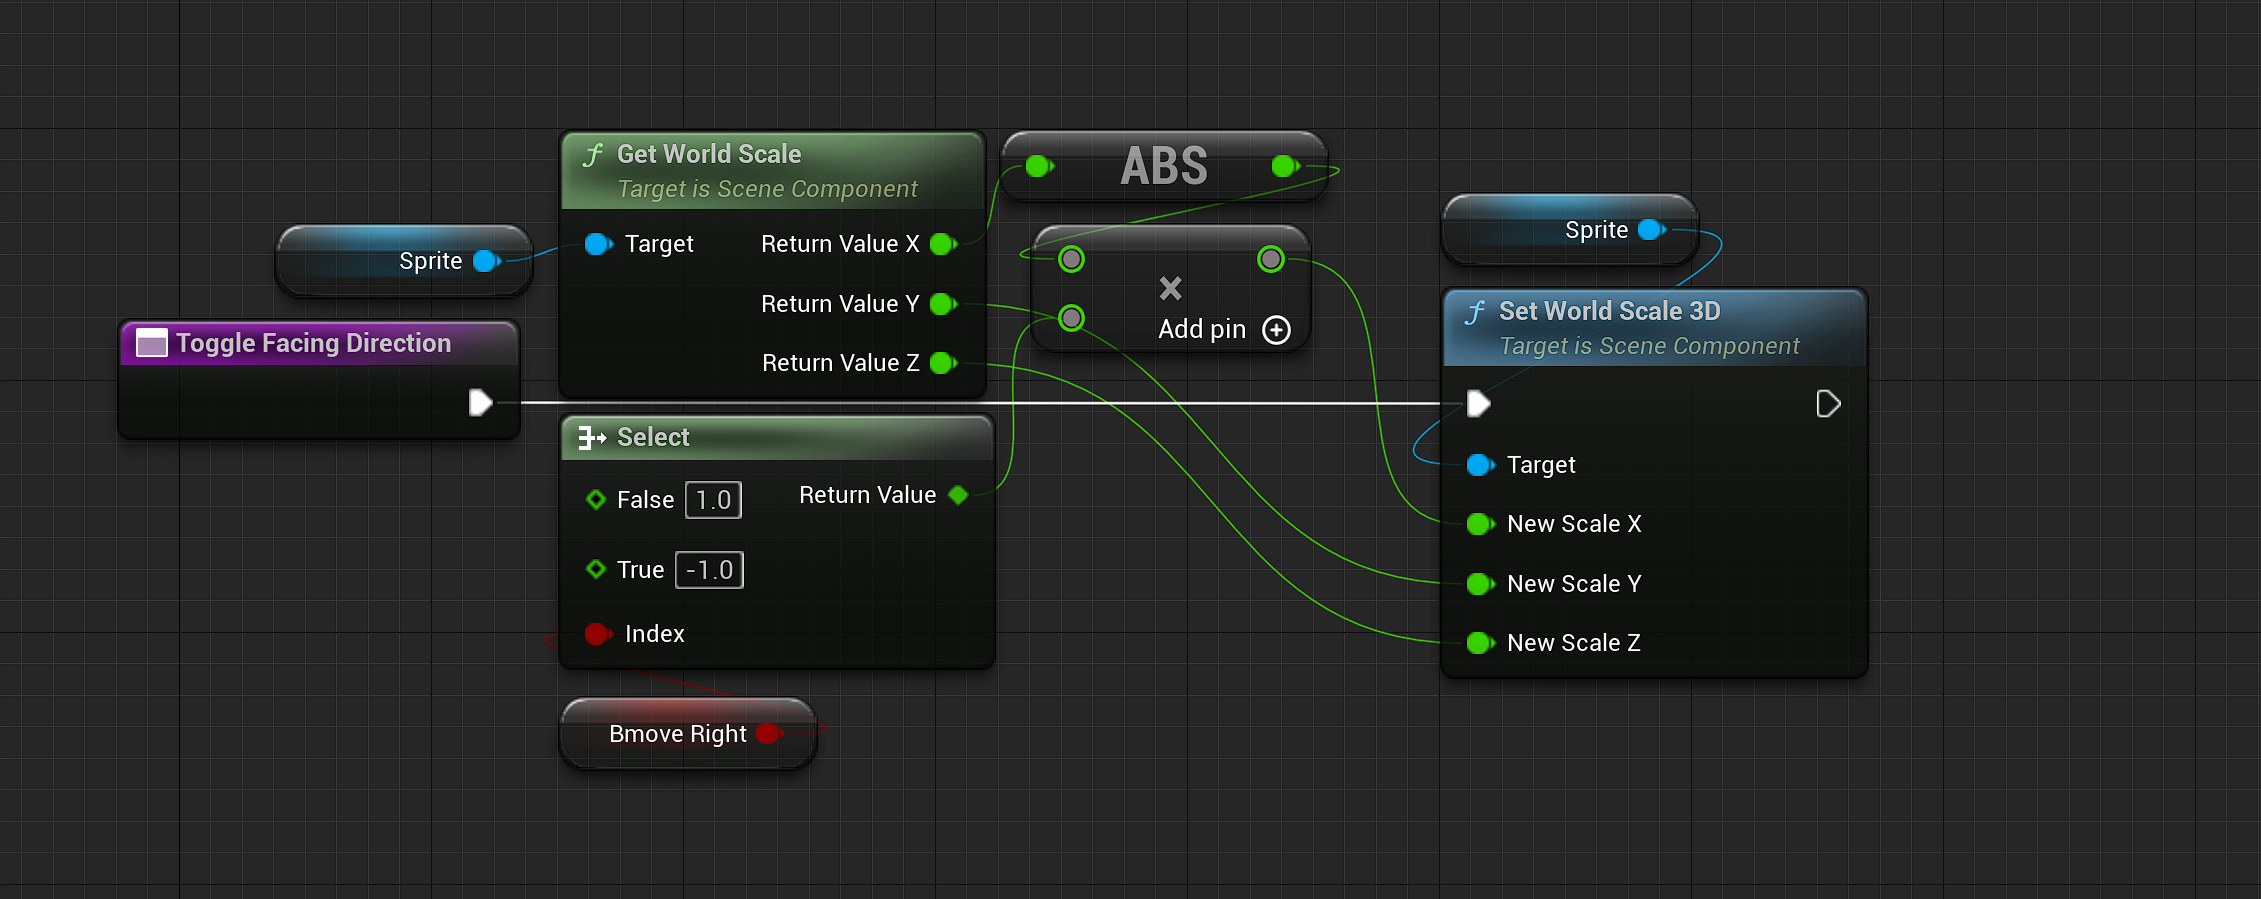
To get movement to work on a touch device I had to create a virtual joystick to emulate a gamepad inputs. The right joystick controls the characters direction and speed, whilst I have changed the left joystick to become a button to control the jumping. The player character blueprint selects the relevant flipbook animations depending on the type of movement currently happening.

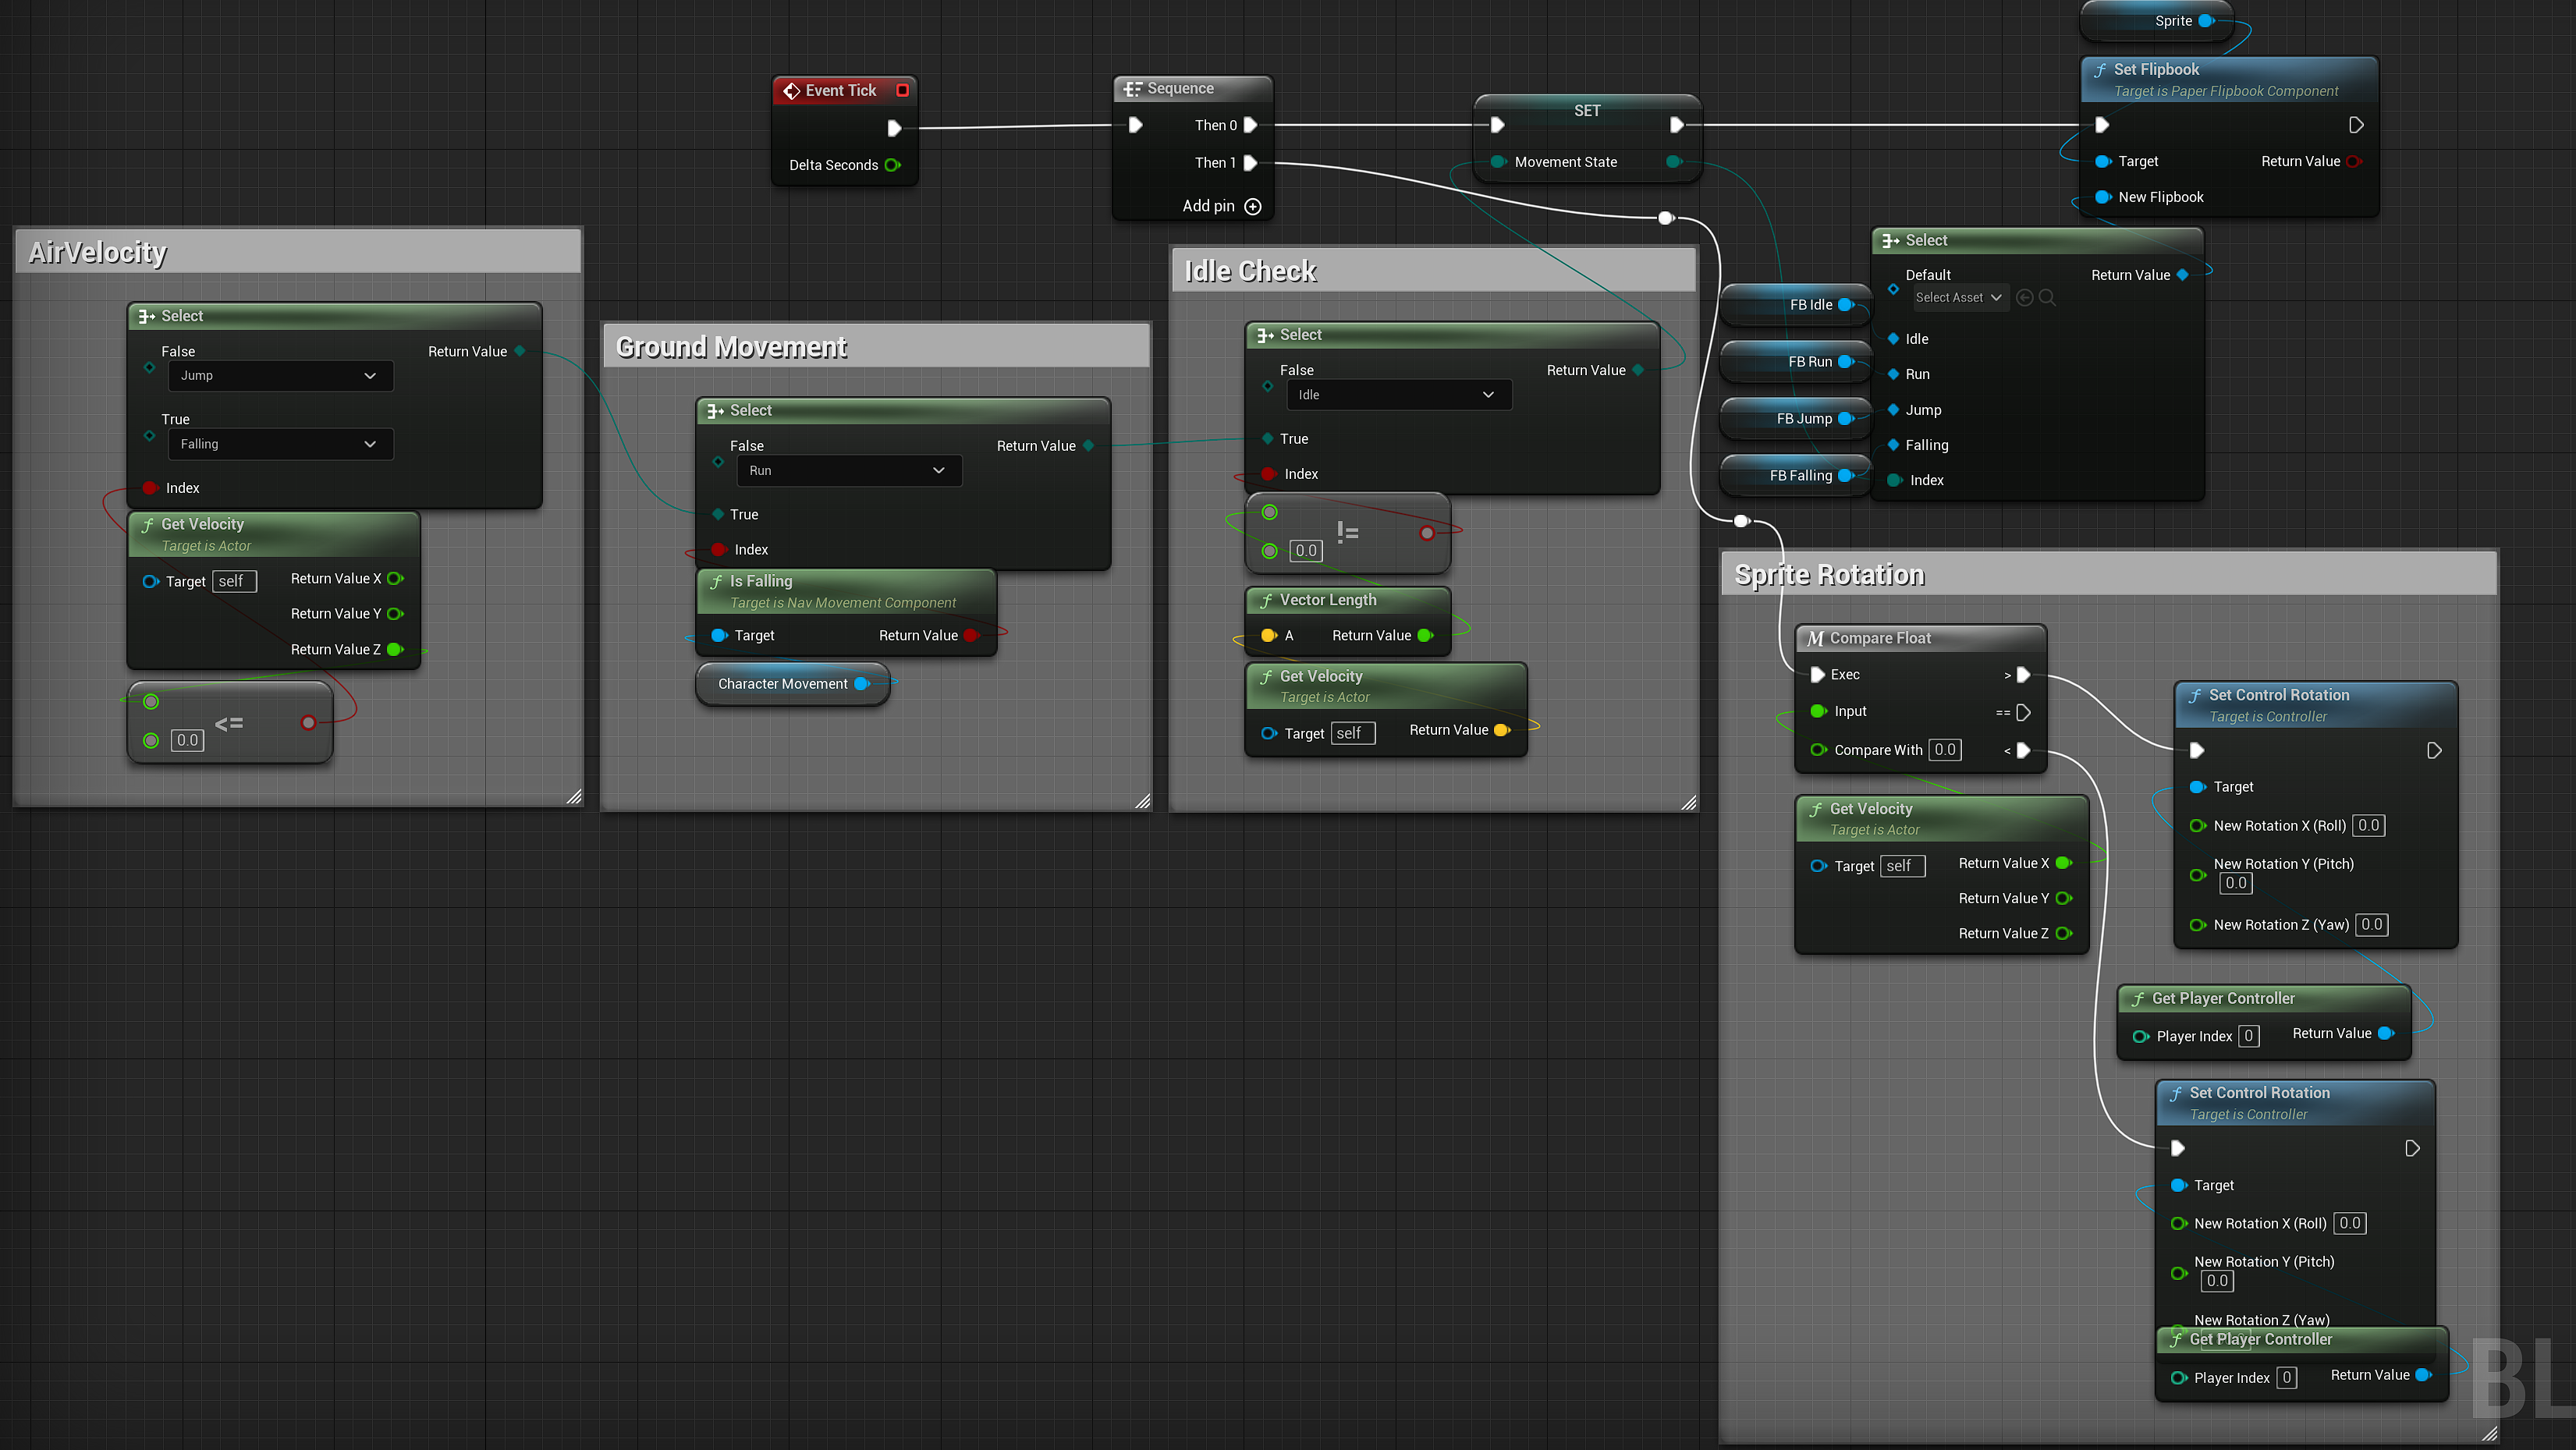
The character must jump on top of the enemies to defeat them like a lot of platformers, if the player touches the enemy from the side or underneath, they will be damaged. At the moment, the player’s health is in the form of a health bar, this will likely be changed to a life based system as this makes more sense for a game like this, as such this code may change if a player dies in one hit and the level is reset.

Enemy controls
The enemy uses simple code to walk or fly back and forth flipping the sprite flipbook depending on which direction it is travelling. If the player hits the enemy above a certain X value, it triggers damage and, if the enemy hits zero HP, dies and triggers the death function. Currently enemies die in one hit but coding it this way allows for the potential to add stronger enemies that take multiple hits to kill.

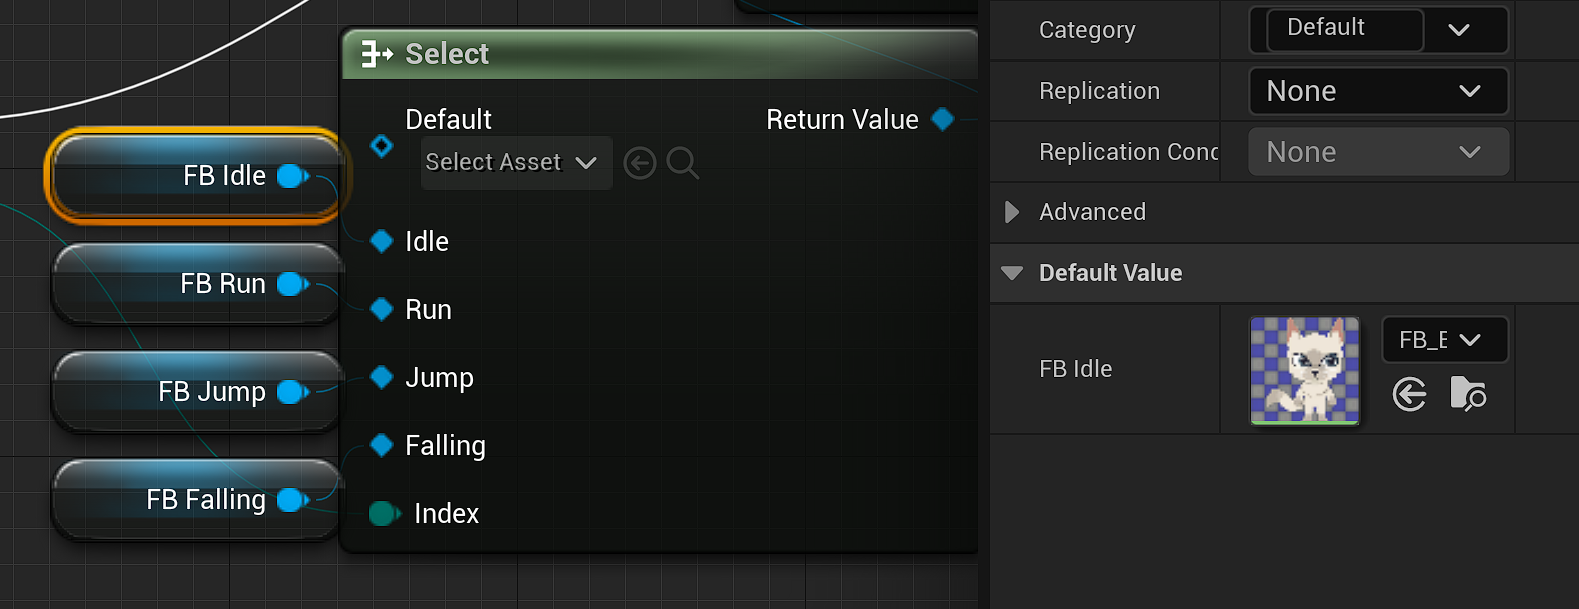
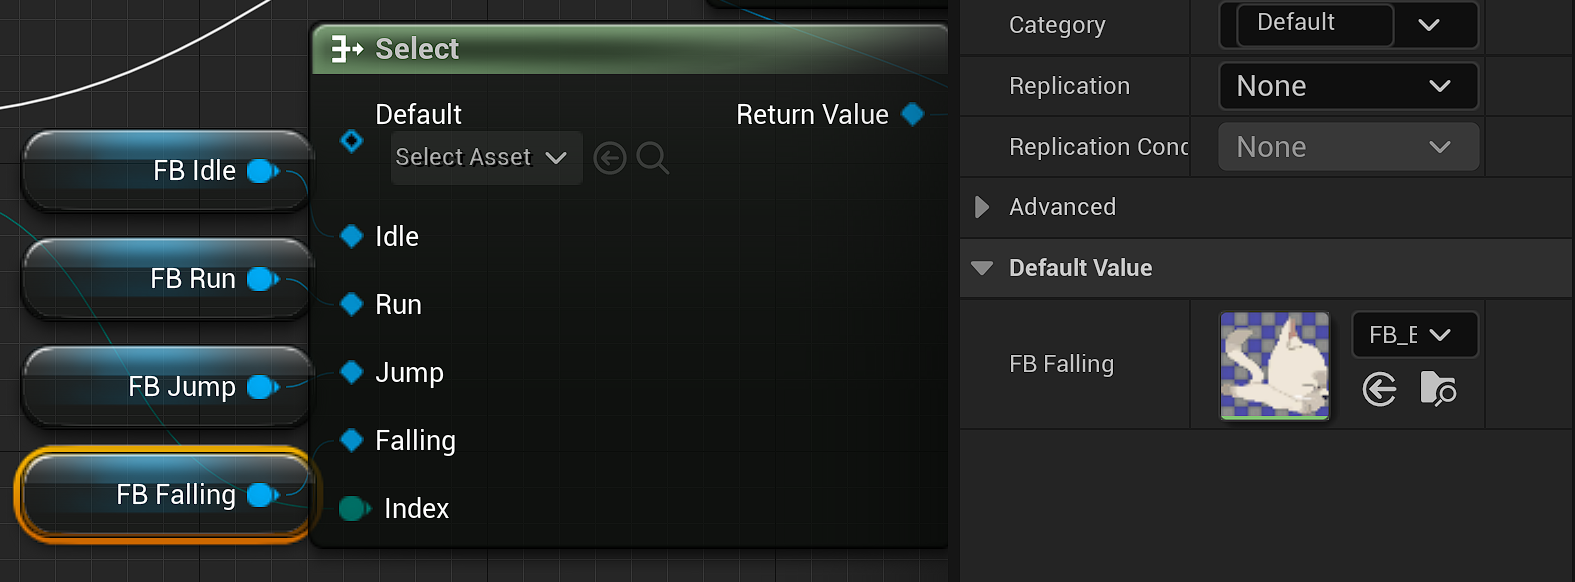
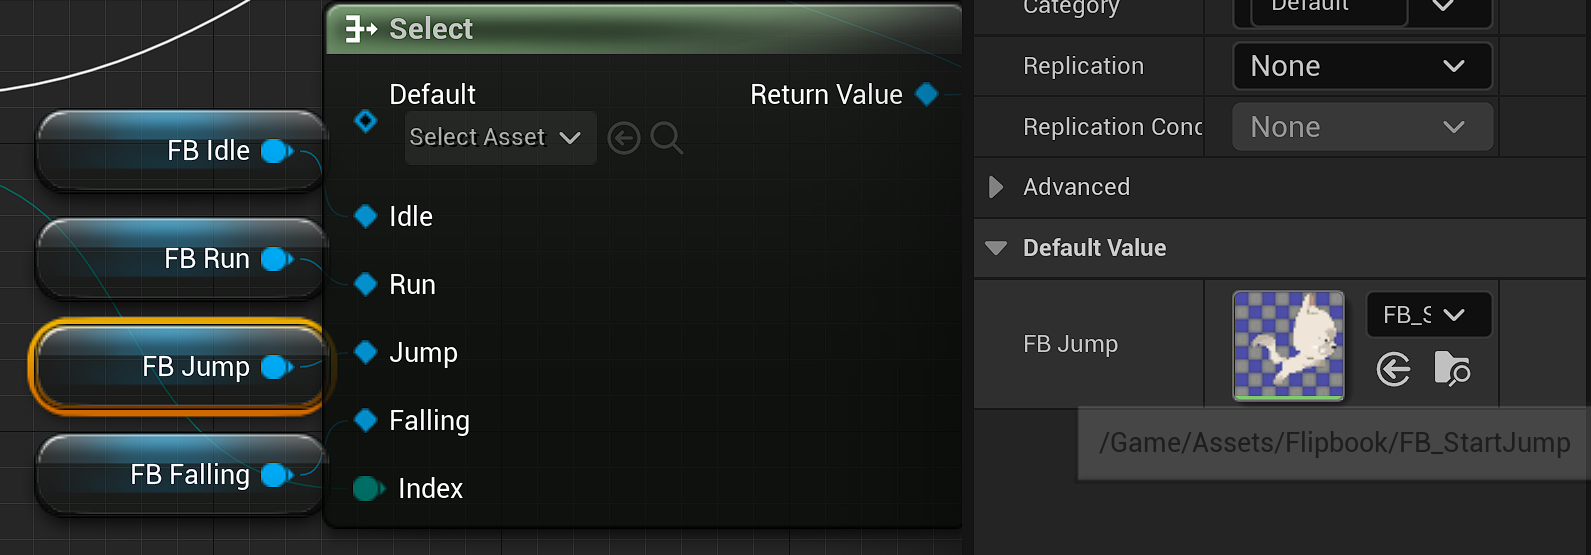
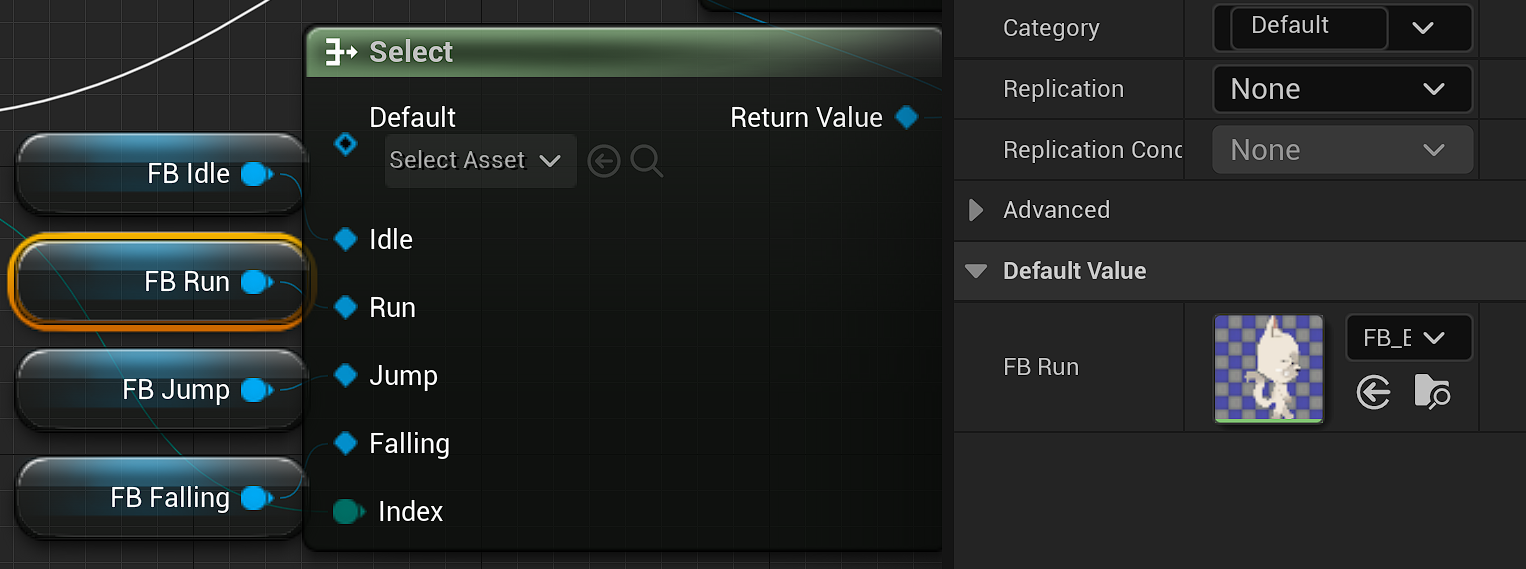
Flipbook animations
One of the main components of this game will be flipbooks, these are basically what they sound like, a virtual flip book to create an animation using a series of still images. To avoid making a tonne of separate sprite files manually (which would frustrate the artist as well), all the sprites for an animation can be put into a single sheet. This sheet must be equally spaced out for the extraction to be accurate, there is an automatic extraction option, however I never found this to be usable and instead let the artist know how the software worked so we could make it easier on ourselves and I was informed of the grid size of each sprite sheet before hand. When extracted, the individual sprites are separated into their own file (including any empty grid areas so these are manually deleted), these are then selected with right click to select the option ‘Create Flipbook’, the sprites are then put in name order (should be automatically be in order as long as the sprite sheet was laid out correctly from left to right top to bottom.) and the animation will play in the field to the left. The frame rate can be changed to either speed up the animation or slow it down.
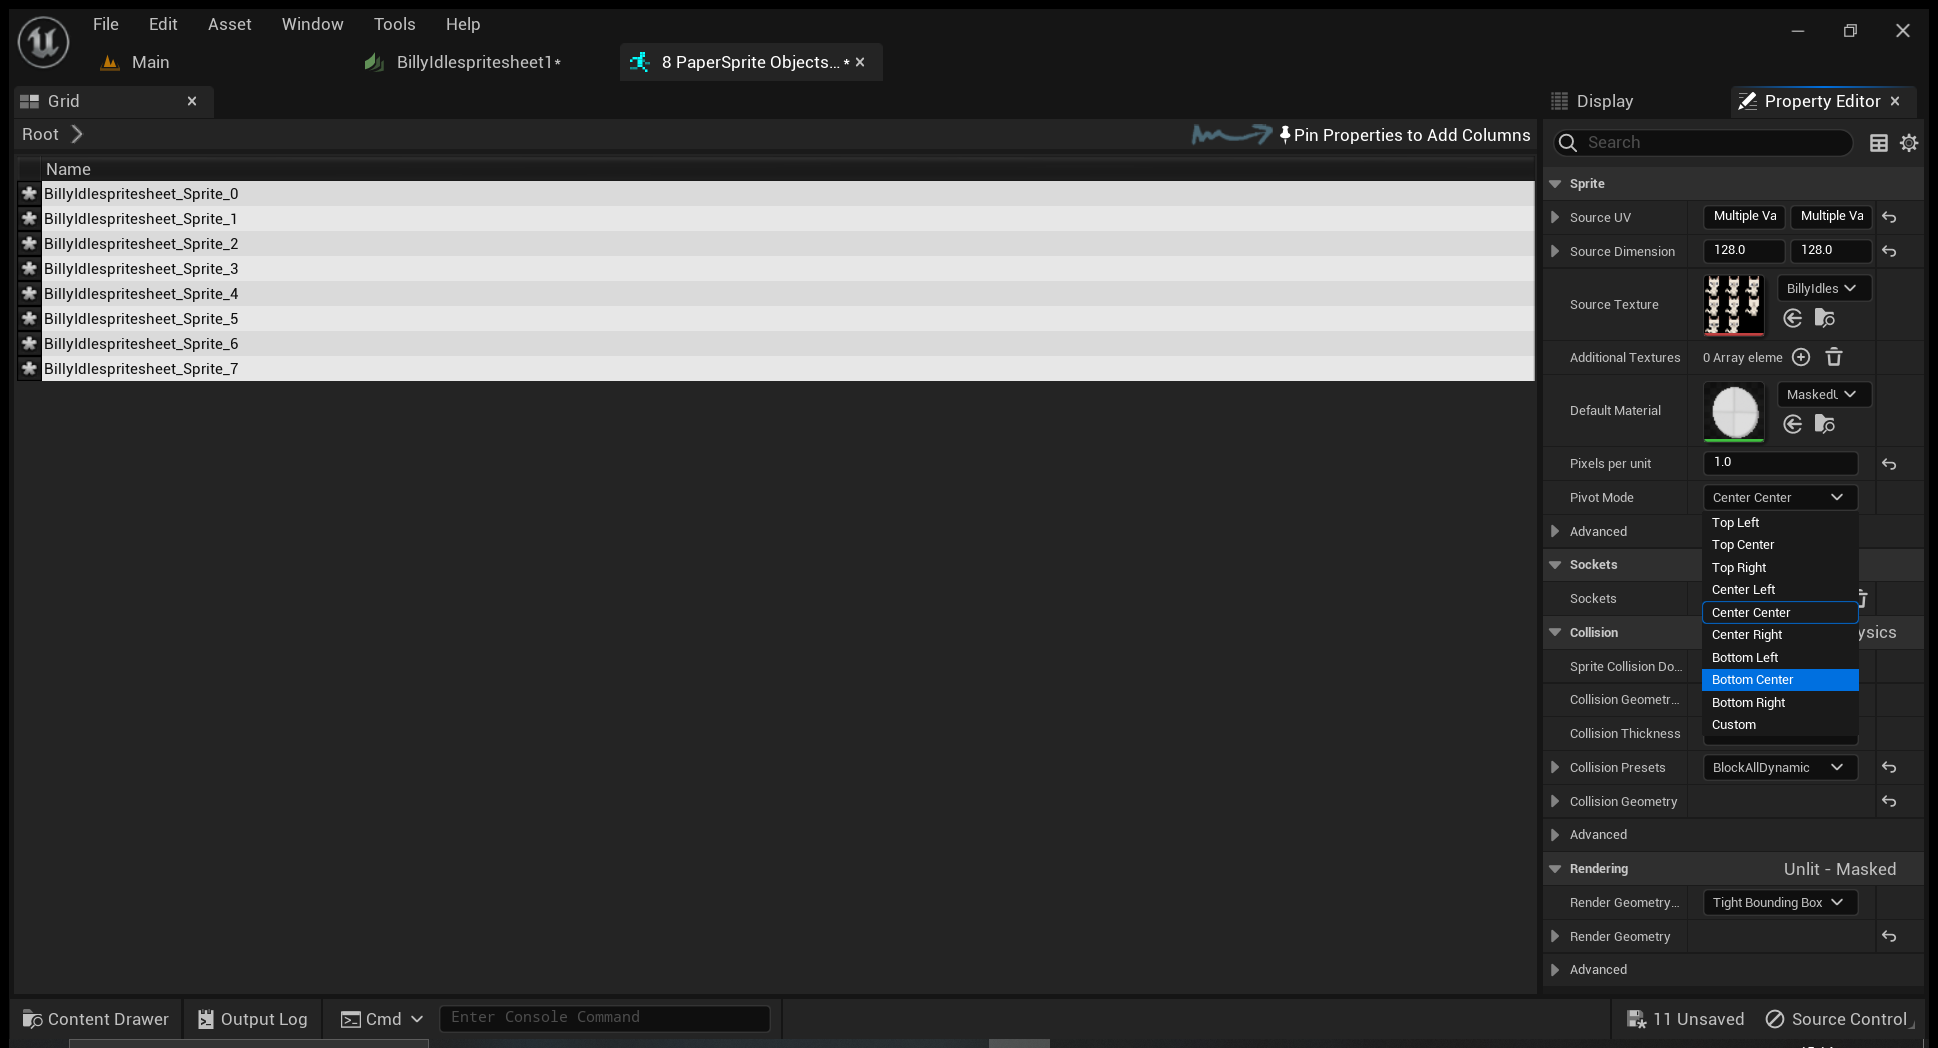
Sometimes the animation may look a bit off, for example, instead of the character’s upper half bobbing up and down whilst breathing, the characters feet are the bit that lowers which make’s the character look like it’s floating. This can be rectified by selecting all the sprites and bulk editing them to change the pivot point to the centre centre or the bottom centre, this usually will sort out the issue.
Demo of Player and NPC sprites
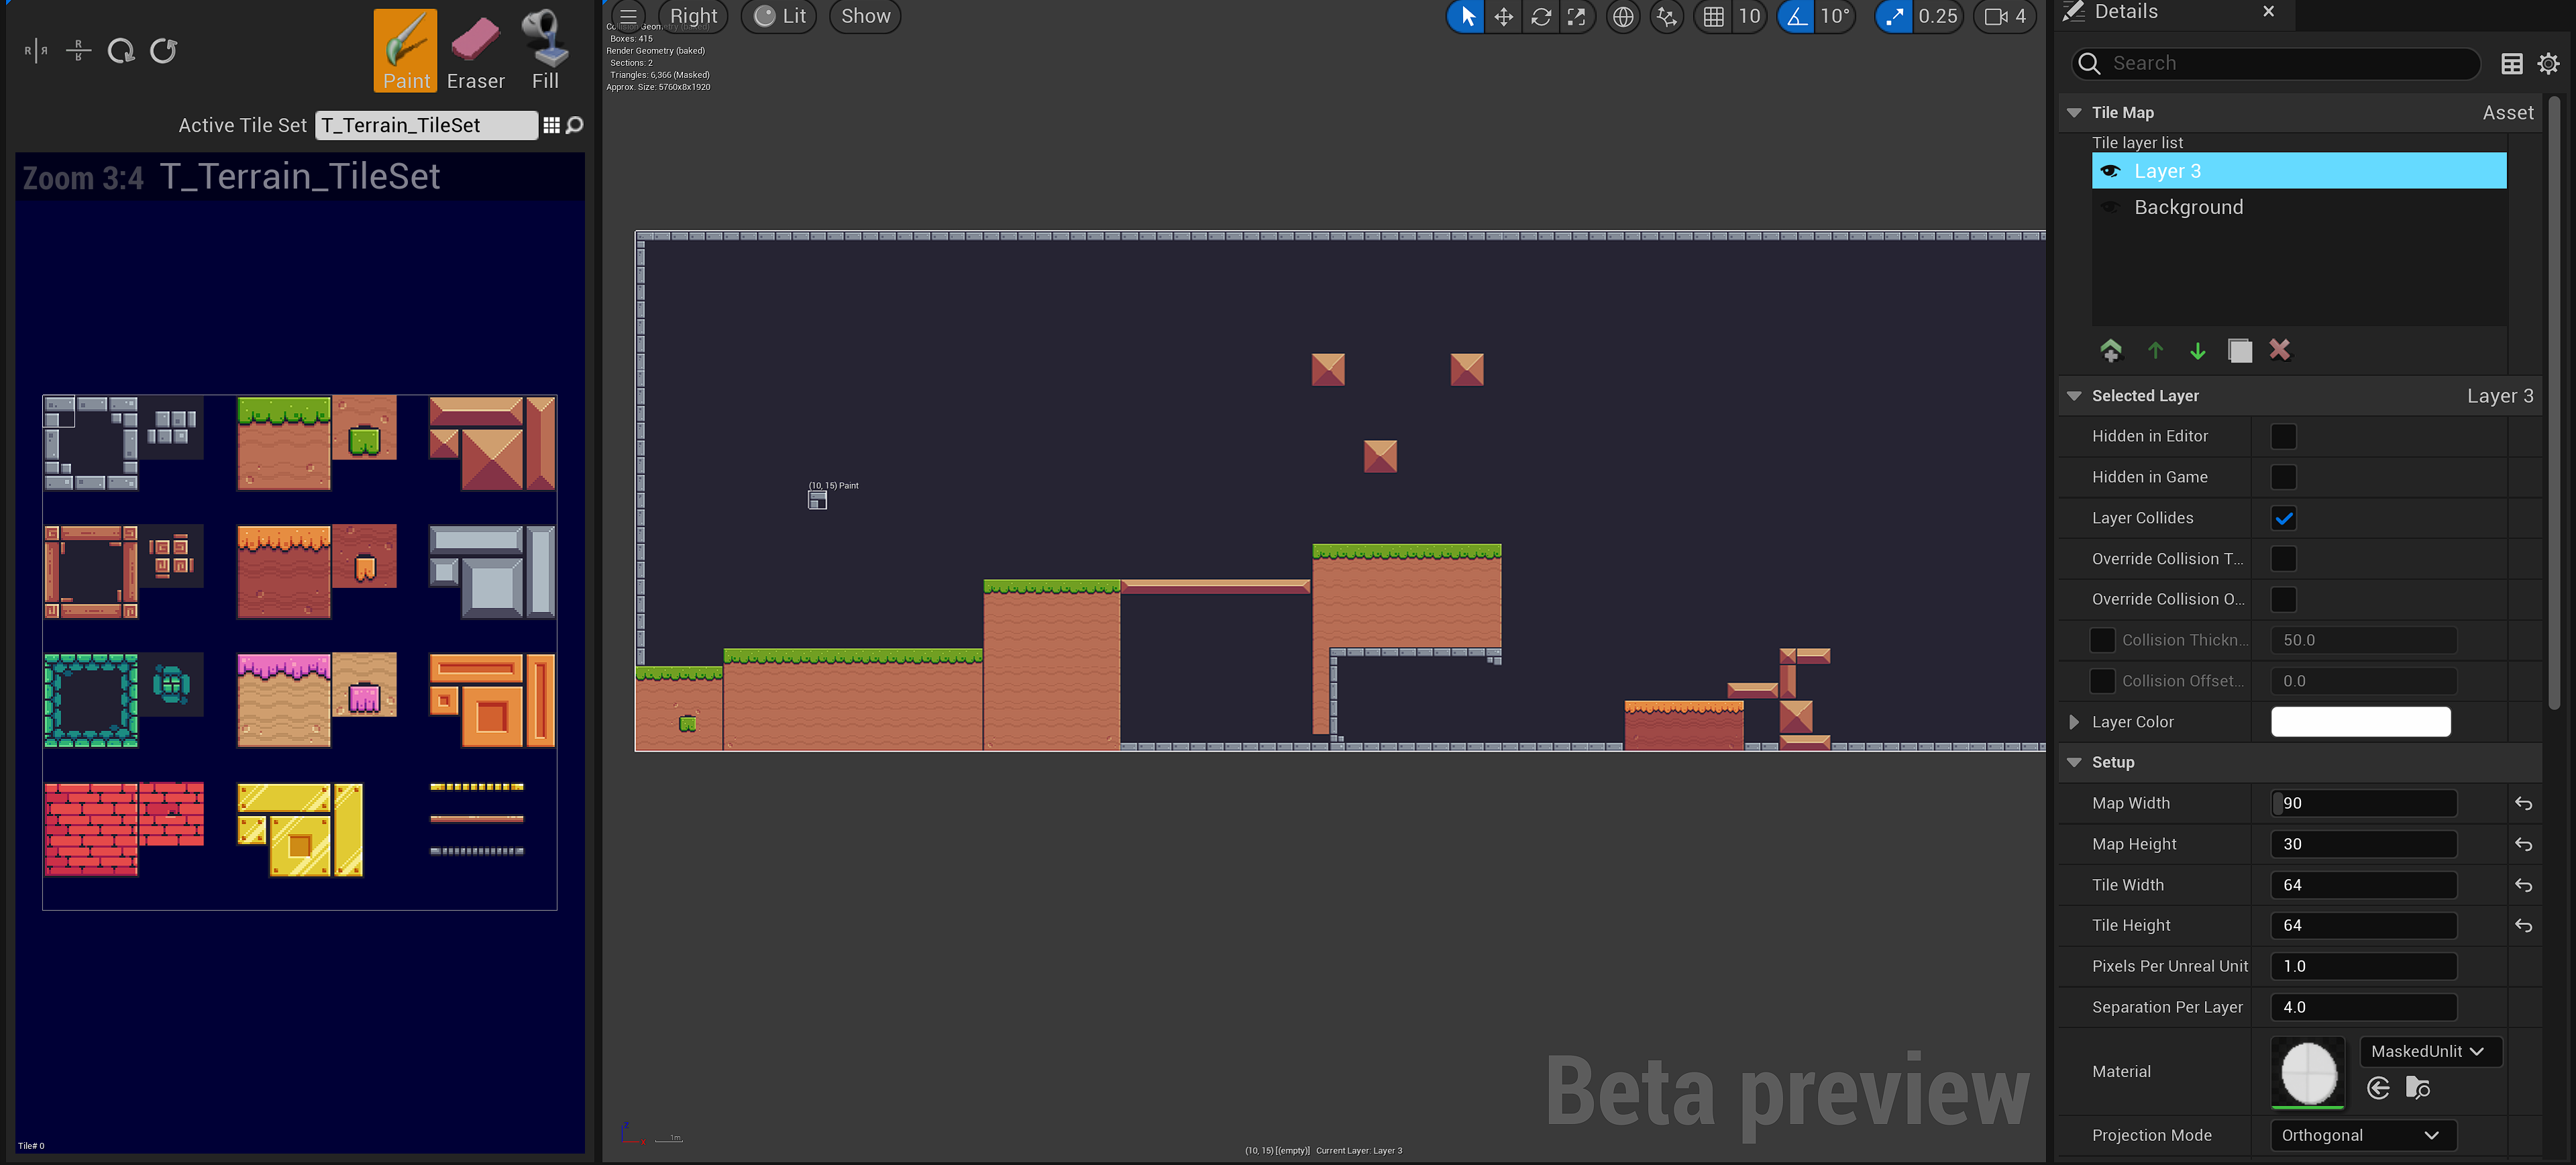
Tilemap and level creation
To create a 2D level that works with flipbooks, I used the ready available tilemap feature on Unreal Engine 5. Just to note, the assets used for this are from the Pixel Adventure 2 public domain kit here and will not represent the final product. To create a level tilemap, you must first have a tileset file. A tileset is created by using an existing texture file. In the tileset settings, you can change how big the tile selections will be depending on how the artist have set up the file, once this is done, collision must be manually set on any tiles that you don’t want the player to pass through.
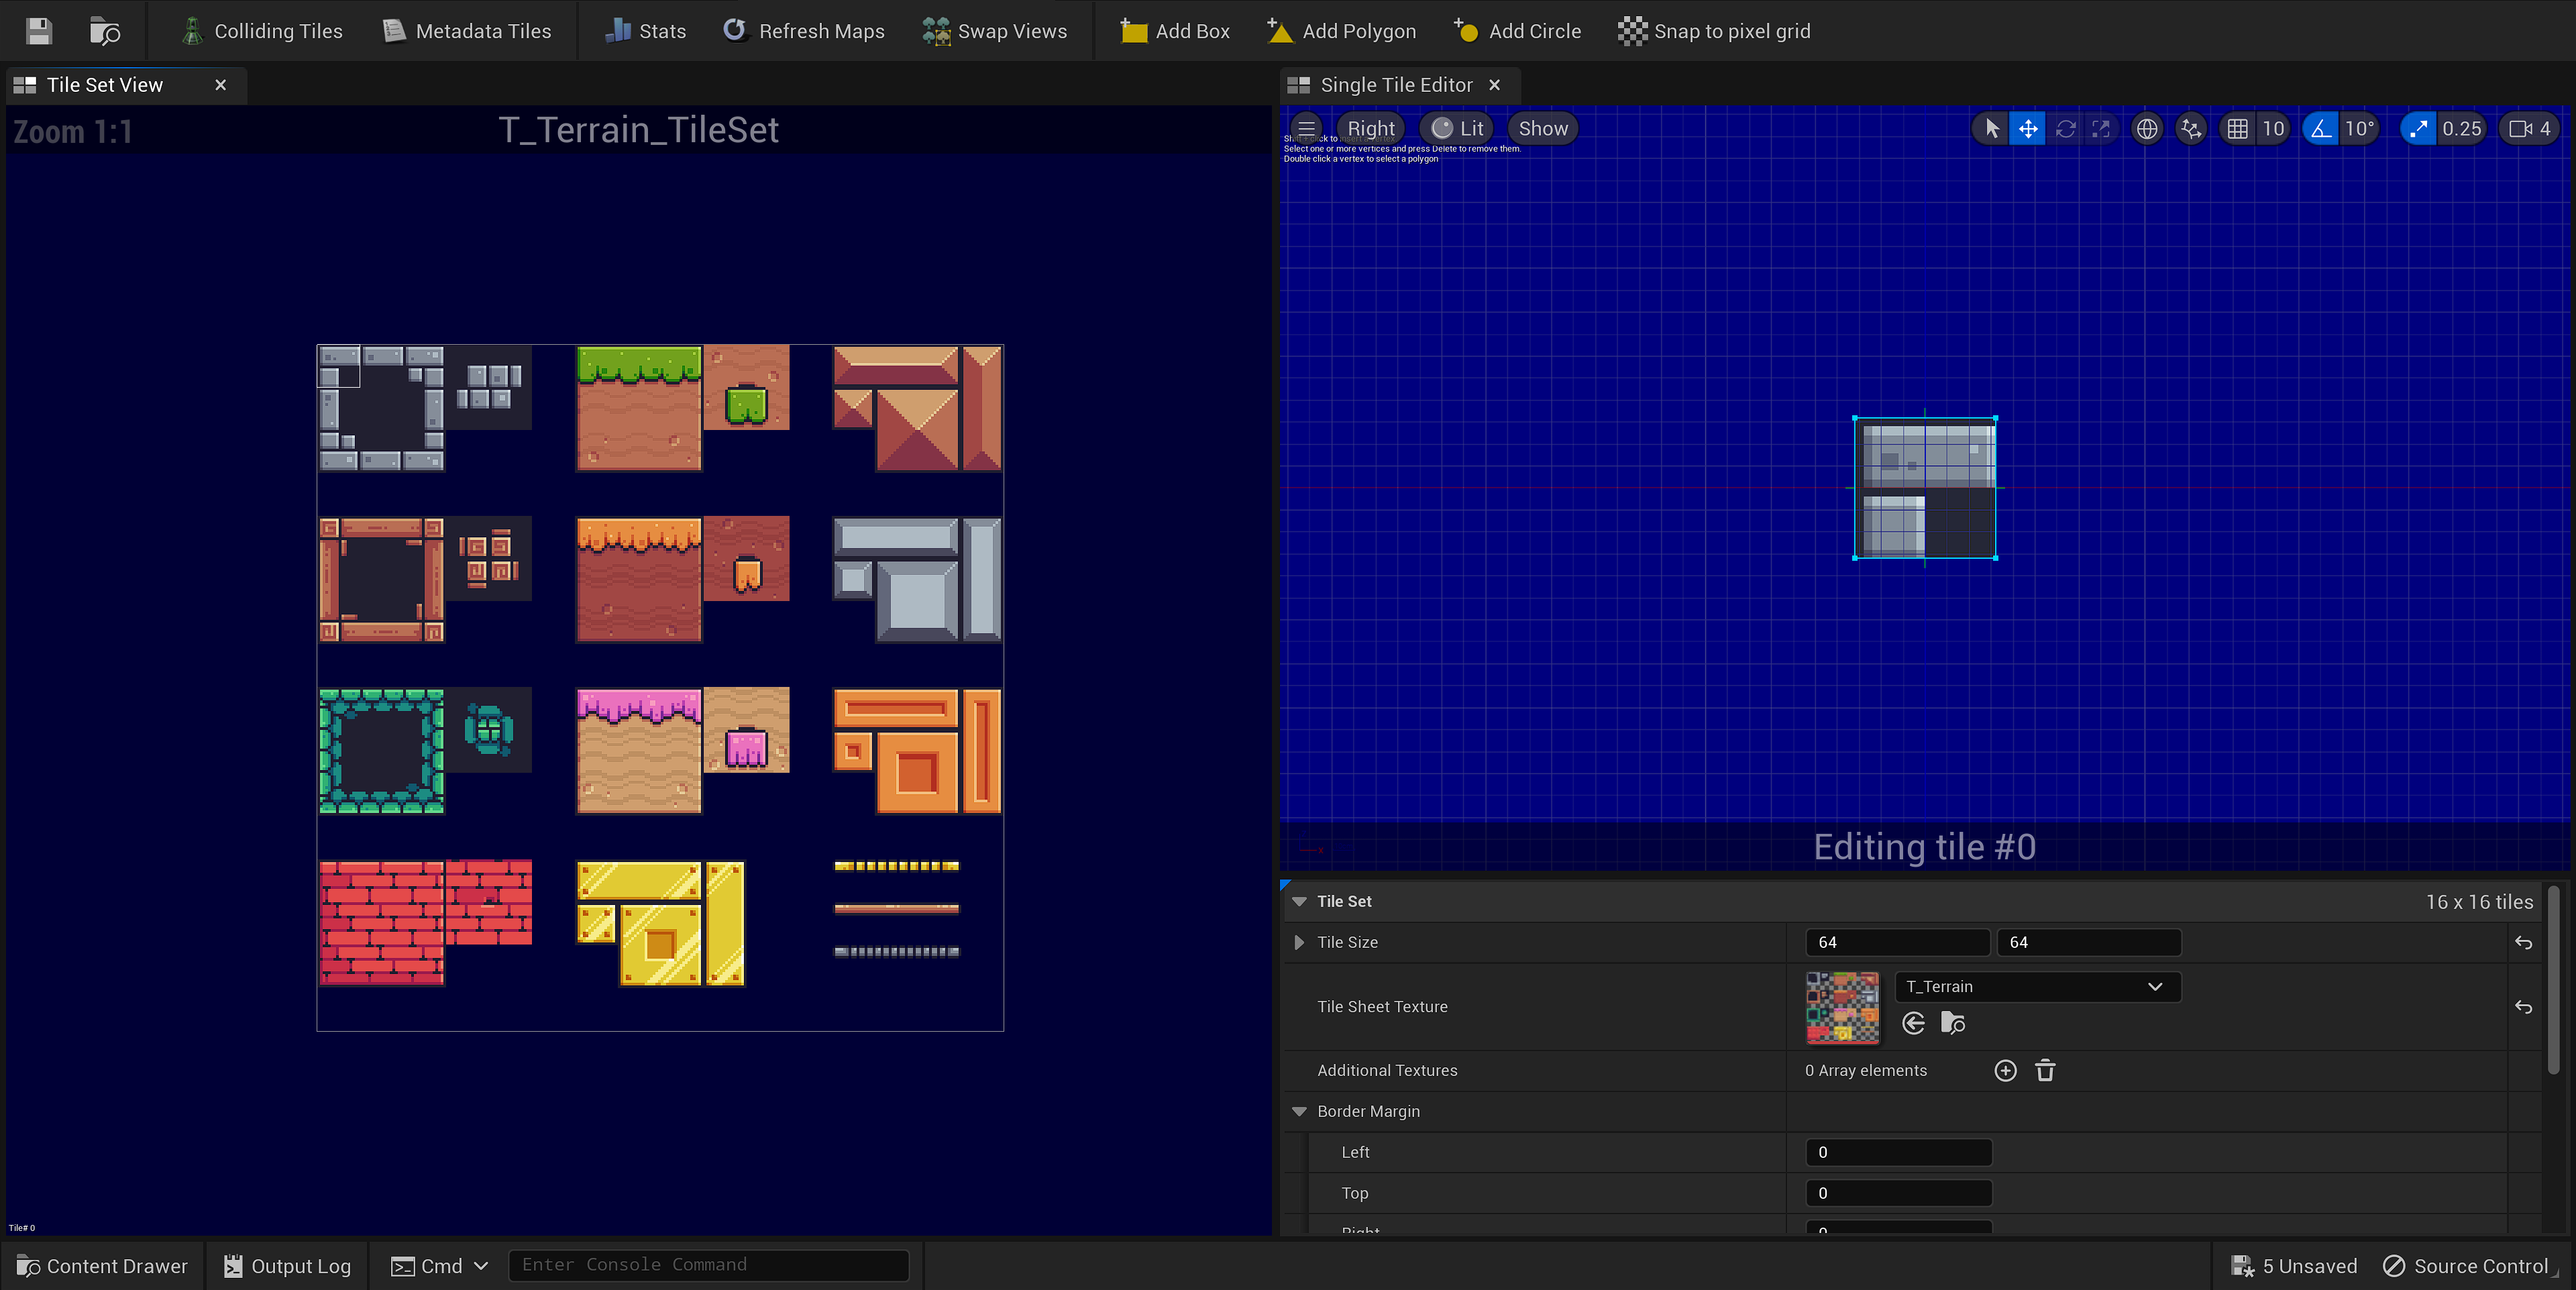
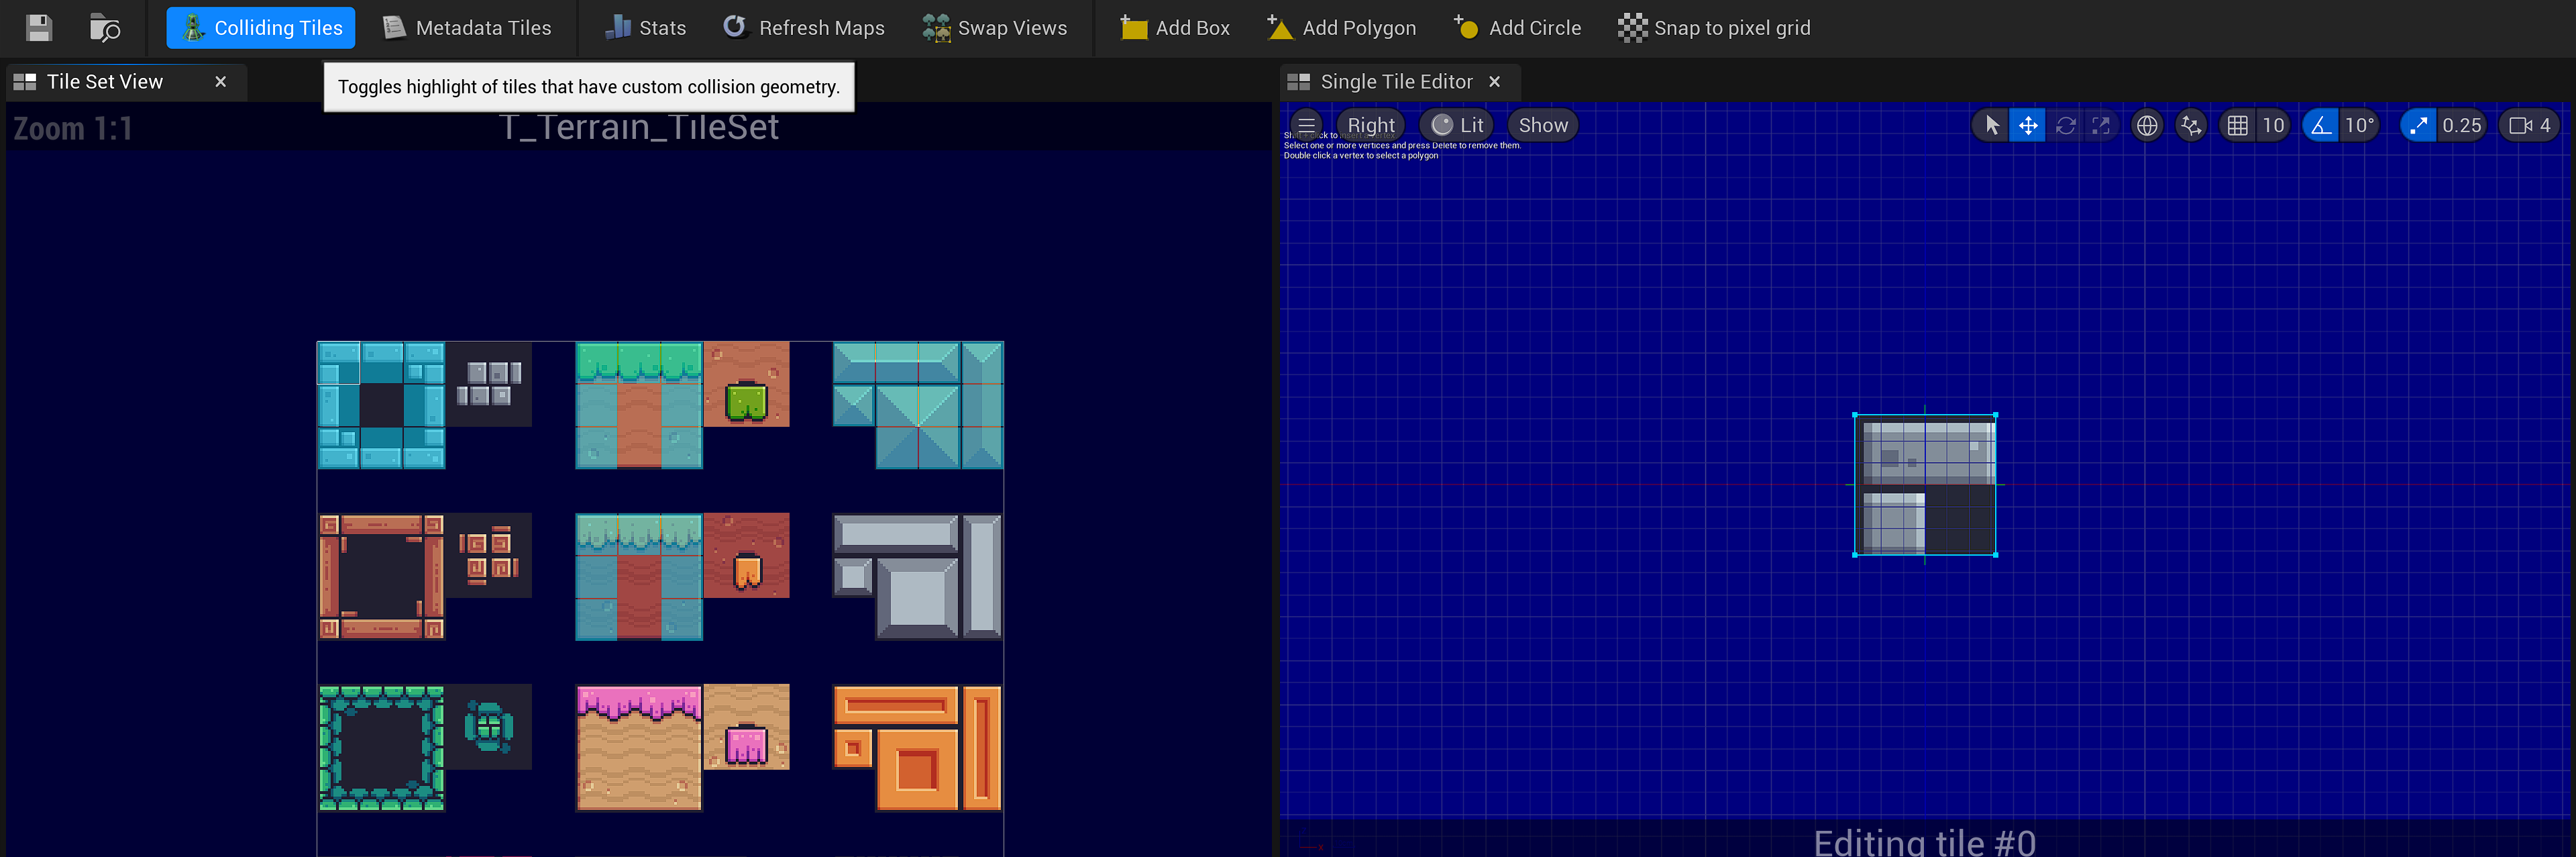
Once set up, you can create a tilemap using the tileset. In this screen, you can select different size sections by editing the tile size, though it’s worth selecting the size you set in the tileset to make sure the collision stays concise and to avoid weird visuals, or at least be mindful of what you’re selecting, for example, if I were to select the whole grass block and used that as a tile to create long platforms, there would be a bunch of random collision underneath the platform (potentially causing issues if the level has multiple elevations) and it will also have the edge pieces every single tile, below is an example.
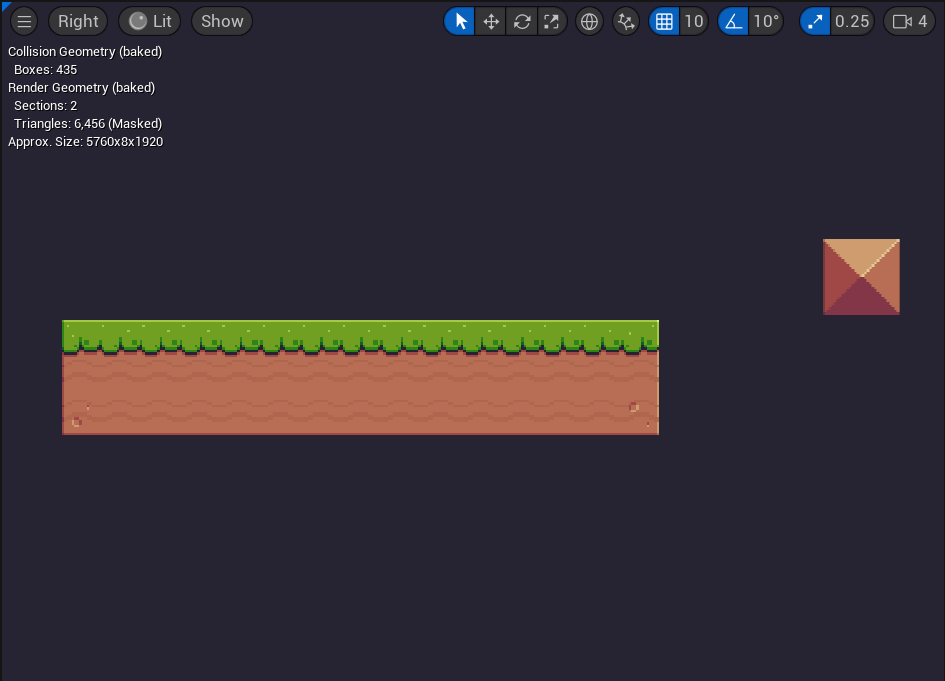

Using the Tilemap tool, you can create a level as big as you want, with multiple layers to create complex backgrounds that don’t affect collision. Once created, the tilemap can then be added to the level, actors and enemies then can be placed against the level to populate it.
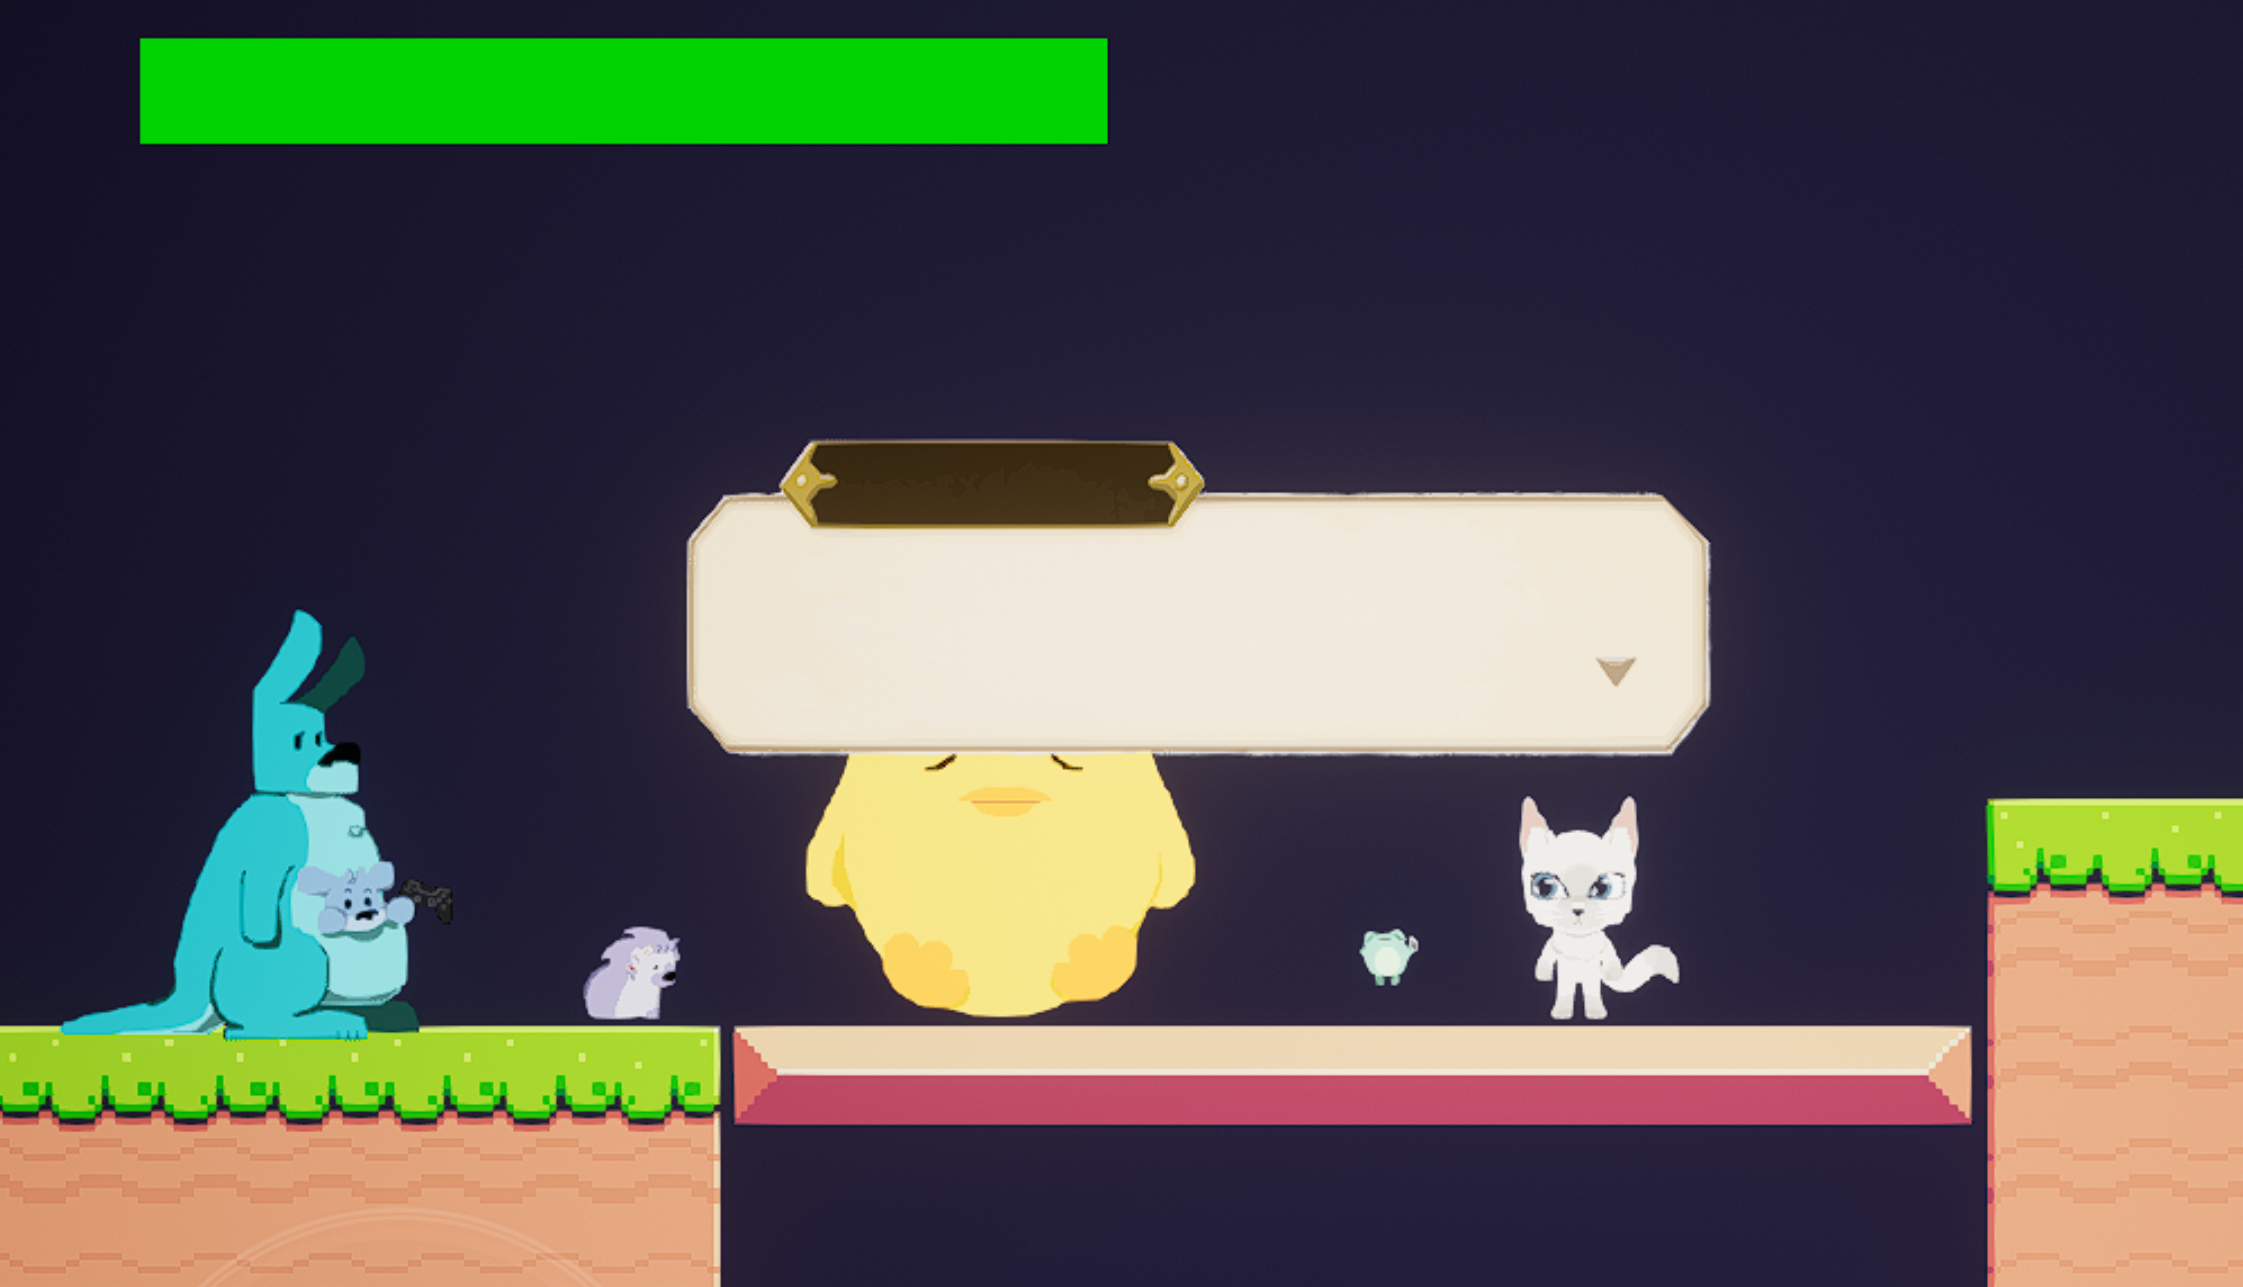
NPCs
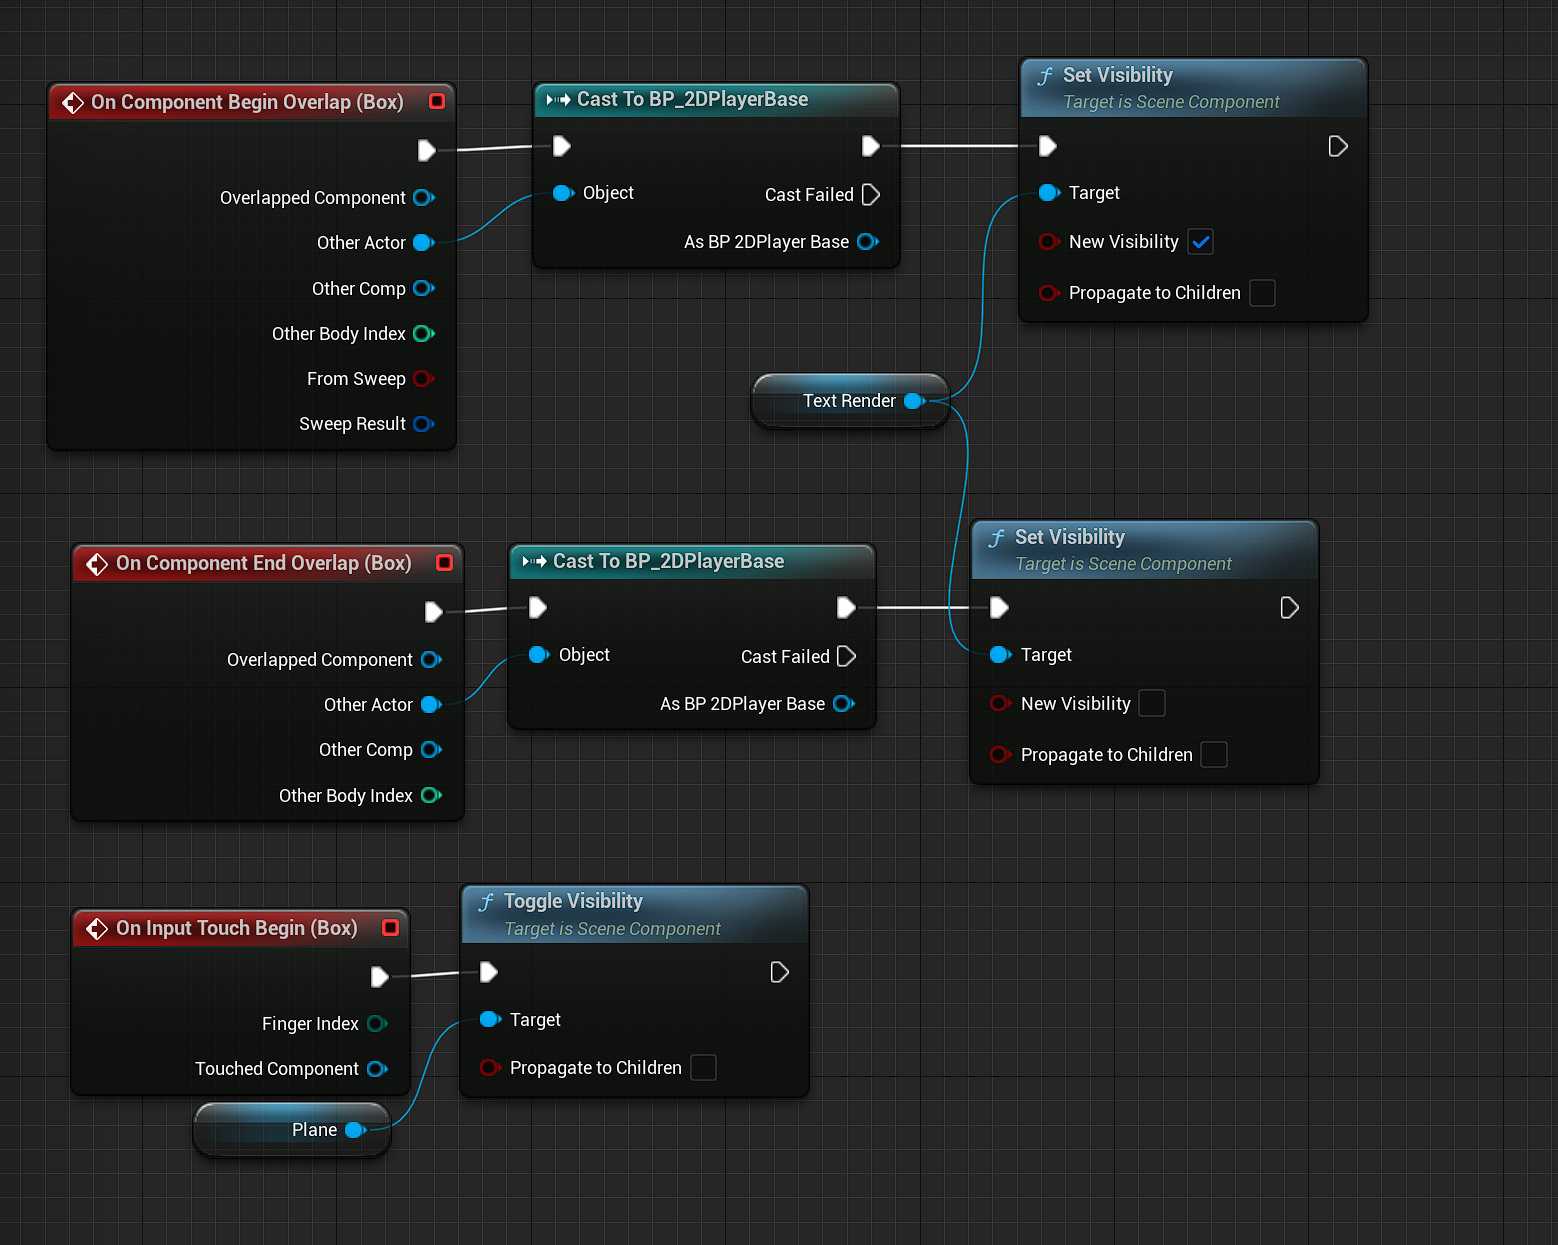
The game will include NPCs that represent the different courses in the digital media umbrella, these characters will give the player their mission for the level. The NPC is a simple flipbook actor which detects whether the player is in their trigger area, if the player is detected, a touch trigger is activated which when triggered (by touching the character, or close to it) will toggle a chat box with the NPCs speech.
Conclusion
As this was not a marked piece of work, there were no update presentations, however we could show our progress throughout the semester to the lecturers to which the response was positive and I am also happy with the result, the sprites animate really well, while the gameplay is simple, it works well and this was never meant to be a huge gaming experience. The skills I learned with the Paper2D plugin and the sprite blueprinting is extremely valuable, I have personally played a lot of games using 2D sprites throughout my many years and whilst I am not likely to use it for my plan next year, I really look forward to using it for again for a personal project in the future. I also learned a bit more about touch implementation for Unreal Engine which could also be important if I have any future mobile projects.
I wouldn’t necessarily change anything regarding this project, however due to the time commitments to the other projects this semester, it would have been interesting to see what could have been done with the game given full time dedication.