Group Client project
Case Closed – Semester 1 Group Project
One out of the three projects this semester was a choice of 9 client briefs with different criteria and objectives, there were two video game options, one of which was a first person slasher roguelike, and the other a first person psychological thriller/horror. I decided to opt for the Psychological thriller/horror which was codenamed ‘Workplace’, which we later updated to Case closed.
The brief outlined that the Player would begin in an ordinary office where everyone has disappeared, there would be a narrator who follows the player who would not be able to interact with them. After a couple of weeks of brainstorming ideas, our team came up with some ideas and directions and went to discuss them with the client. The client agreed with our plans which would see our gameplay loop focus on avoiding detection of monsters (representations of the protagonist’s victim’s) and solving puzzles to progress throughout the levels and onto the next stage/environment.
The Game would be for Playstation 4 so all controls will be configured for the relevant controller and the game must be made using Unreal Engine 5. I had never used this engine before this project so all of the below was done alongside learning the Unreal blueprint system at the same time.
Inventory System
To have the game work as intended, an Inventory System would be needed to create the inventory slots for items and equipment to be stored and then store equipment used by the character (e.g Flashlight) and useable items for puzzles. The player would need to be able to see what item they are looking at and be able to press a button to pick the item up.
The inventory system would also need to do the following:
Check whether there are any available inventory slots.
Check what slots are currently empty.
Check how many items are being picked up and whether the item is stackable.
Check if there is already an item with the same ItemID and if they are currently at their max stack size.
Check whether the object is classed as equipment or an item.
Depending on the results of the previous checks, the player will either, pick the item up and add it to a new empty slot in their inventory/equipment, pick the item up and add it to the stack of items already in the inventory or will be unable to pick the item up and it will remain on the ground.
The item/equipment will be represented in the inventory as an Icon image with a number declaring how many items are currently in the stack if the item is stackable.
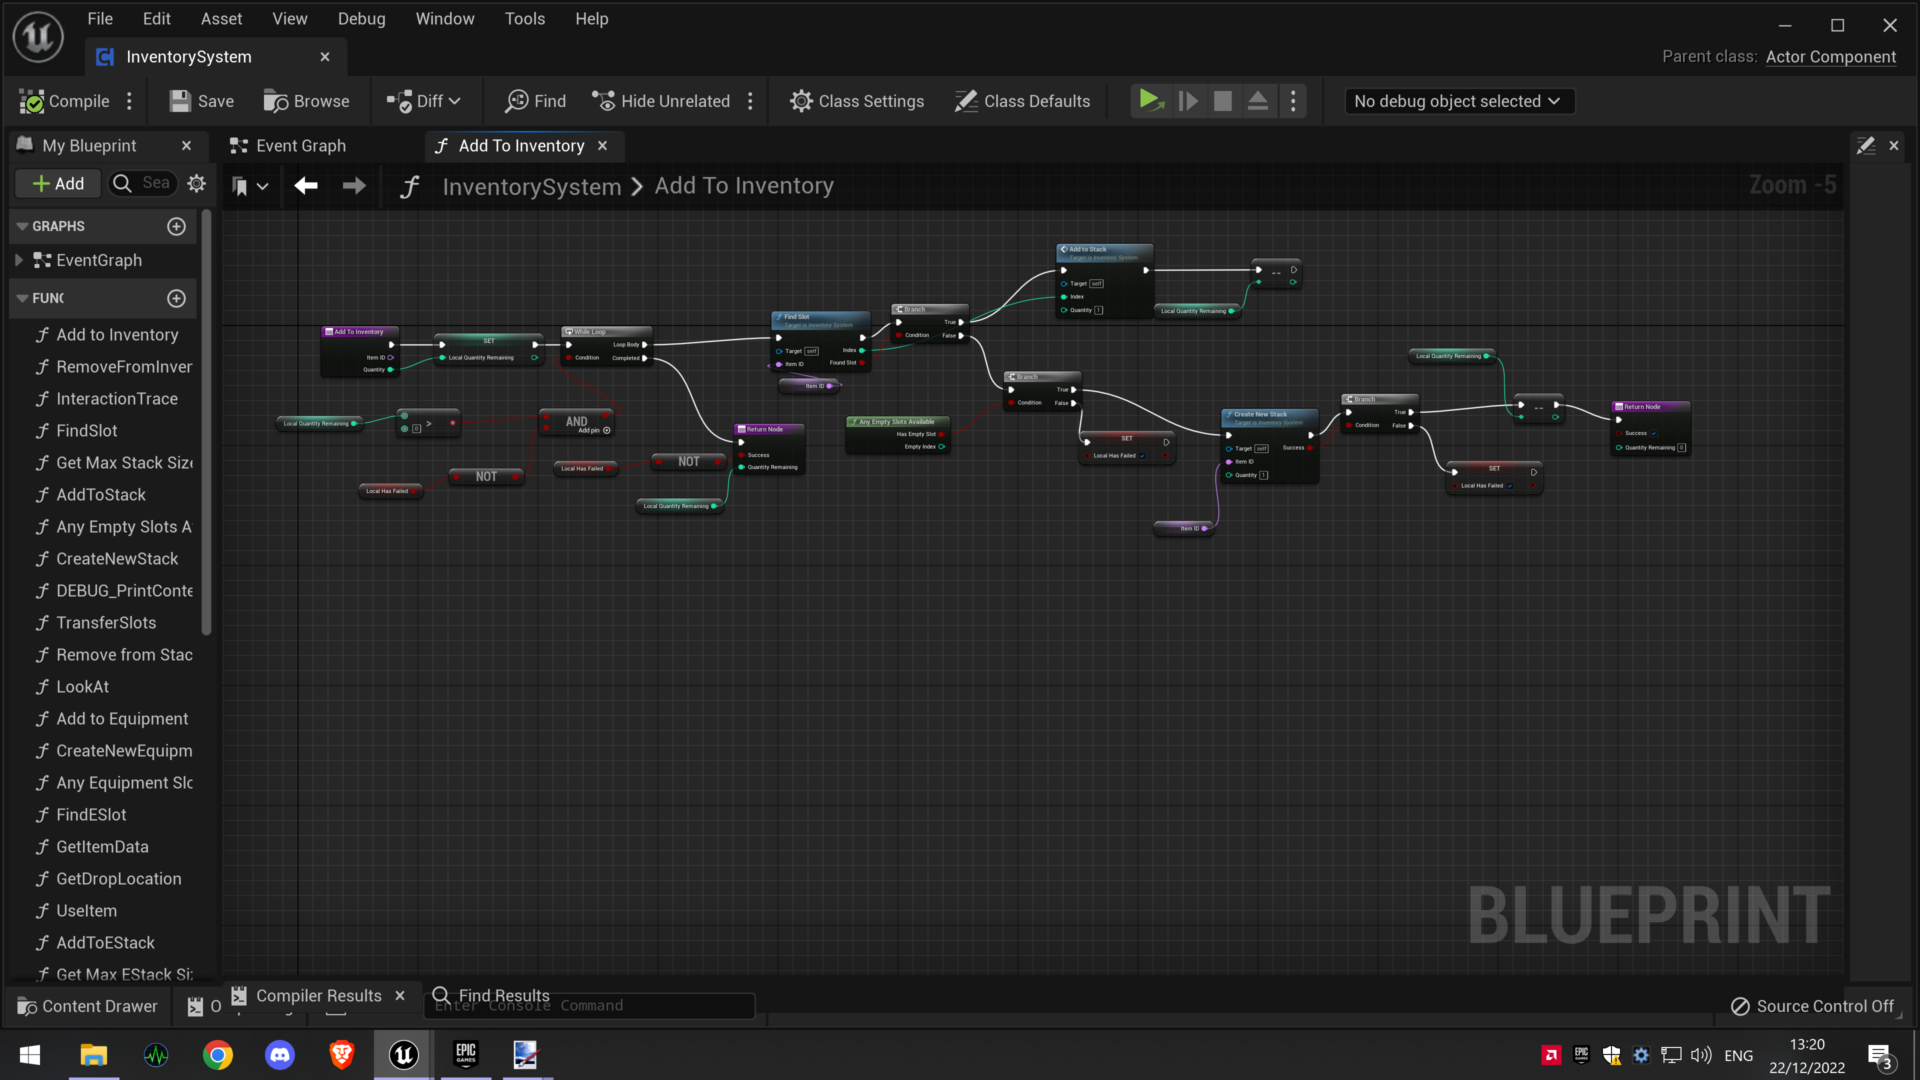
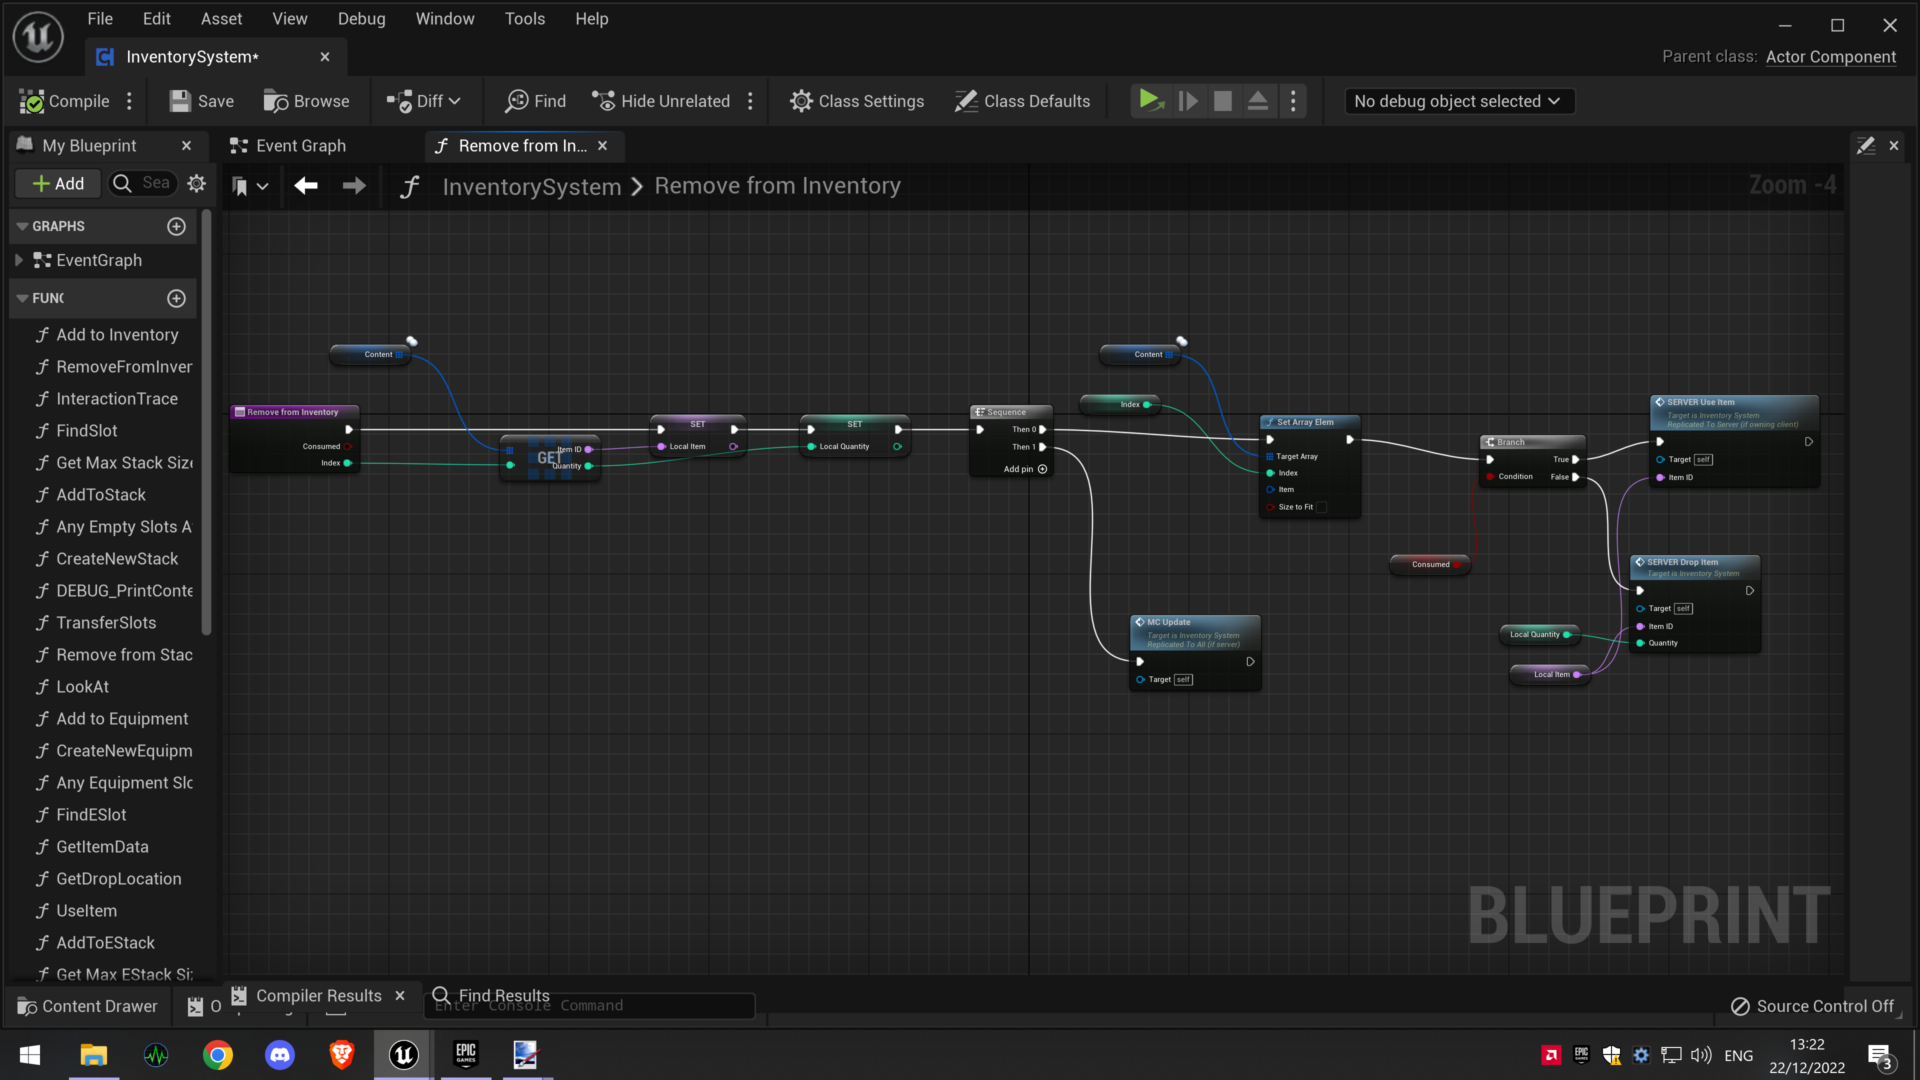
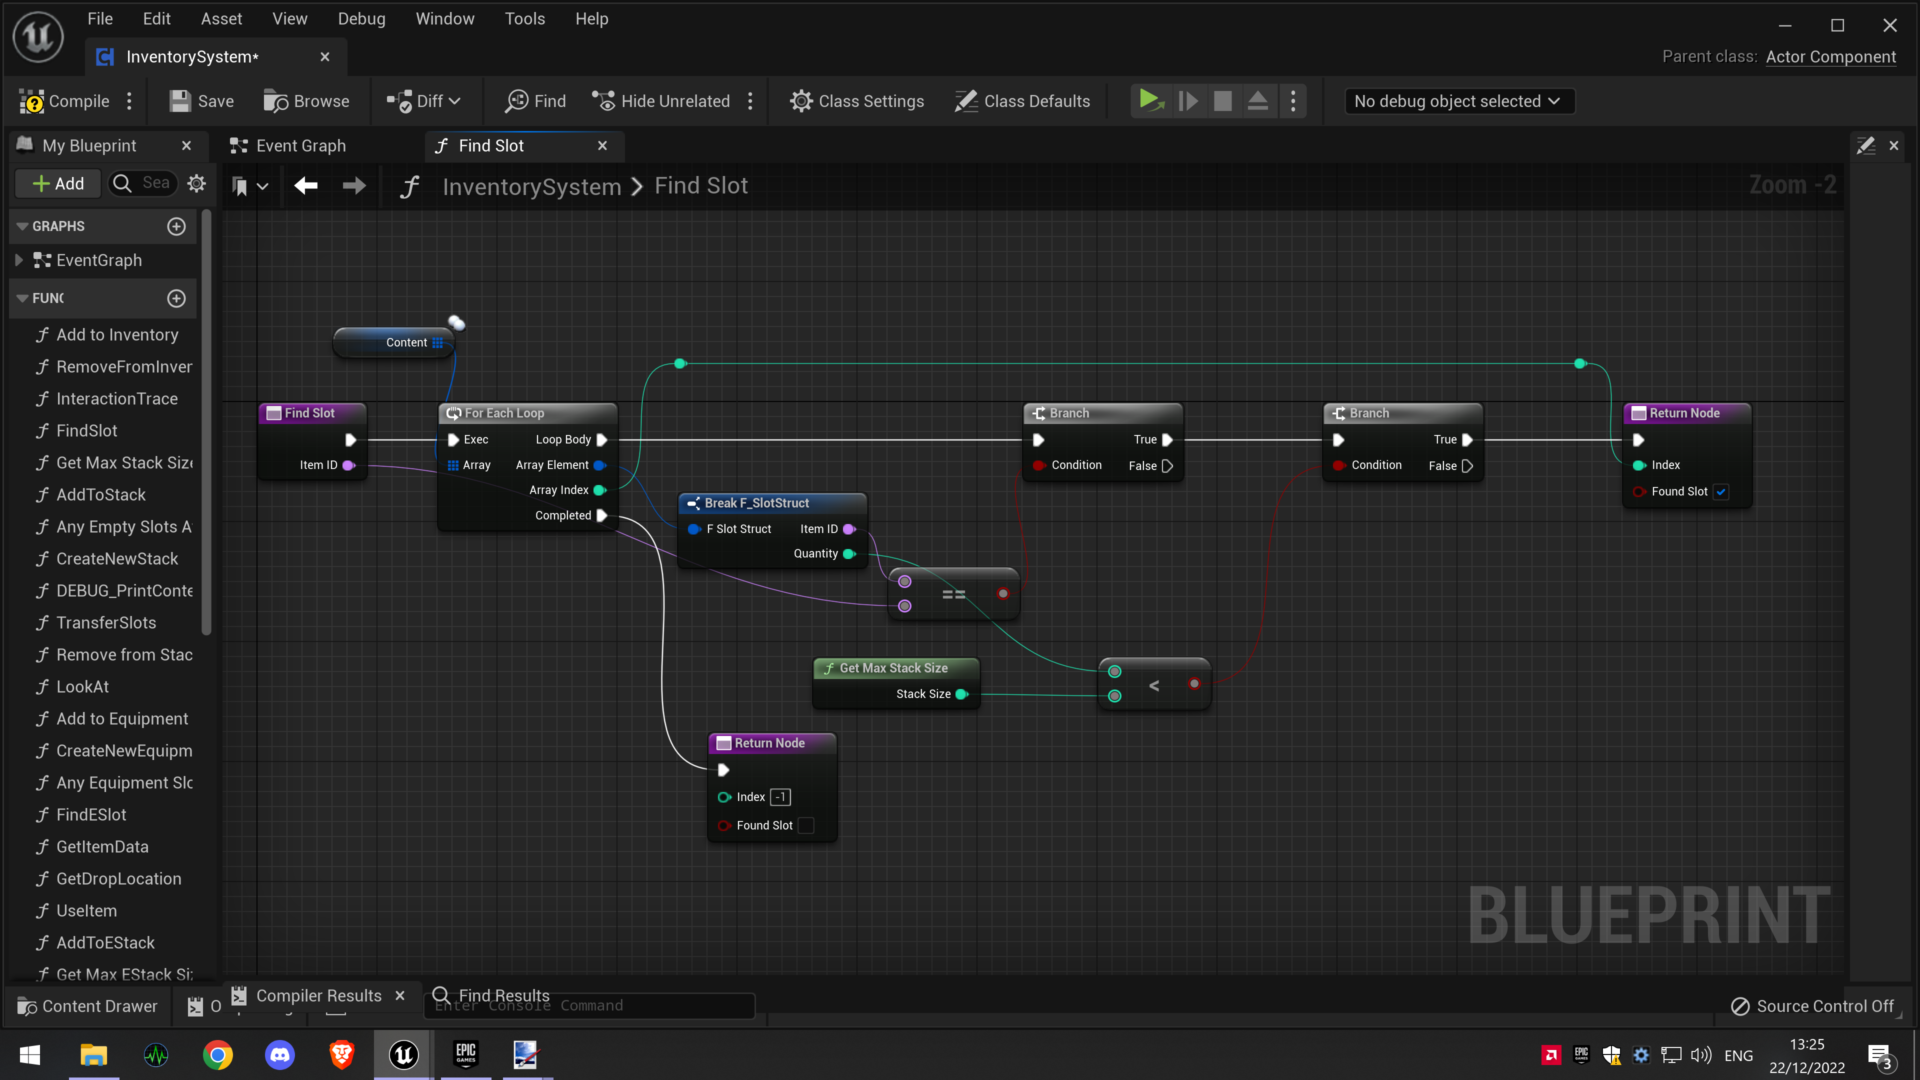
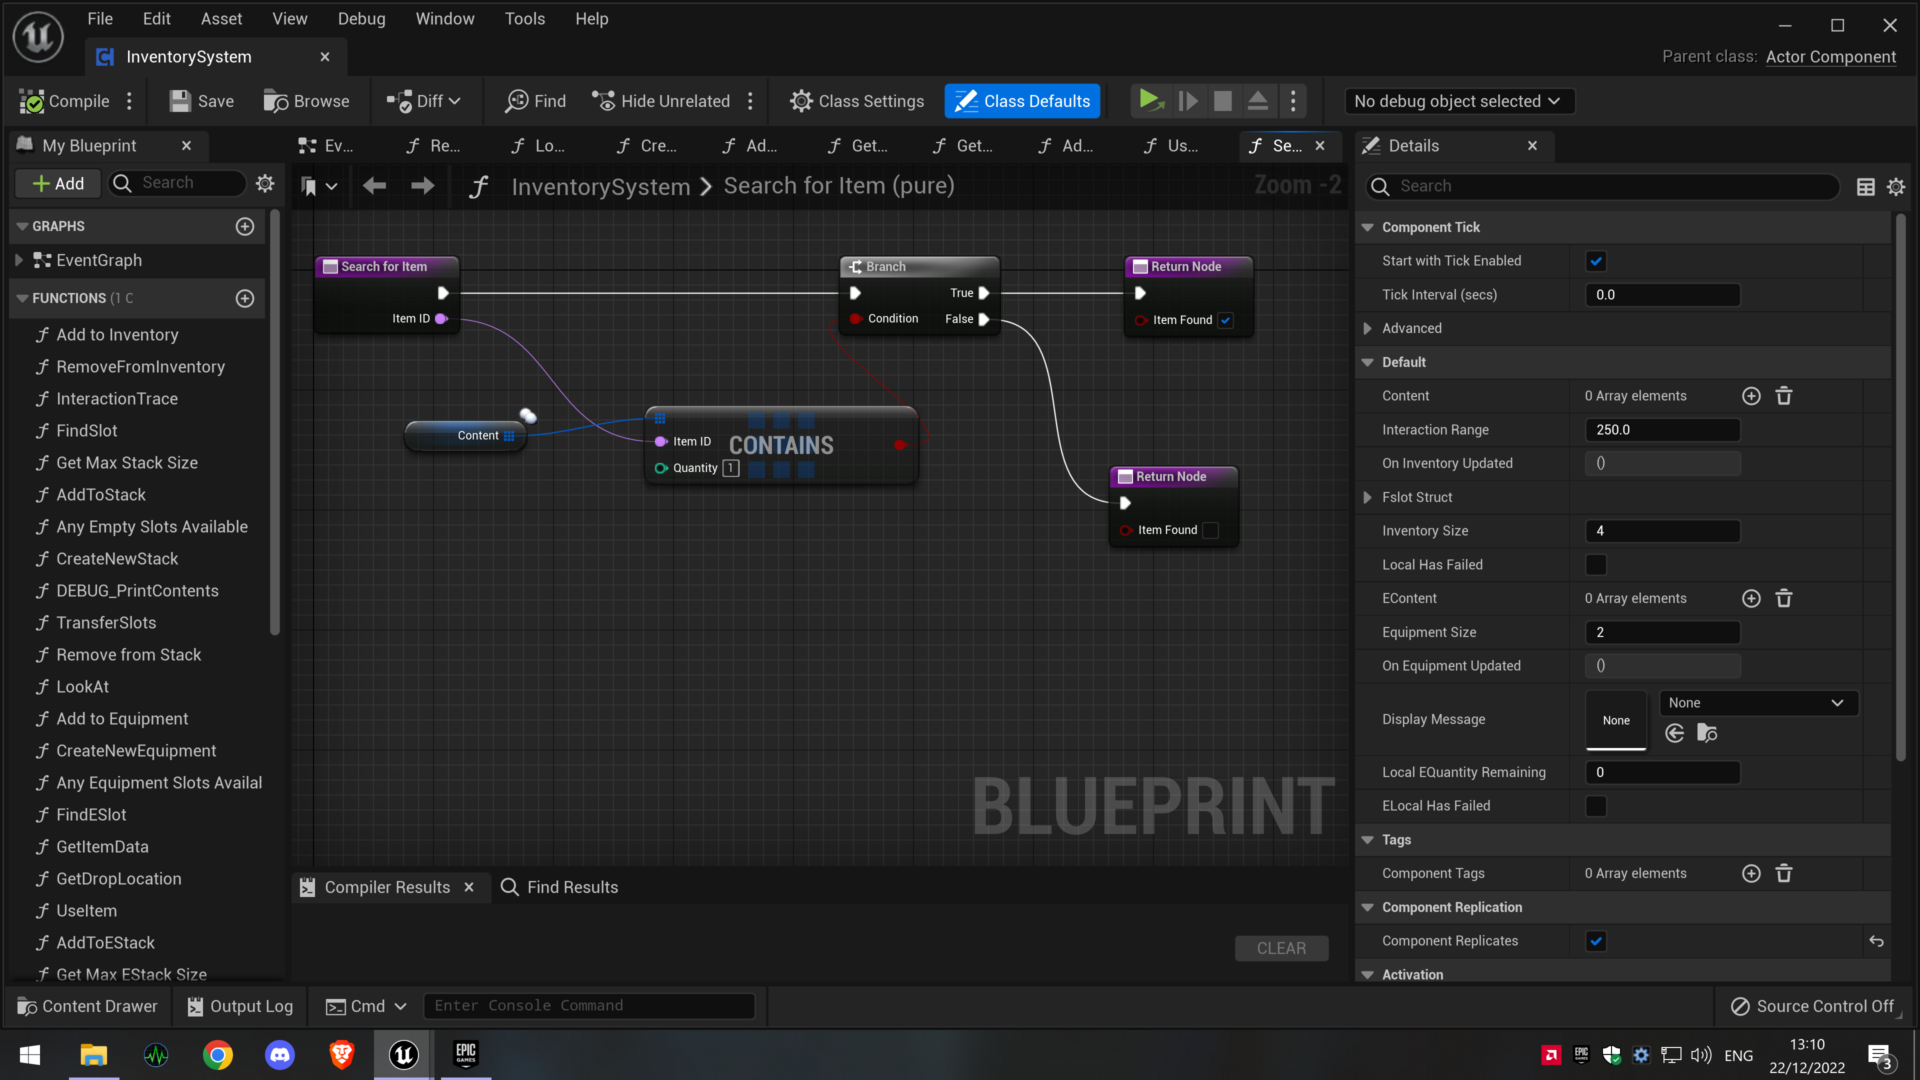
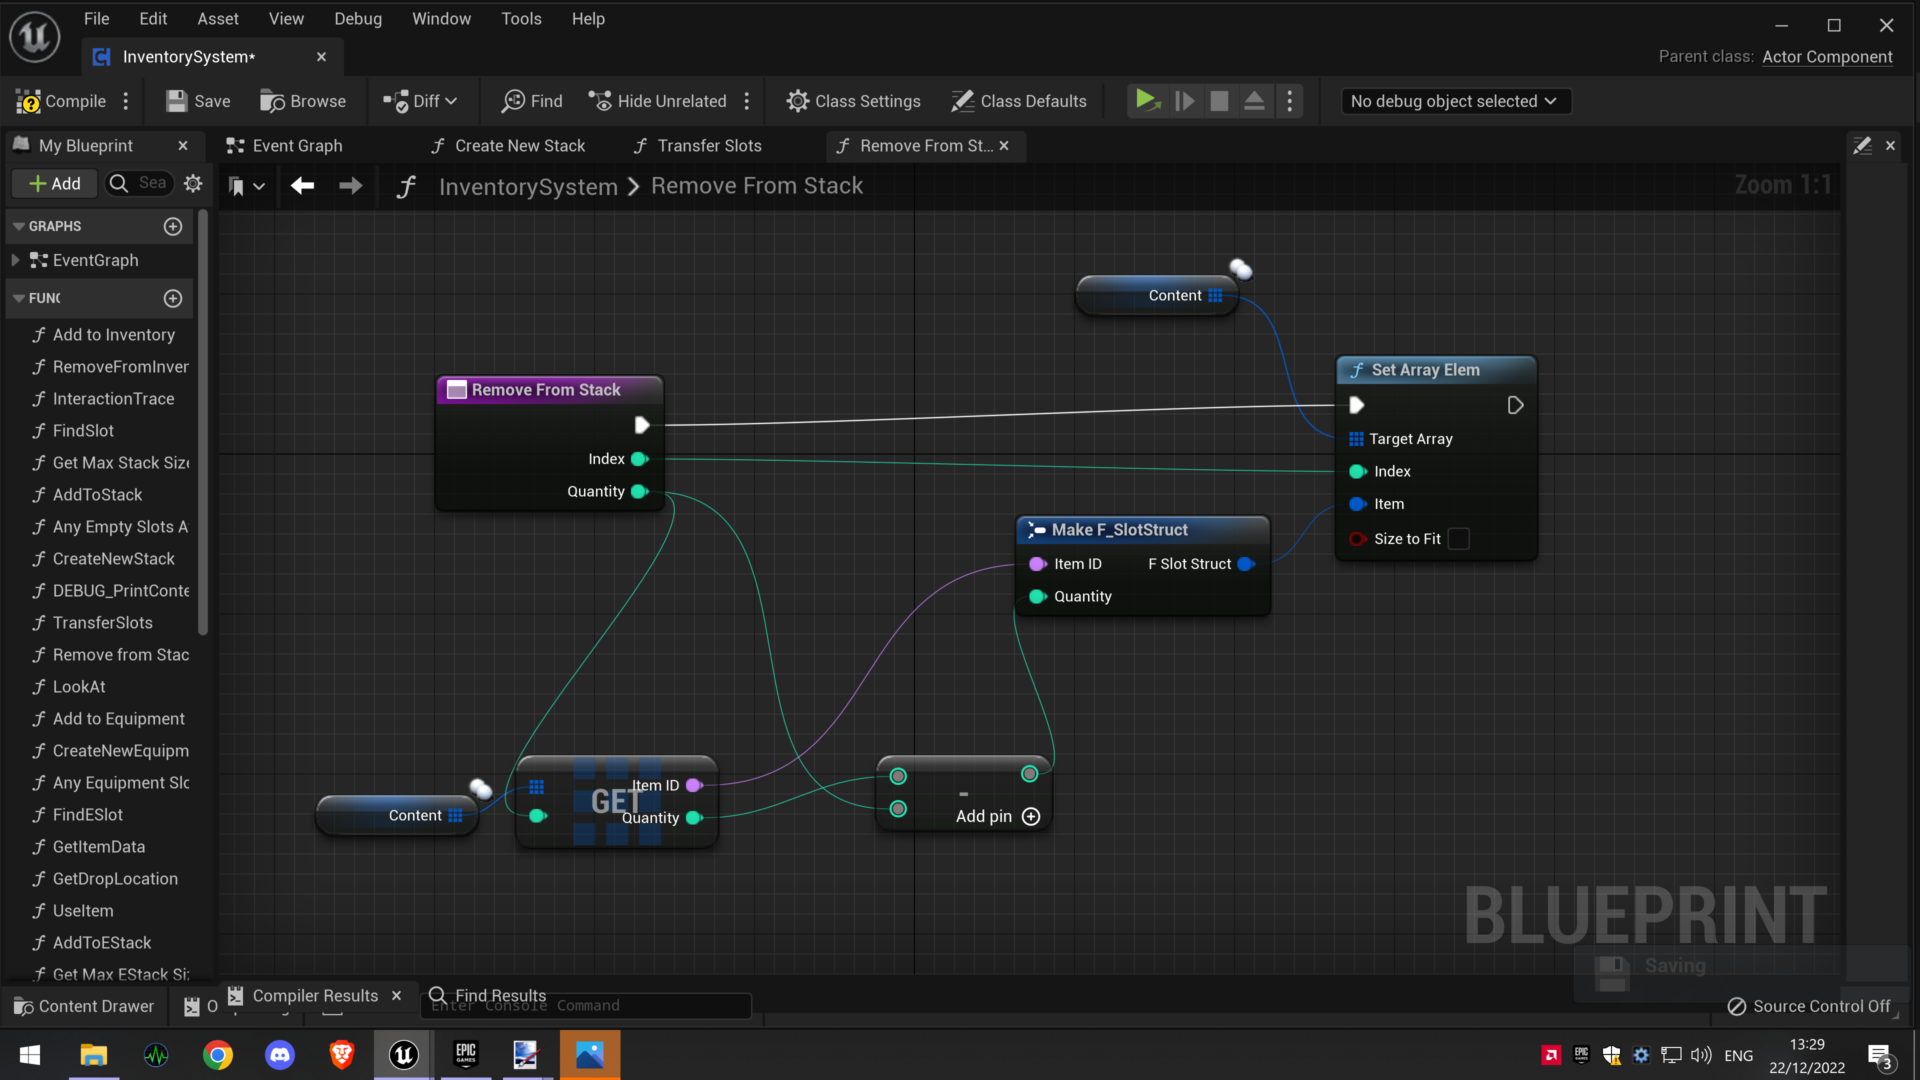
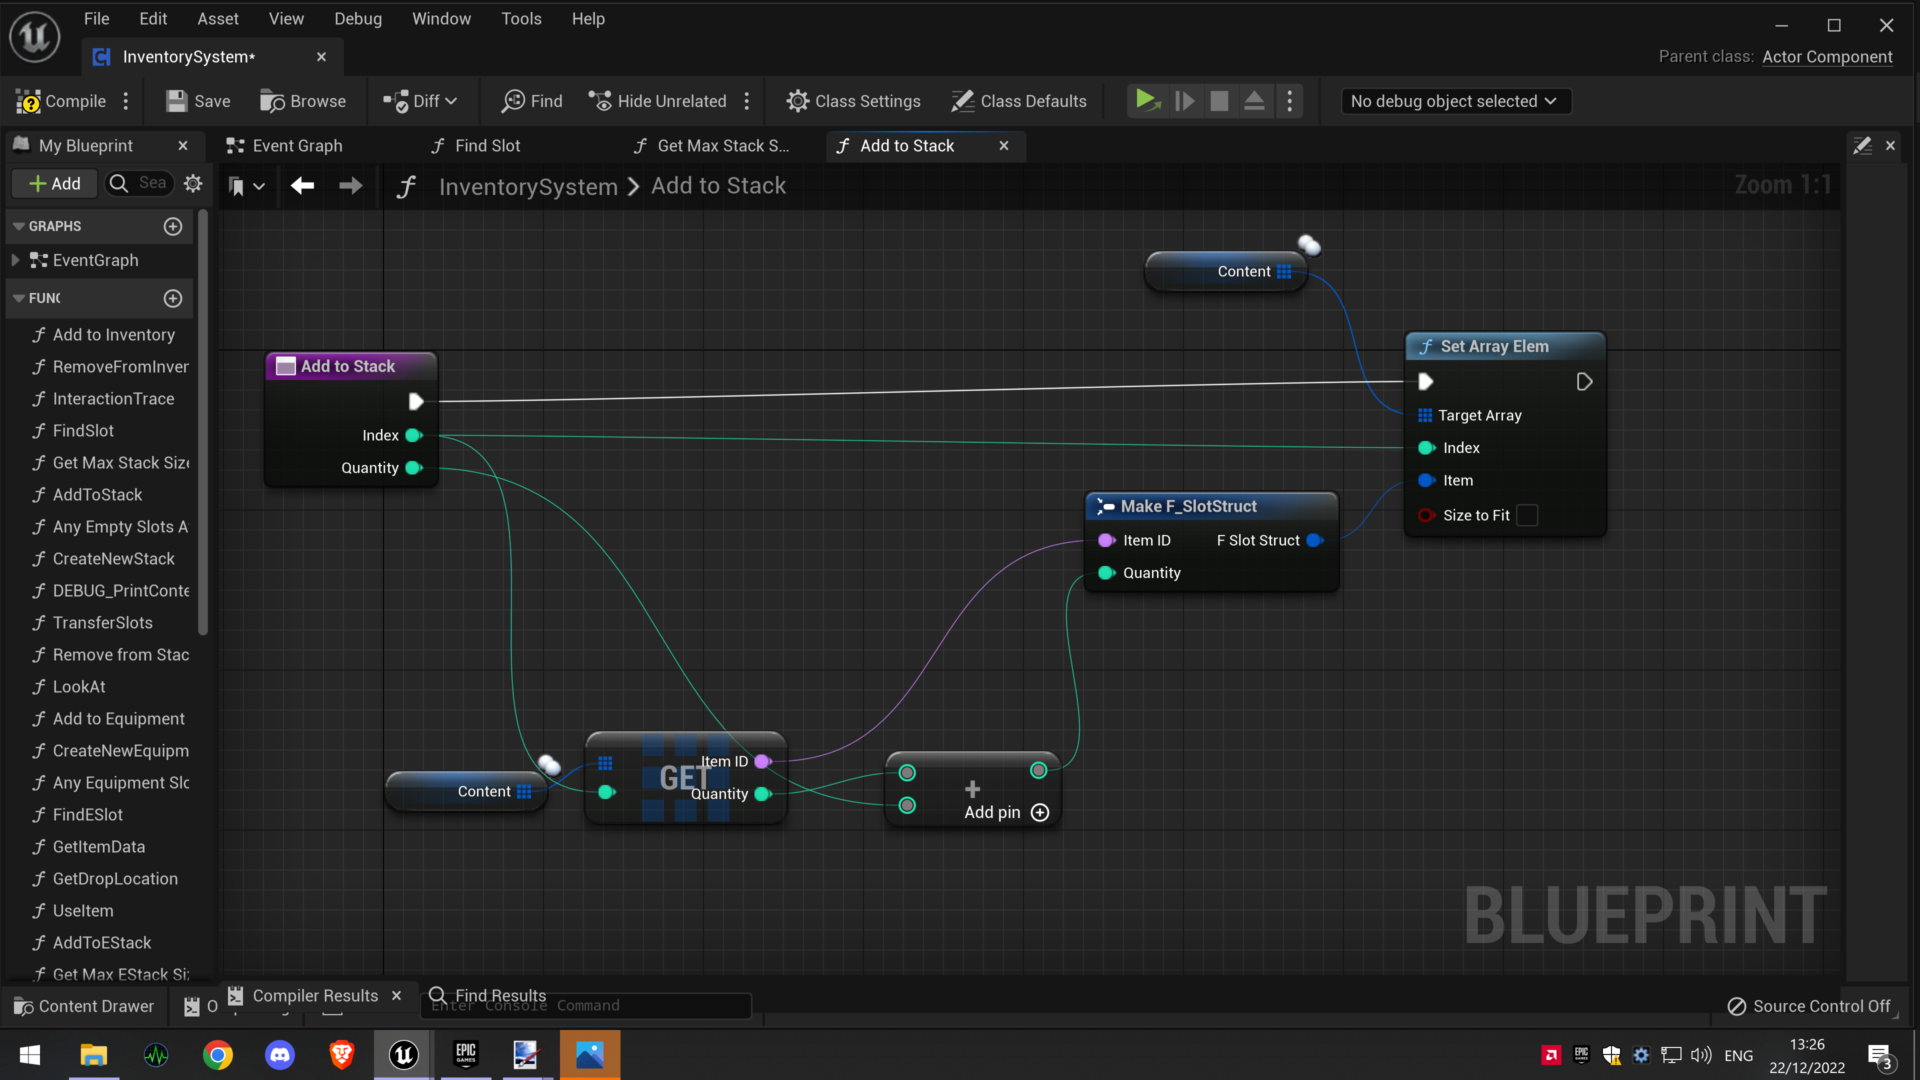
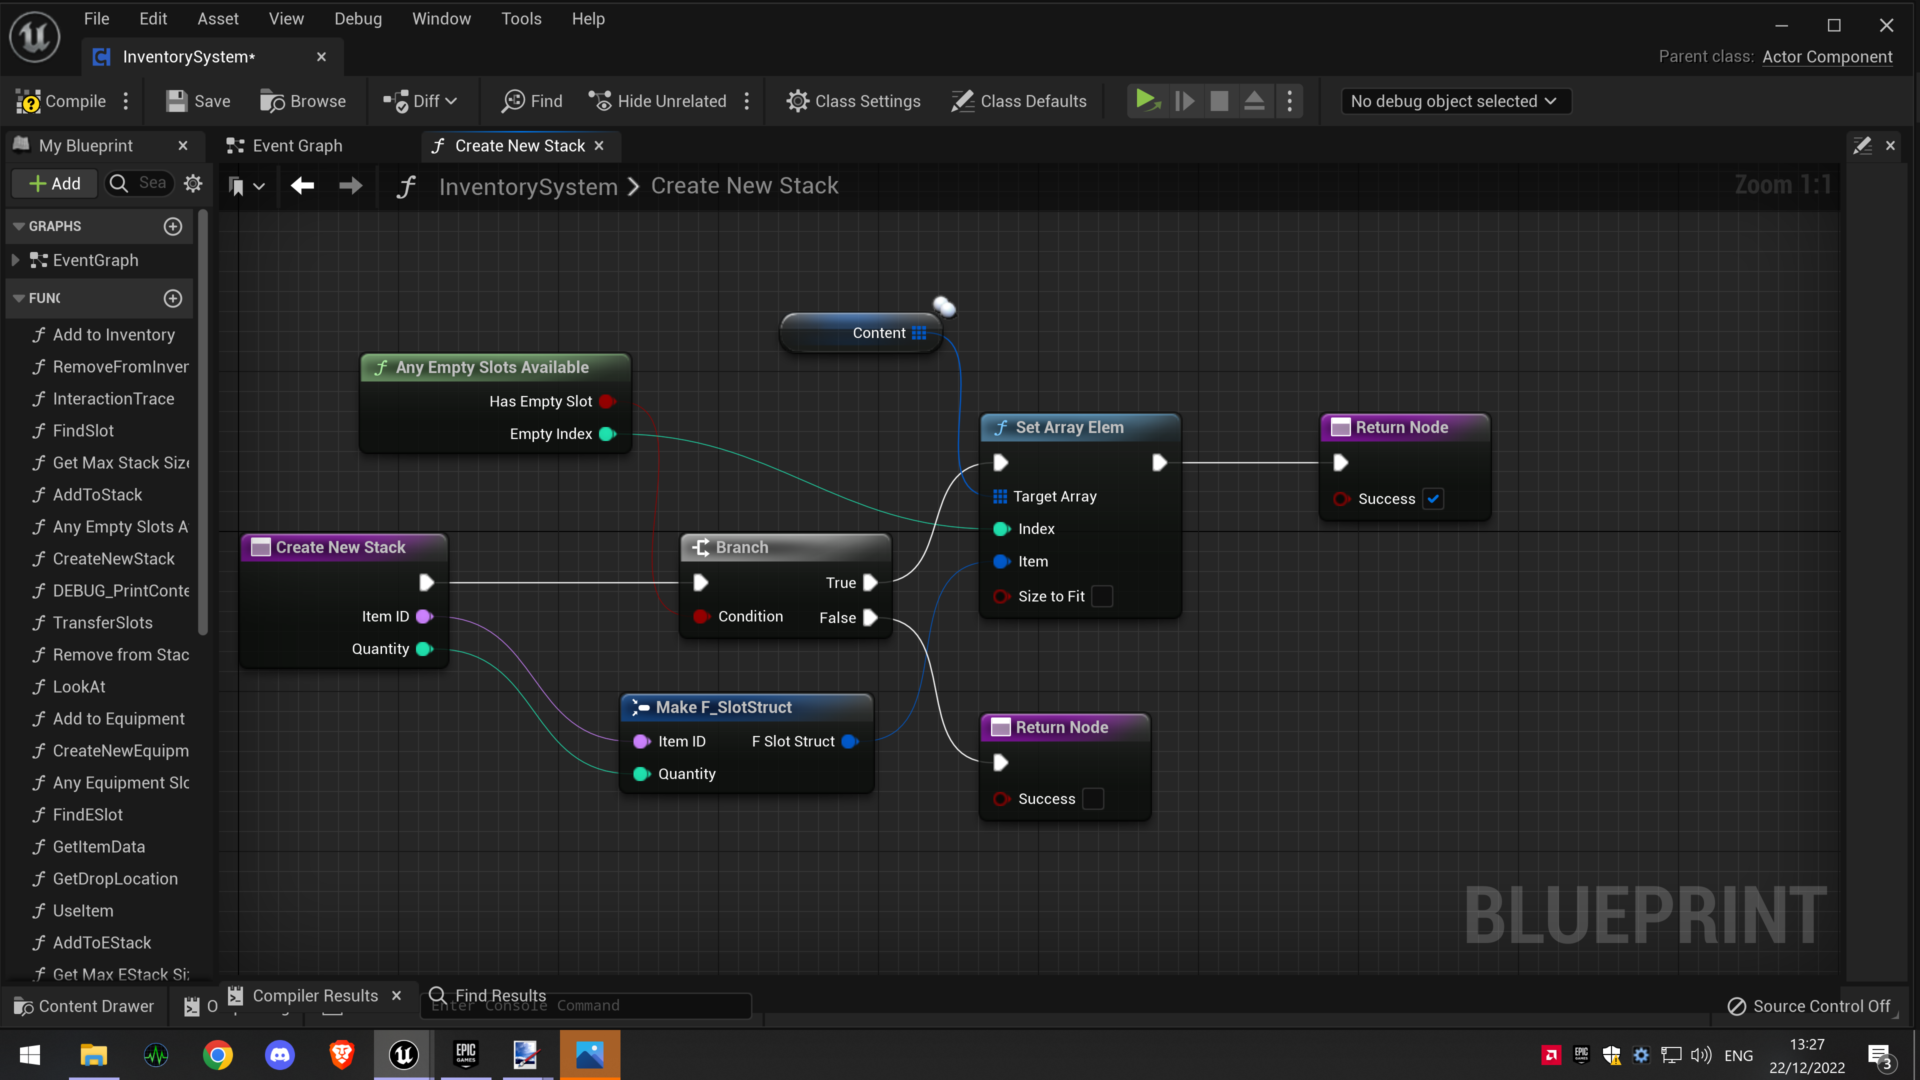
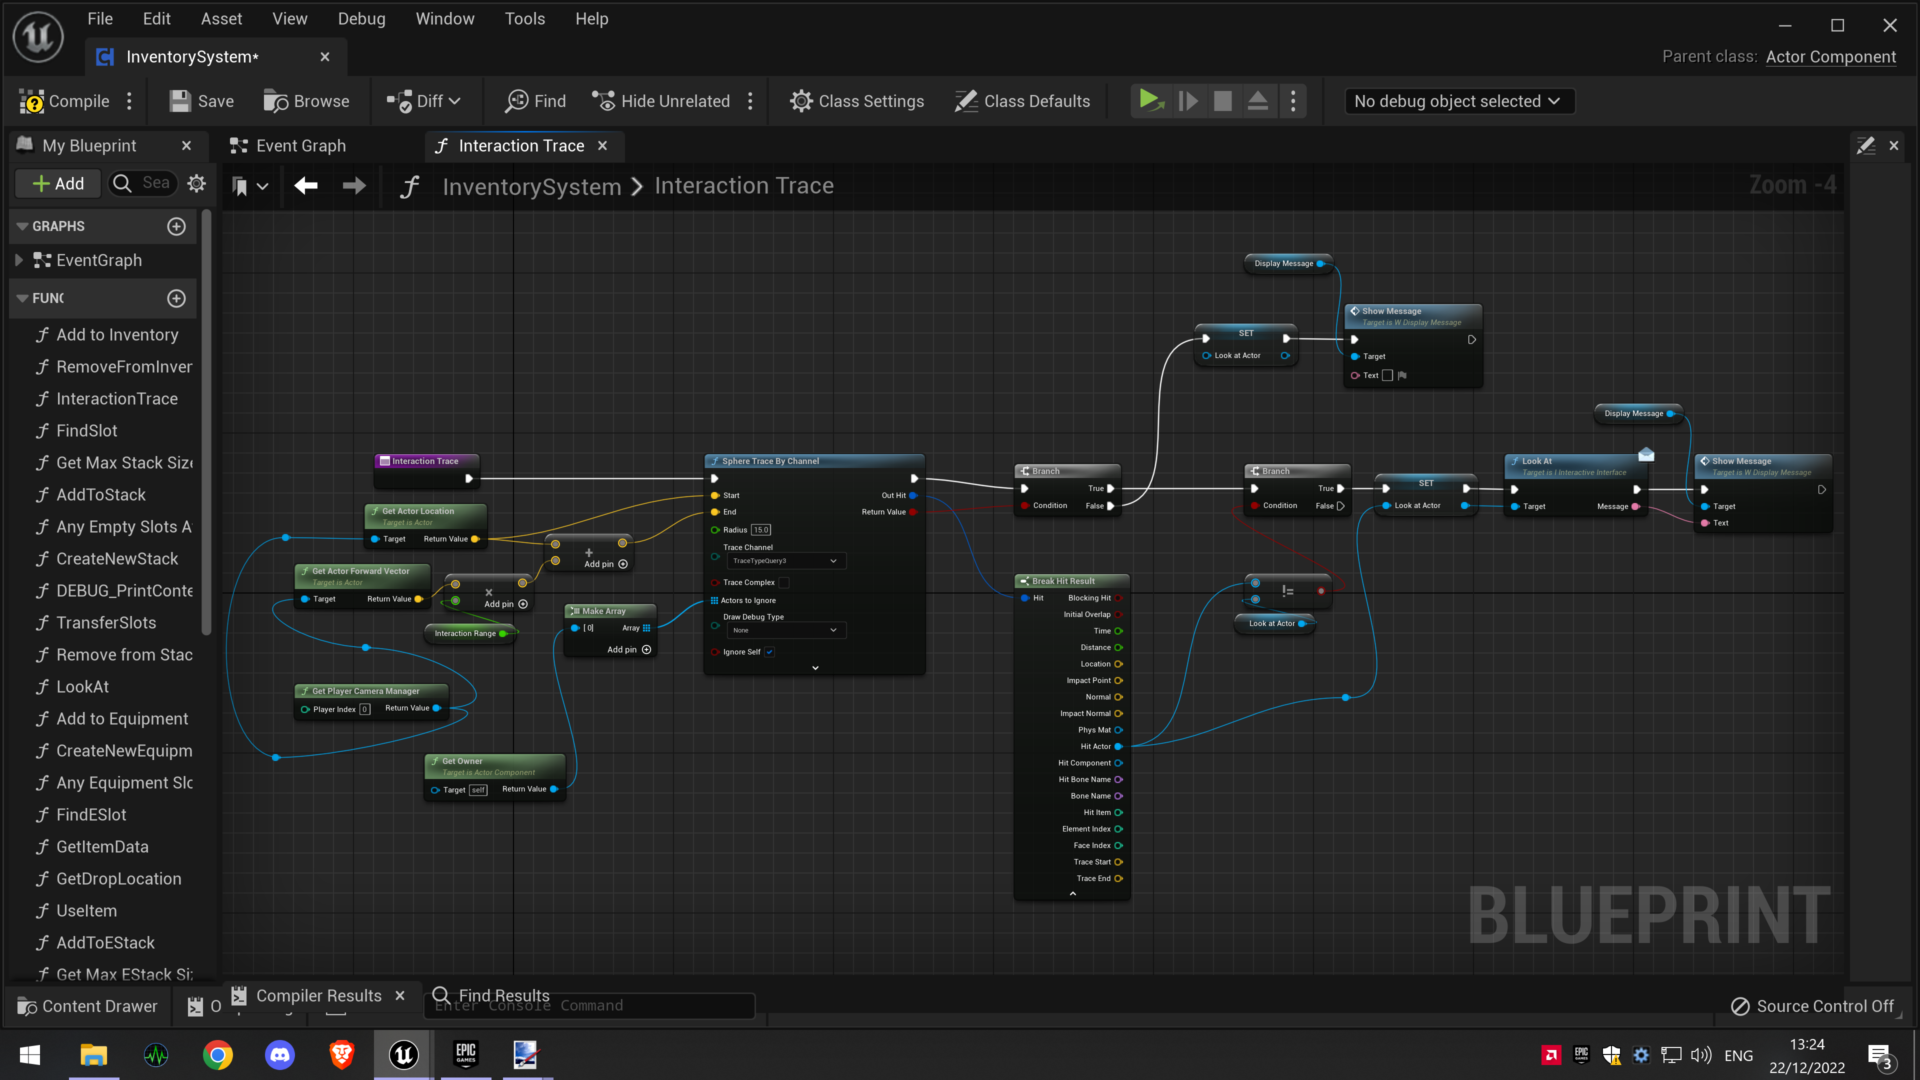
Below is a gallery displaying the Blueprints needed to achieve the above.
To cut down on the amount of screenshots, I have only included the inventory side of the blueprints as the equipment blueprints are nearly identical.
Event Graph
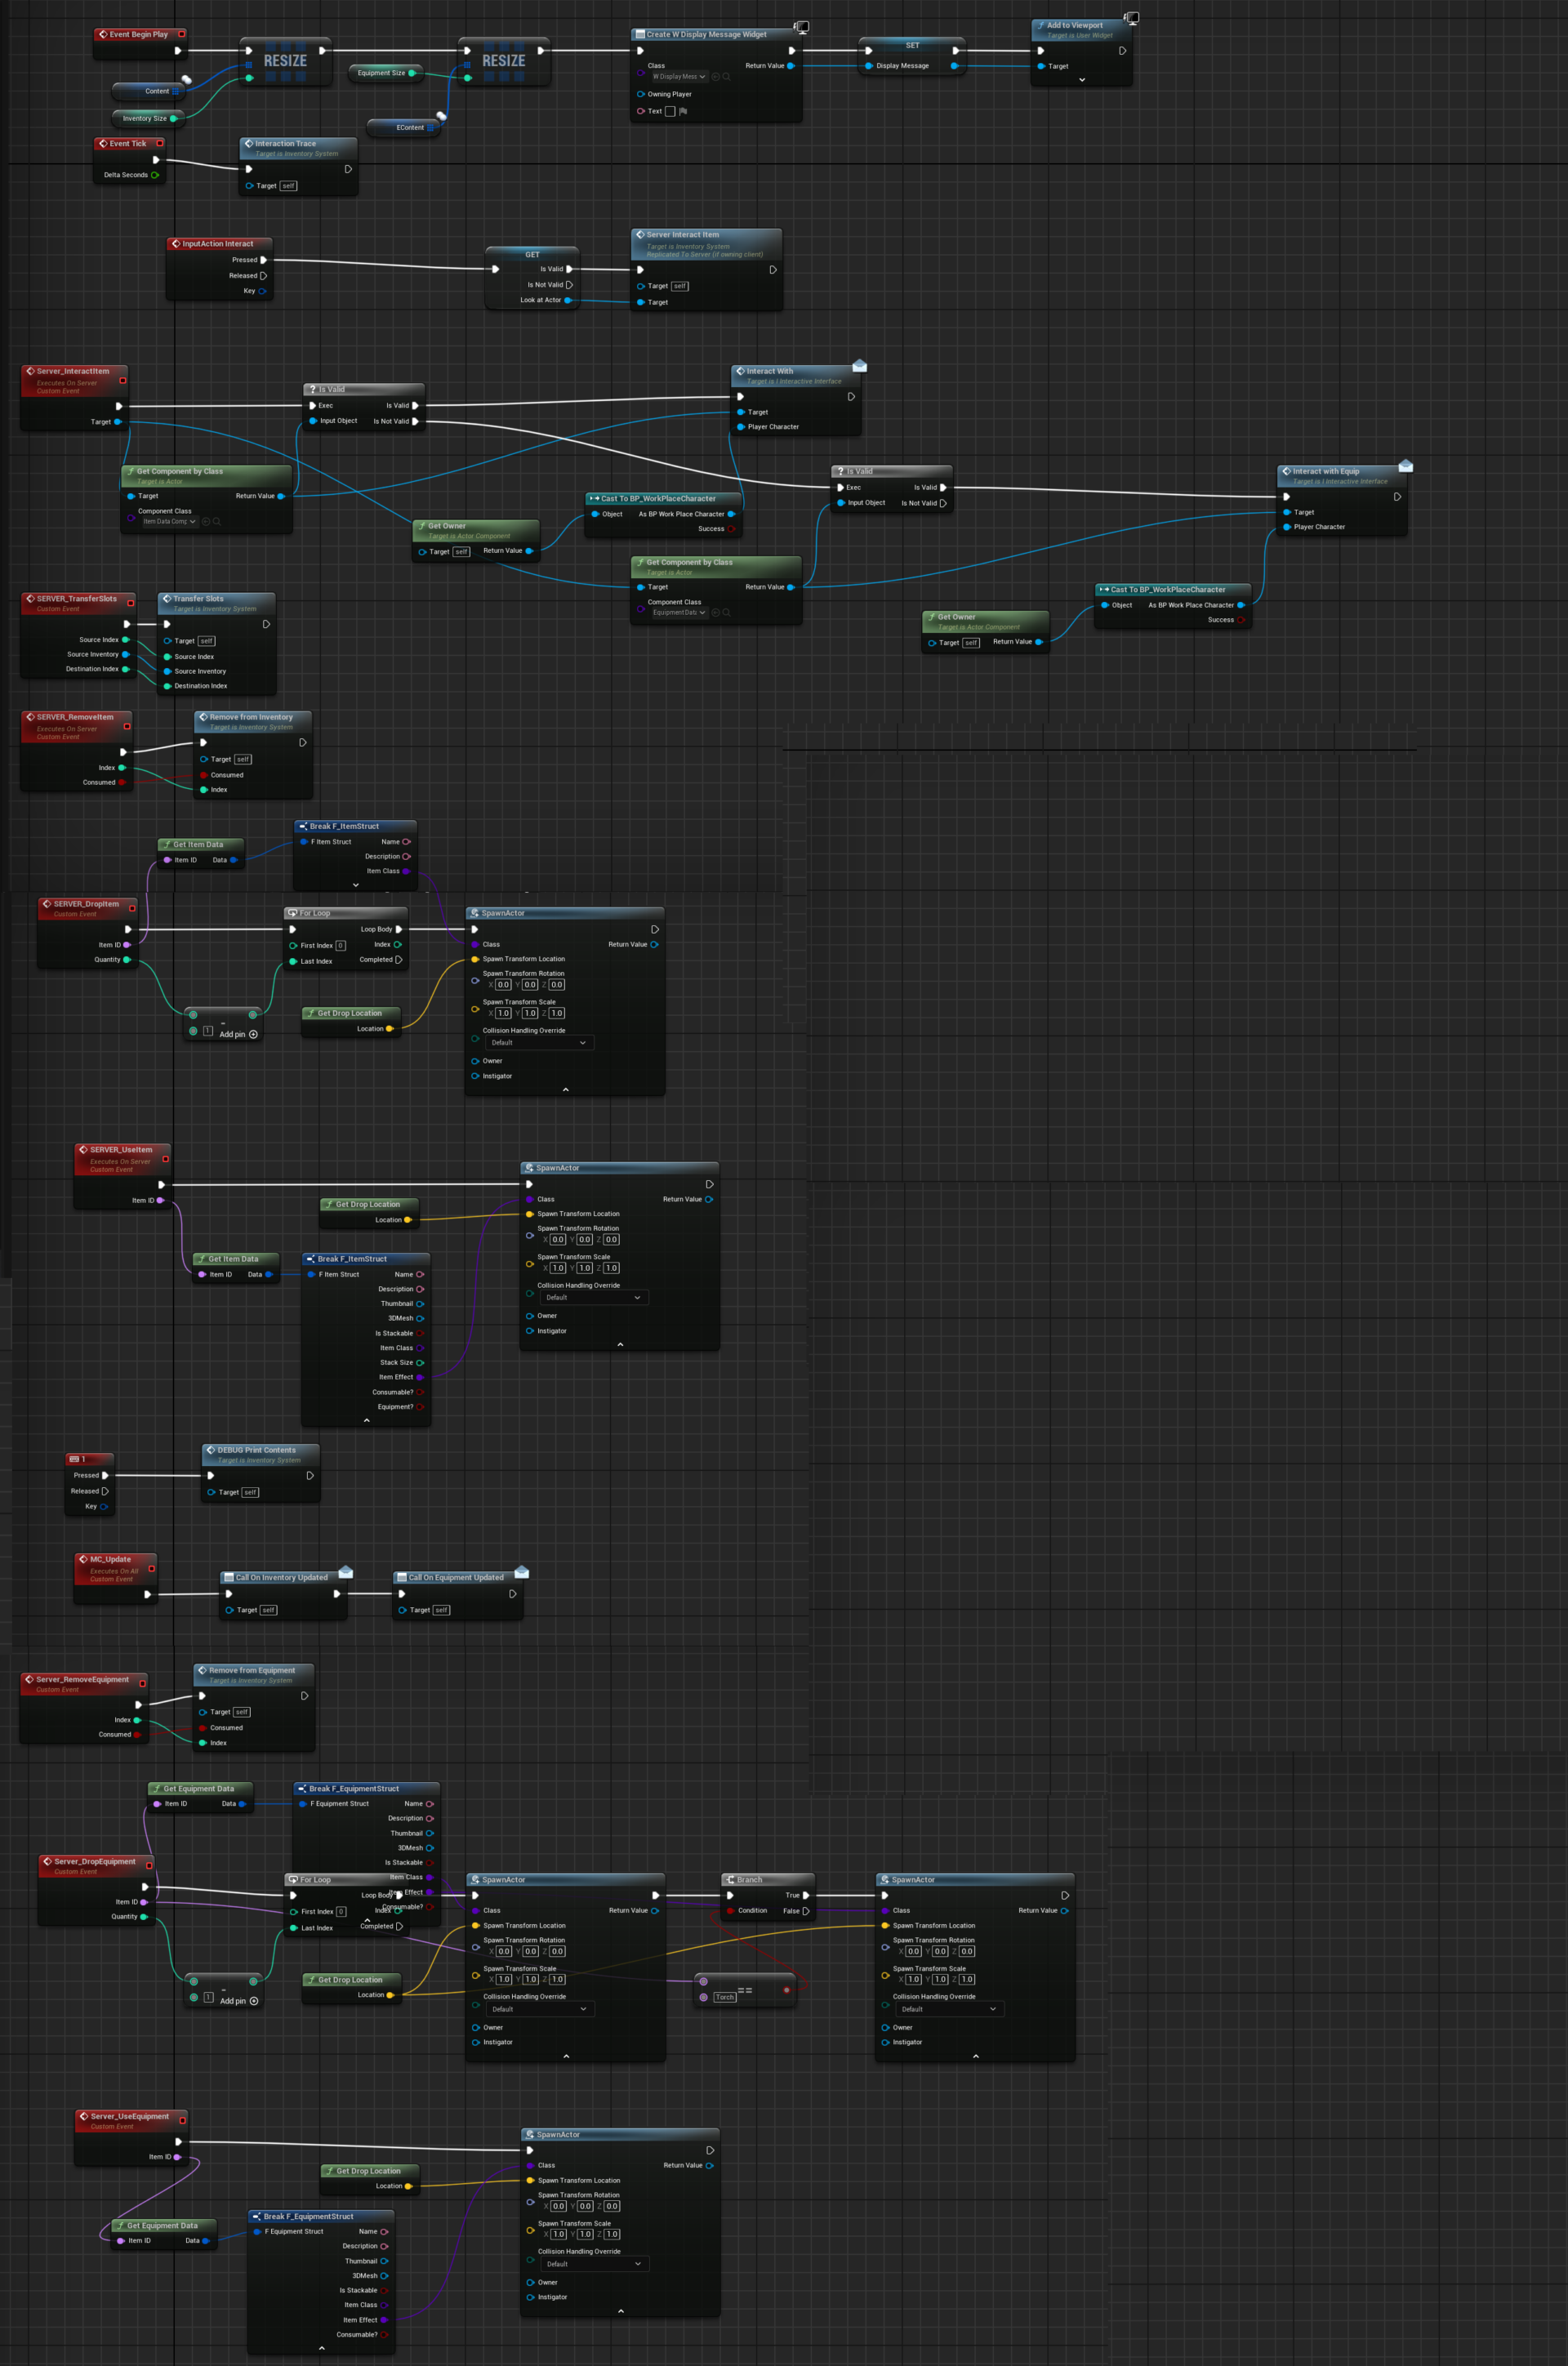
Add to inventory
Remove from inventory
Find slot
Empty Slot Check
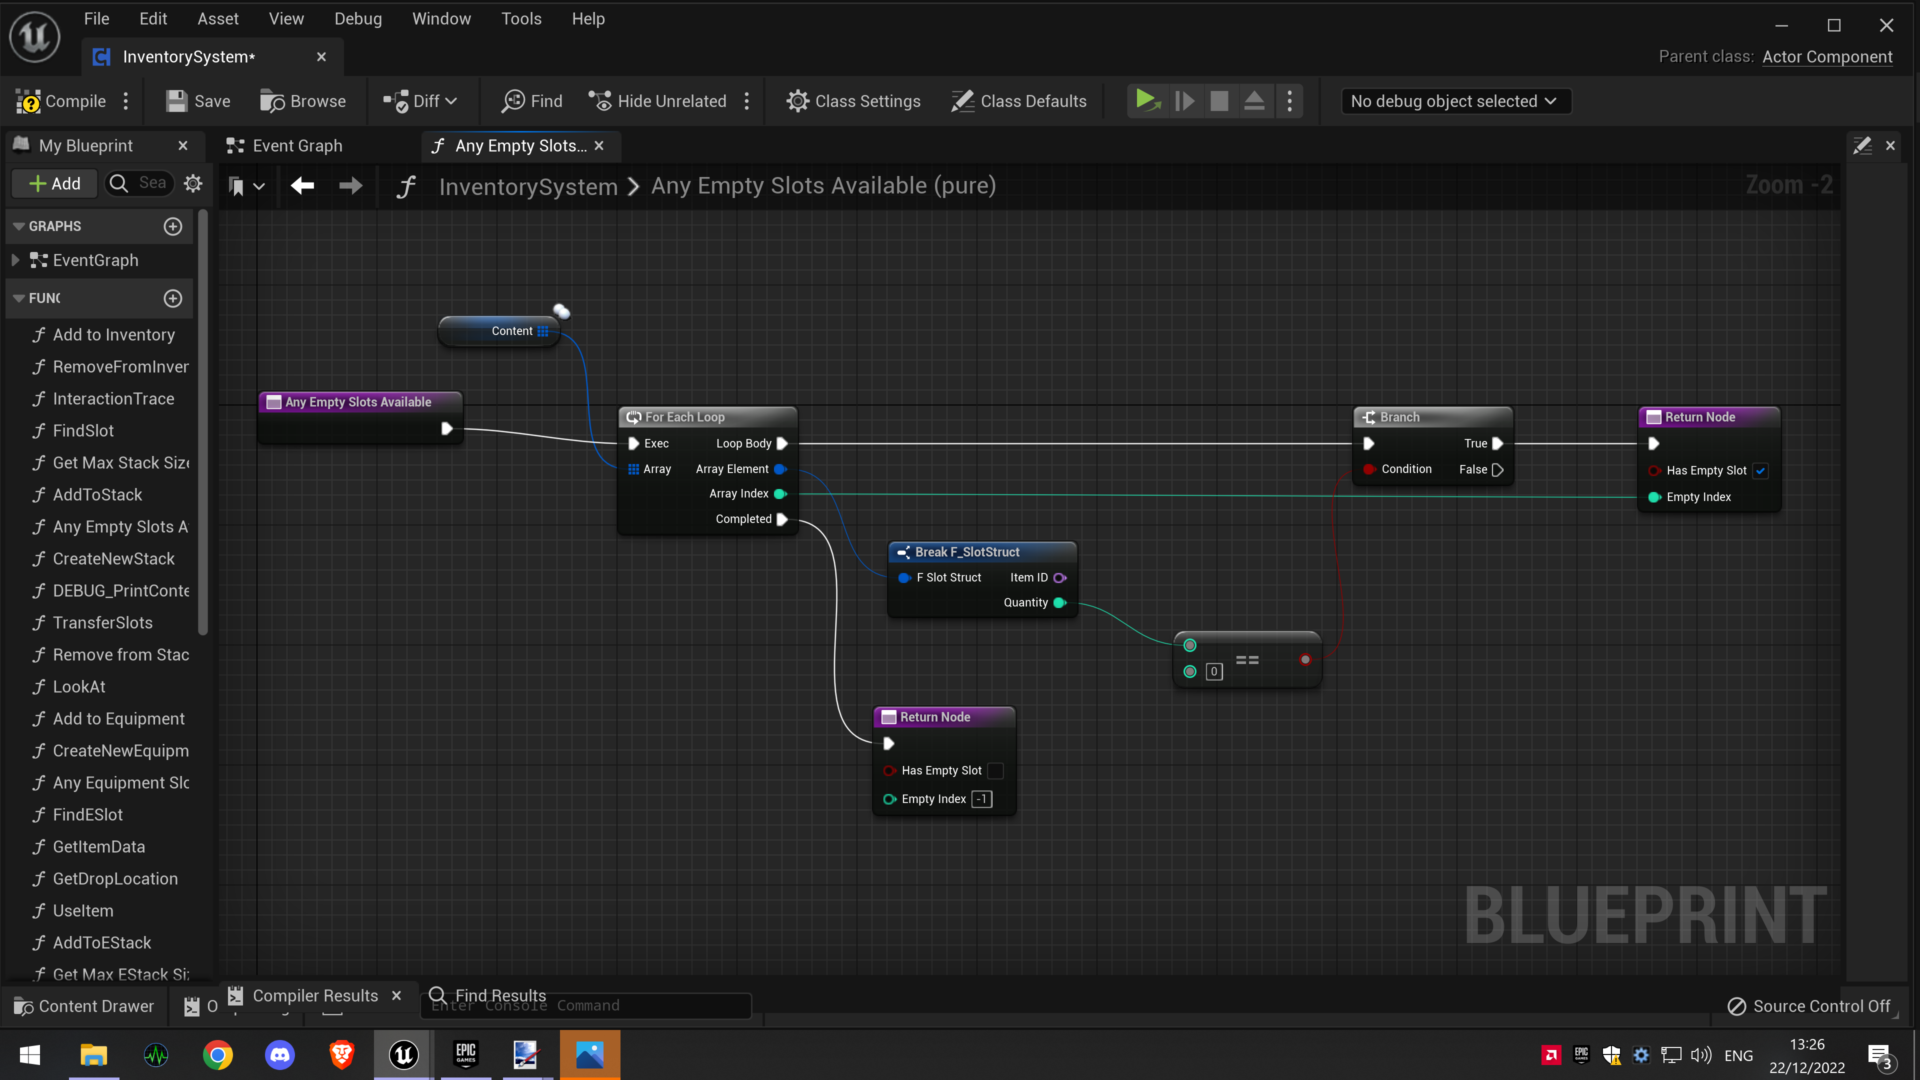
Transfer slots
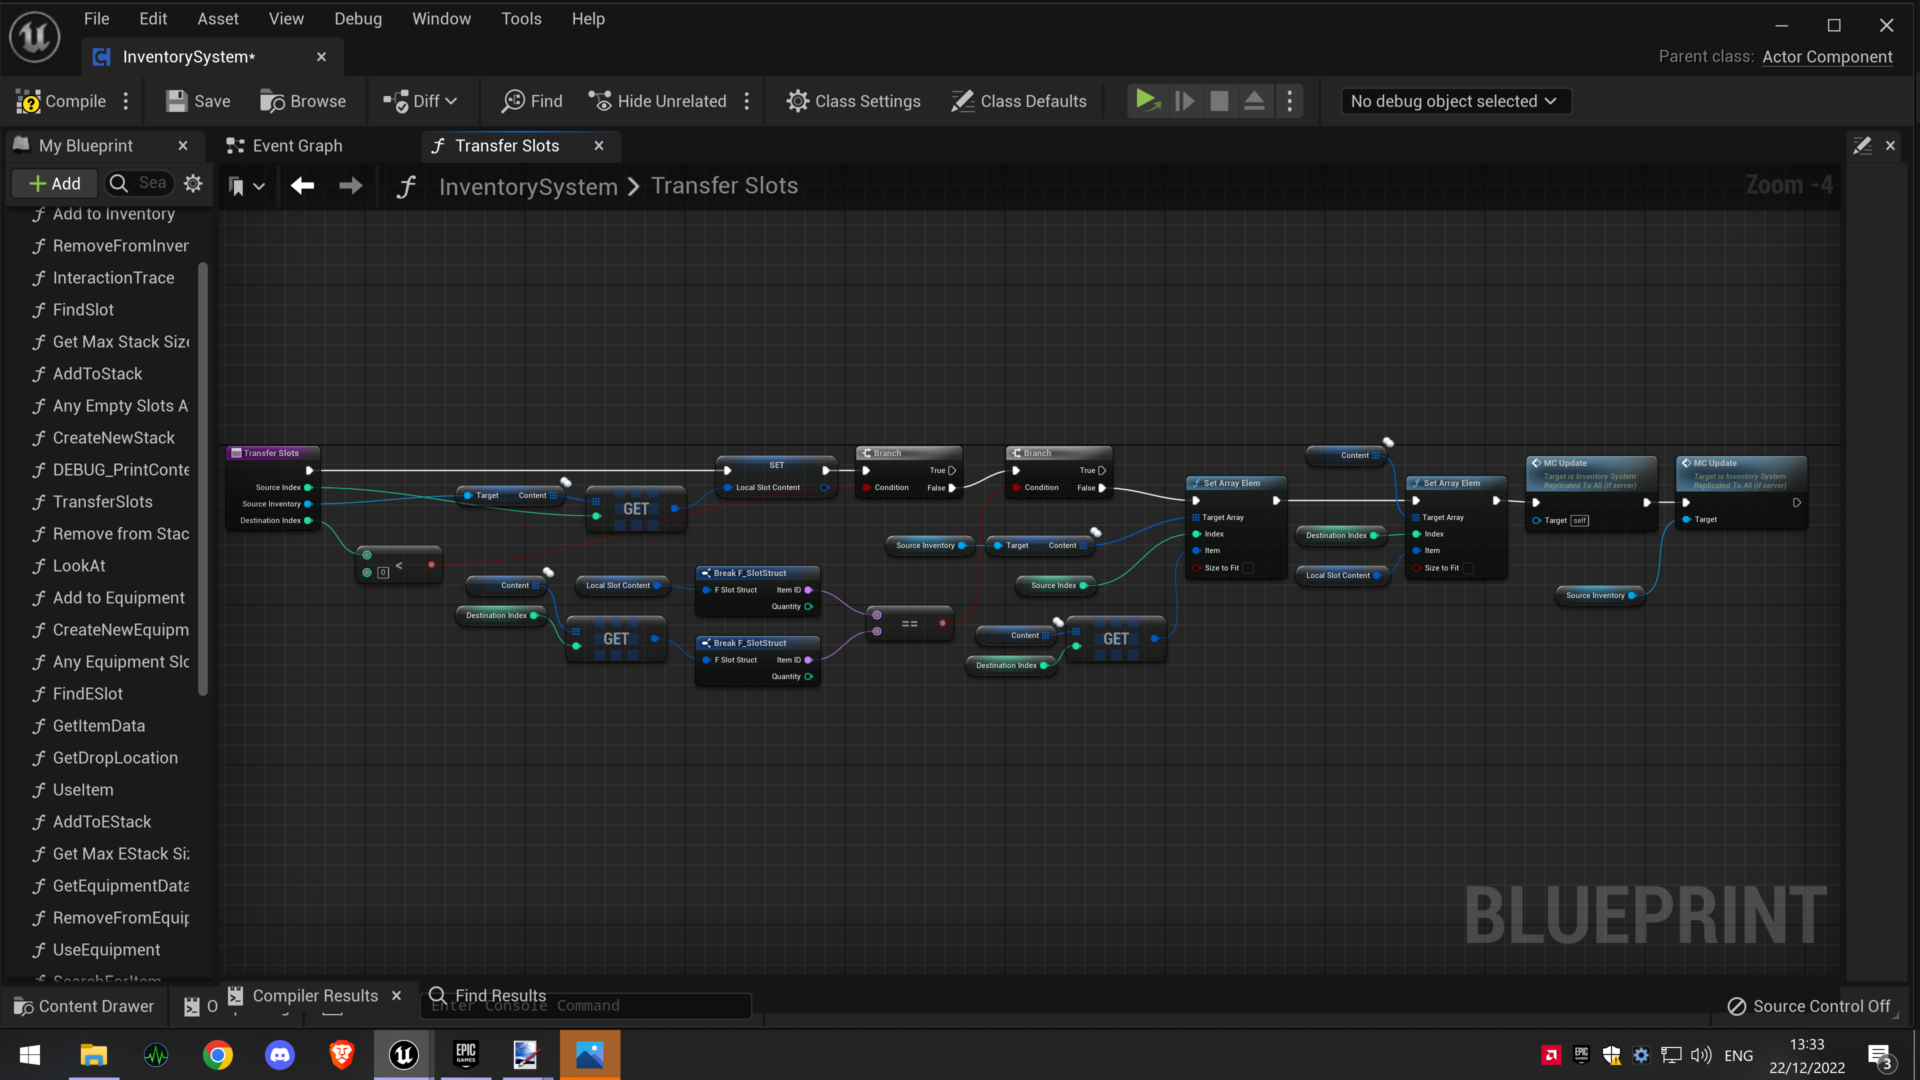
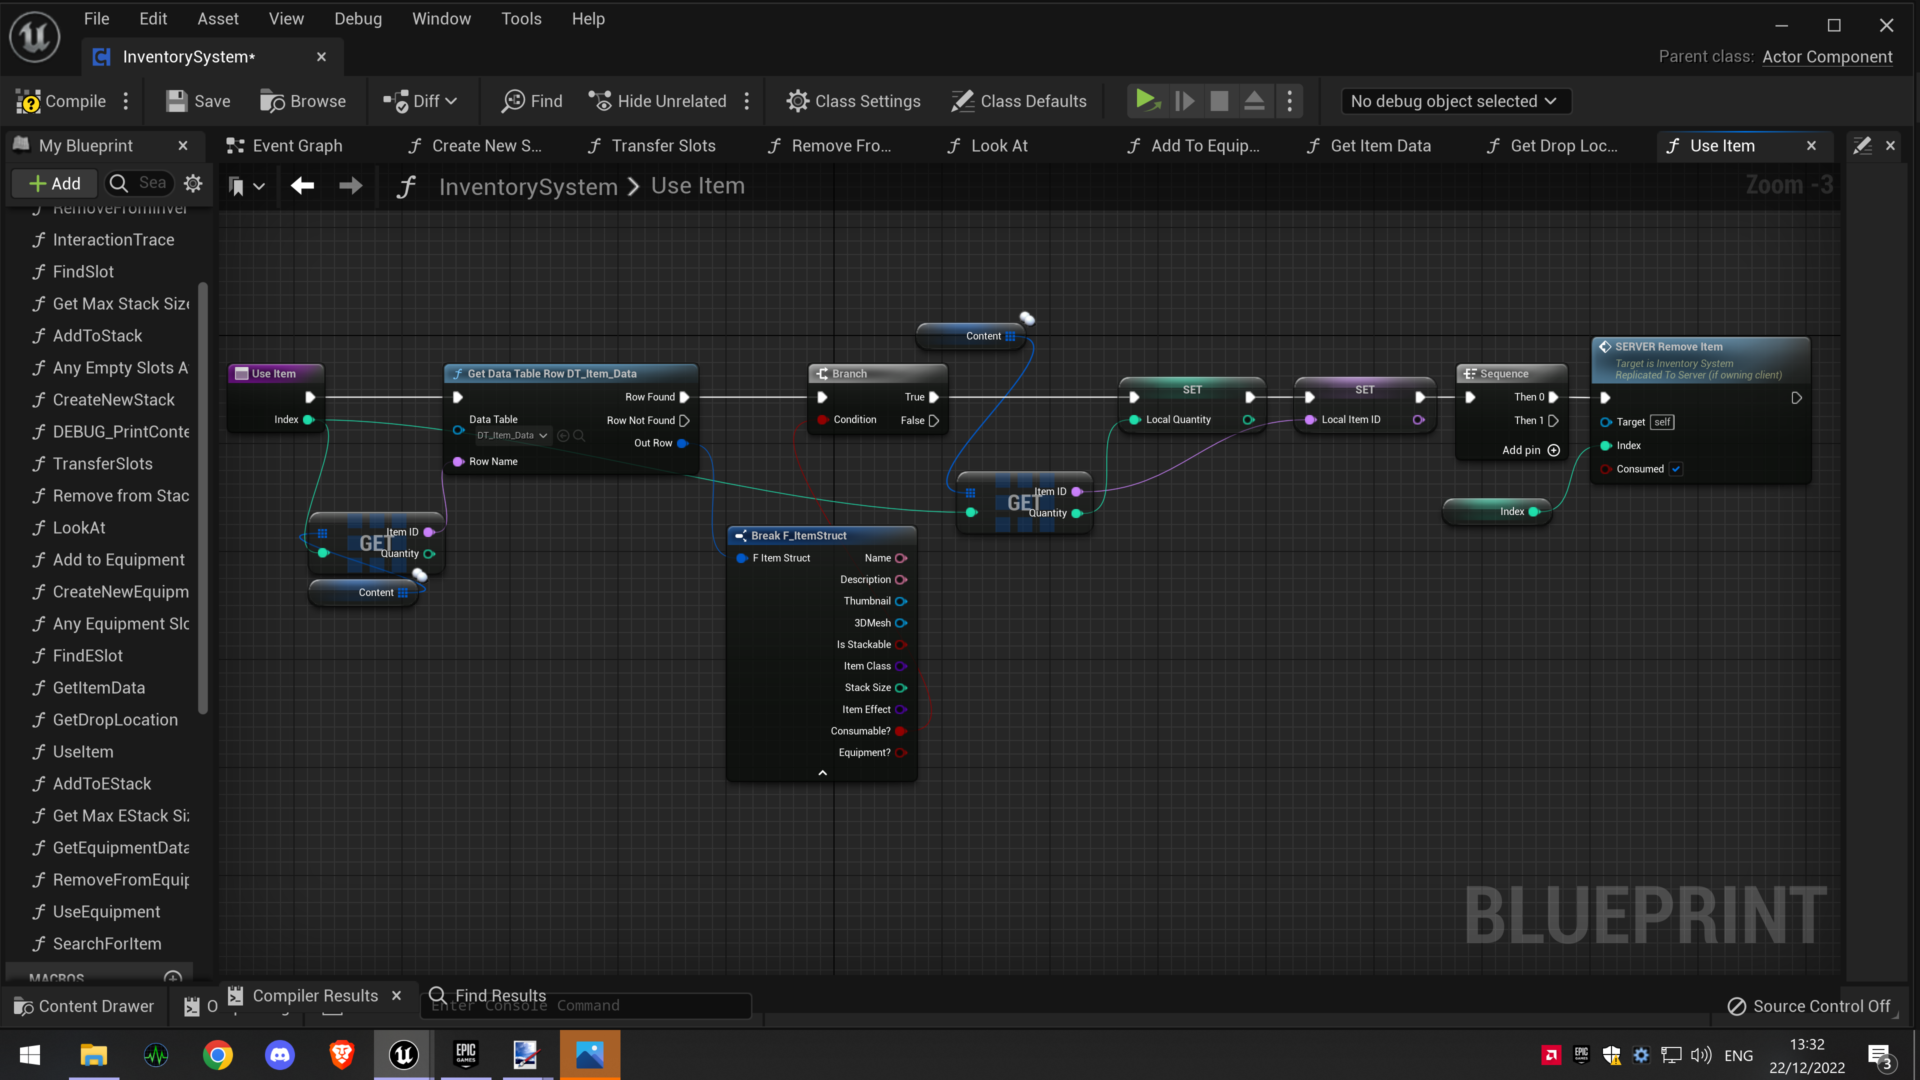
Use item
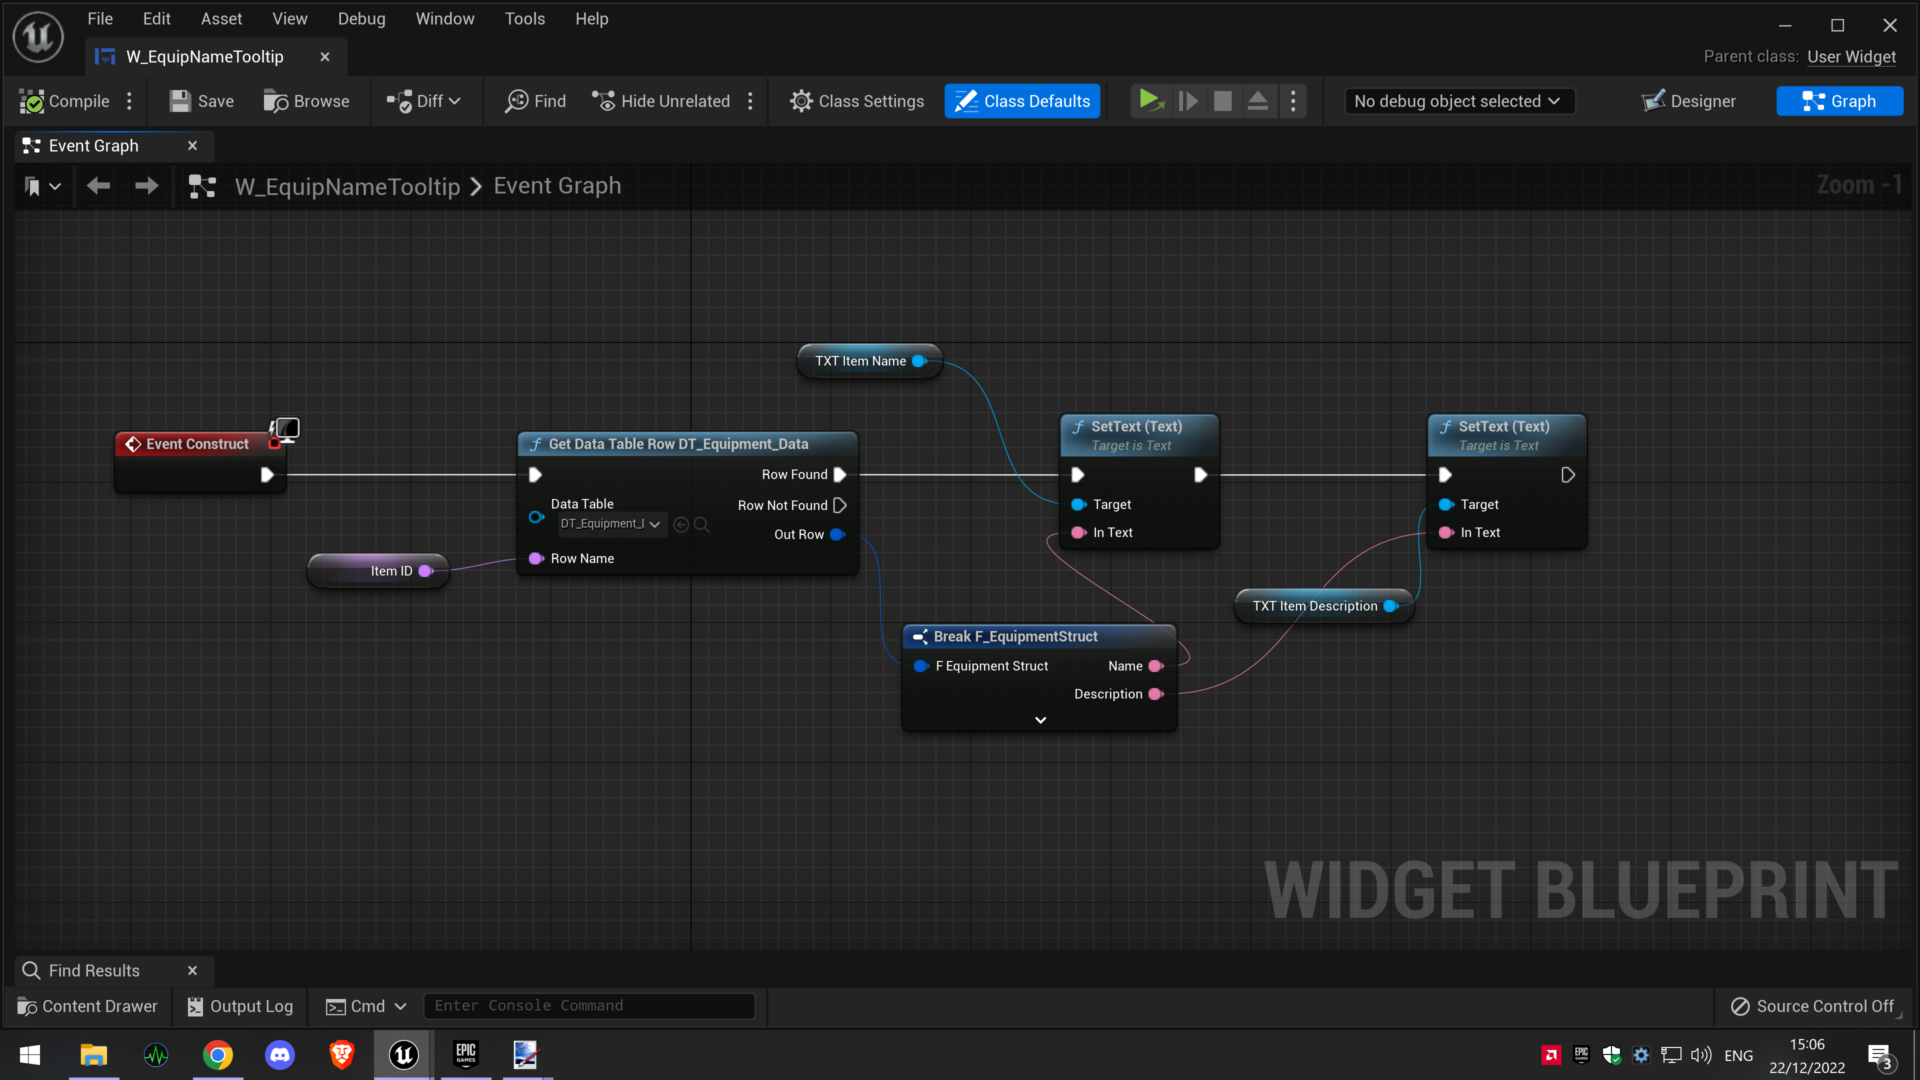
Show item tooltip
Search for item
Remove from stack
Item look at trigger
Add to stack
Create new item stack
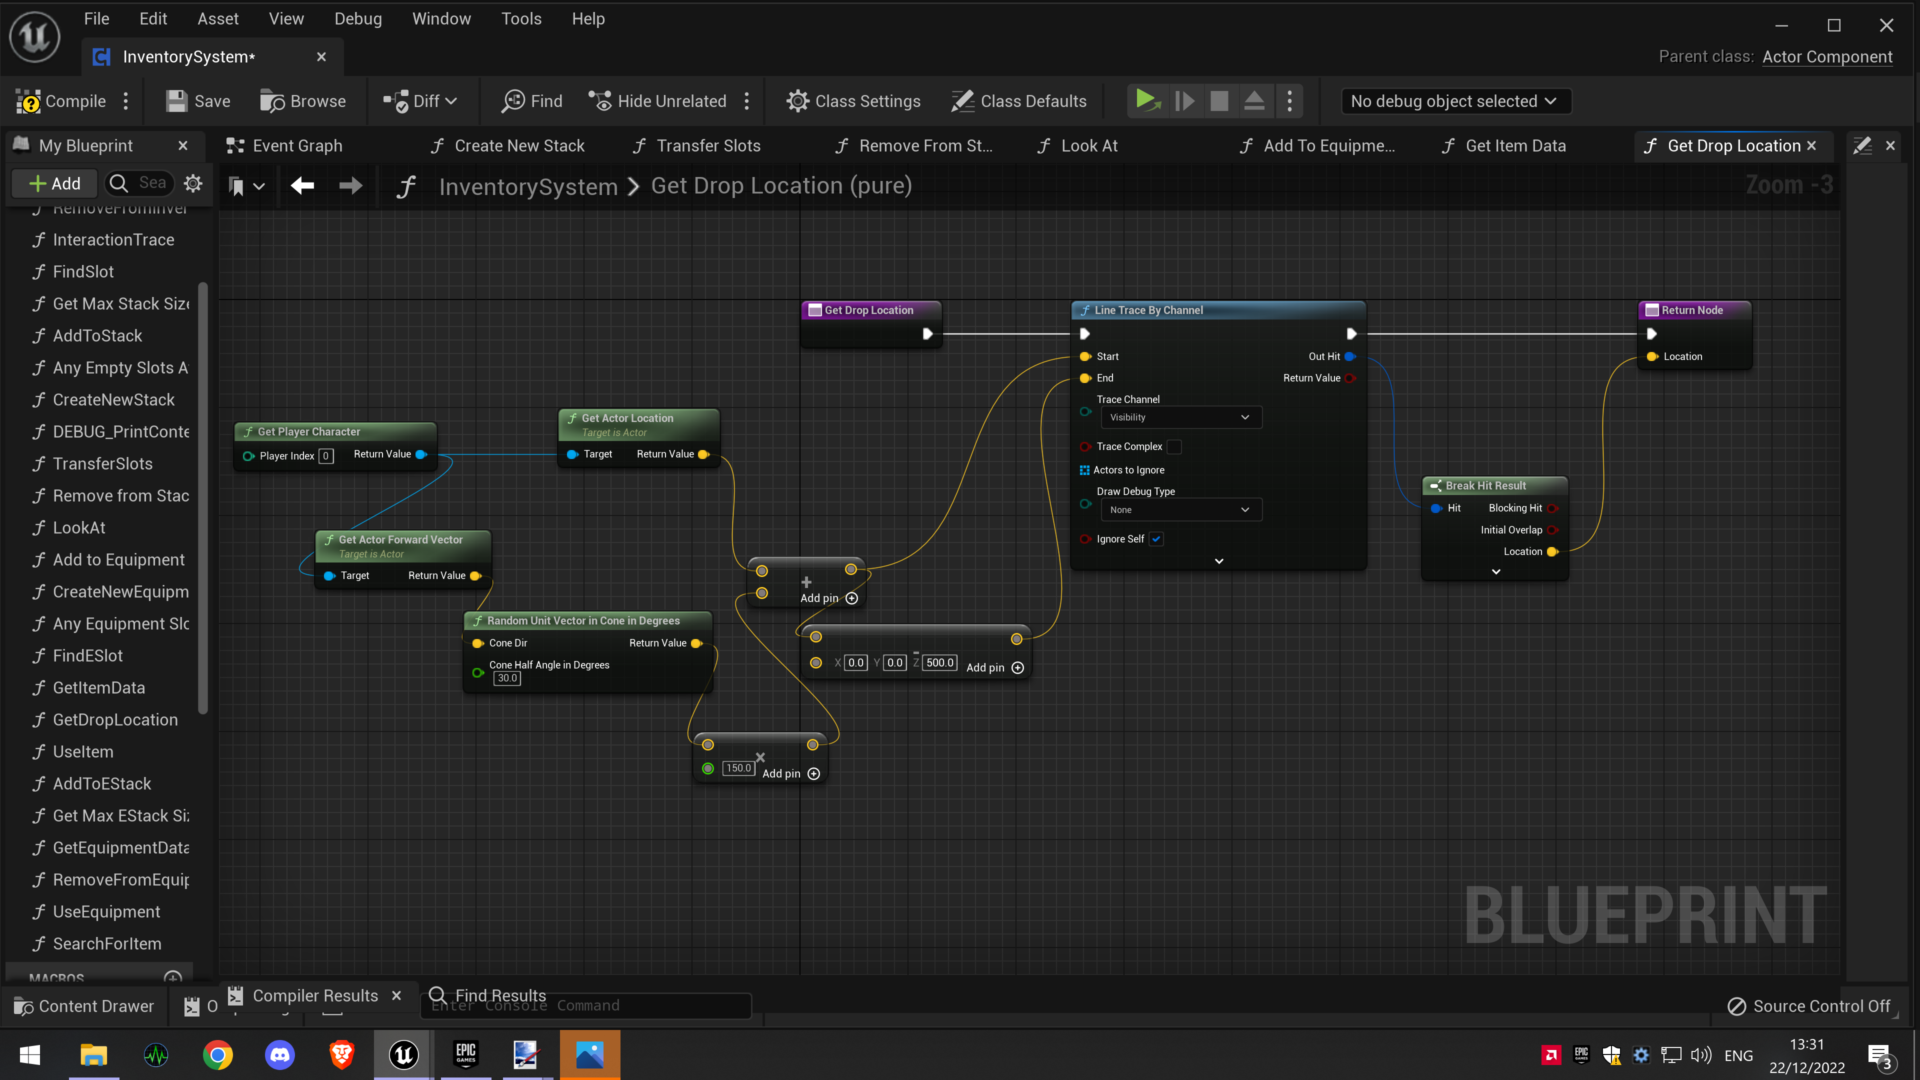
Get Item drop location
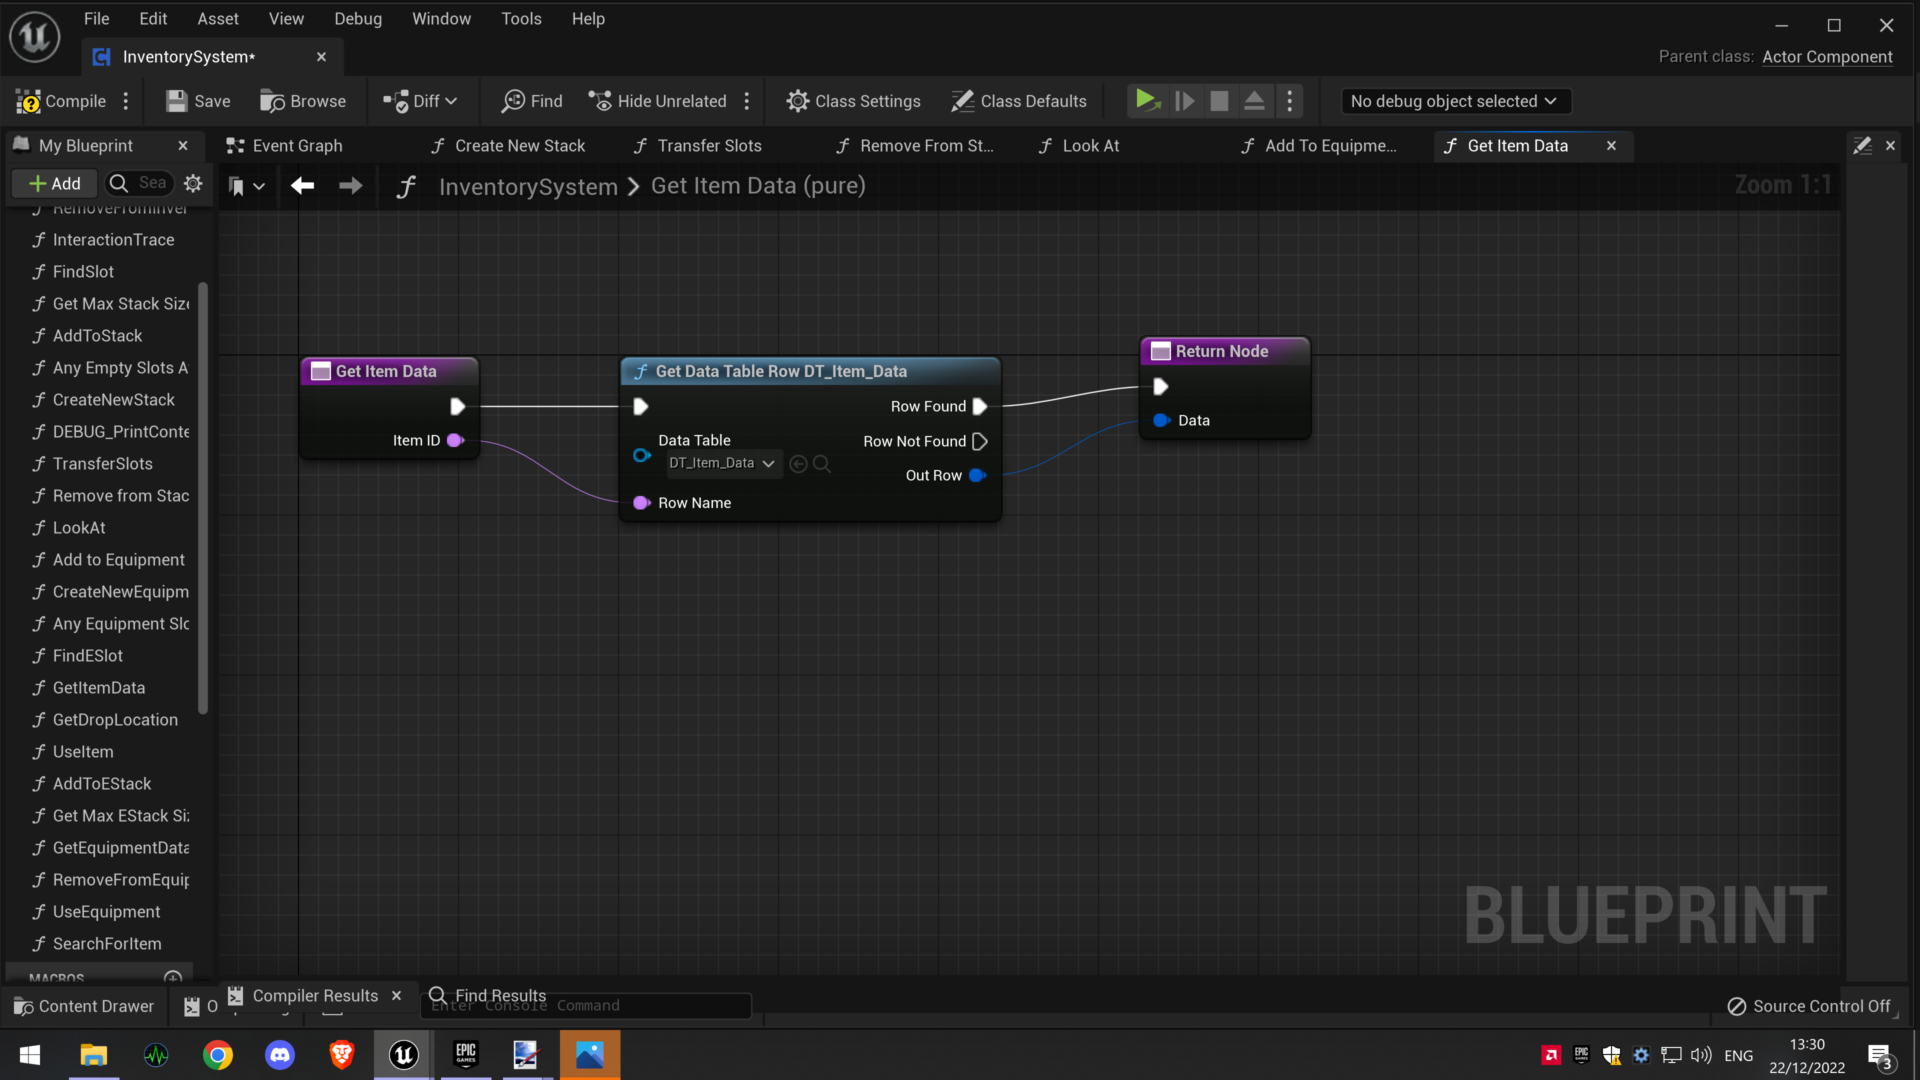
Get item Data
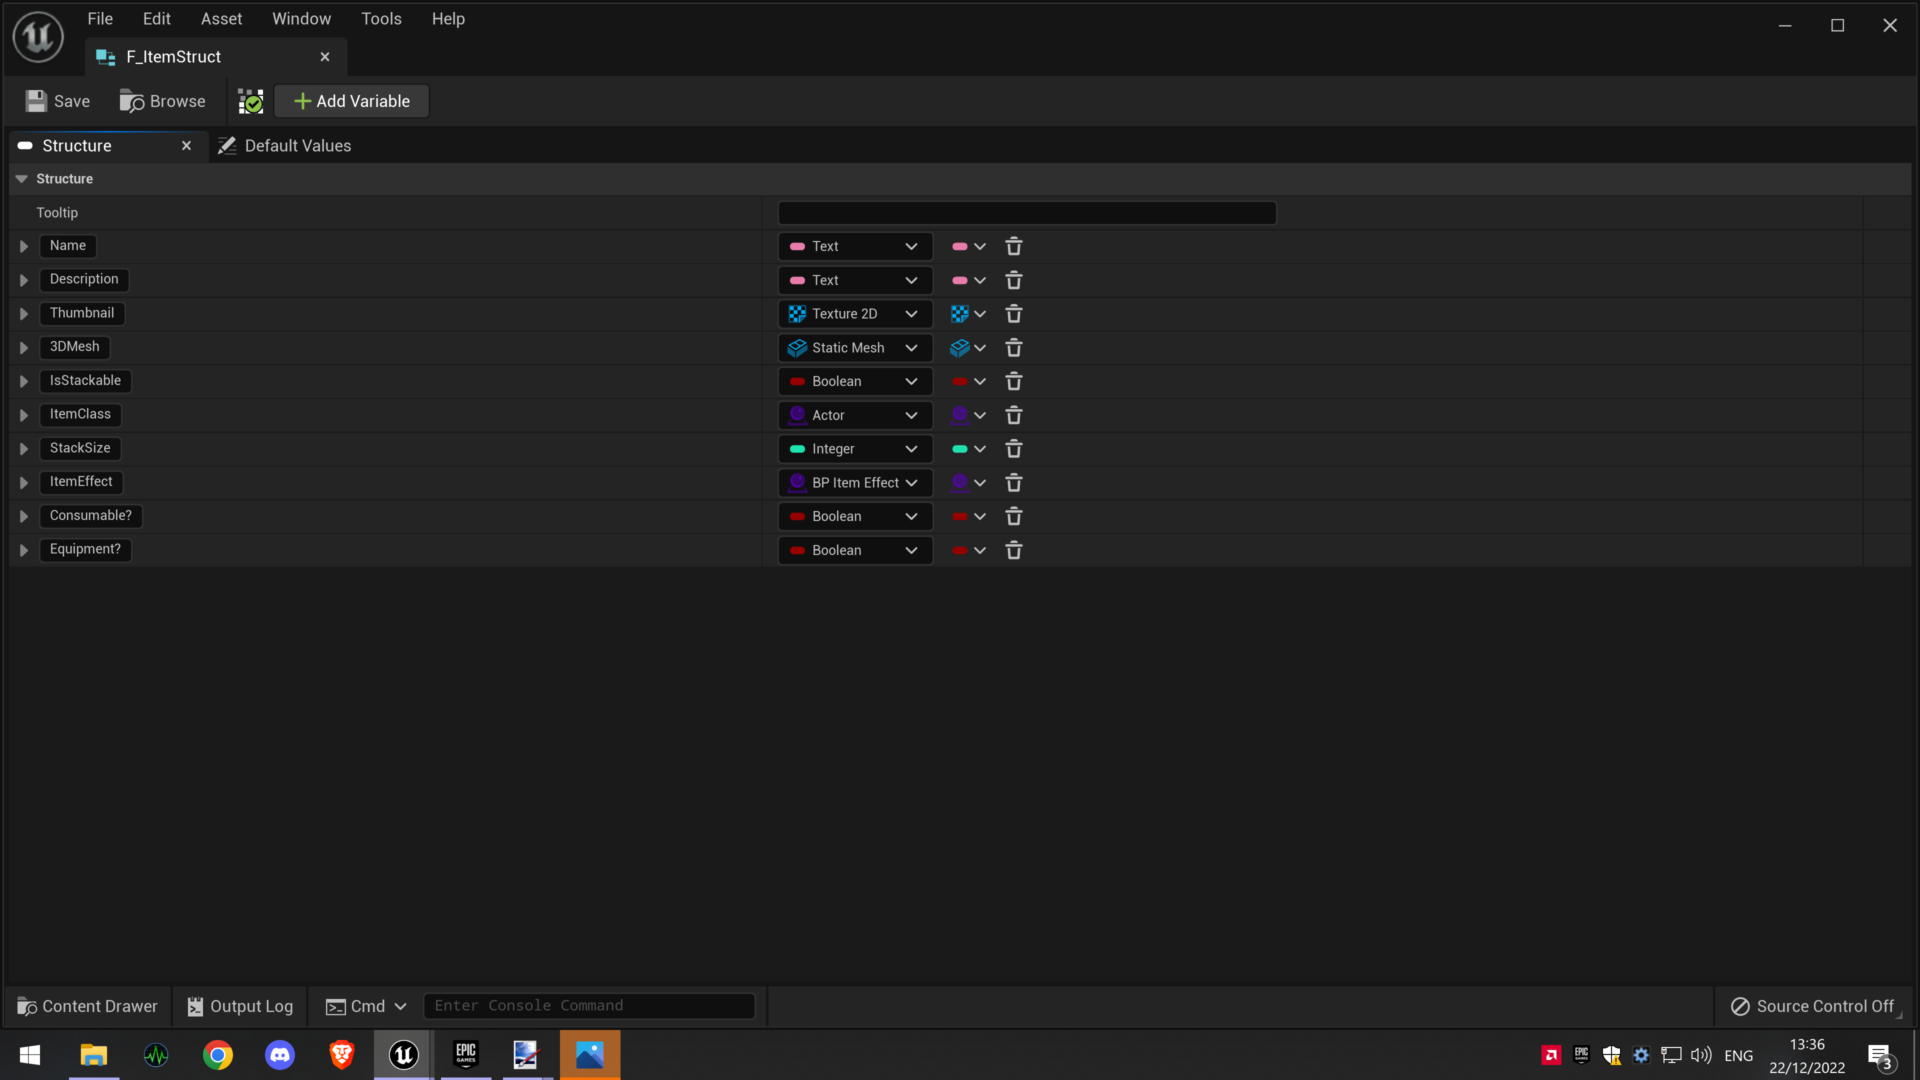
Item Struct
Item Data
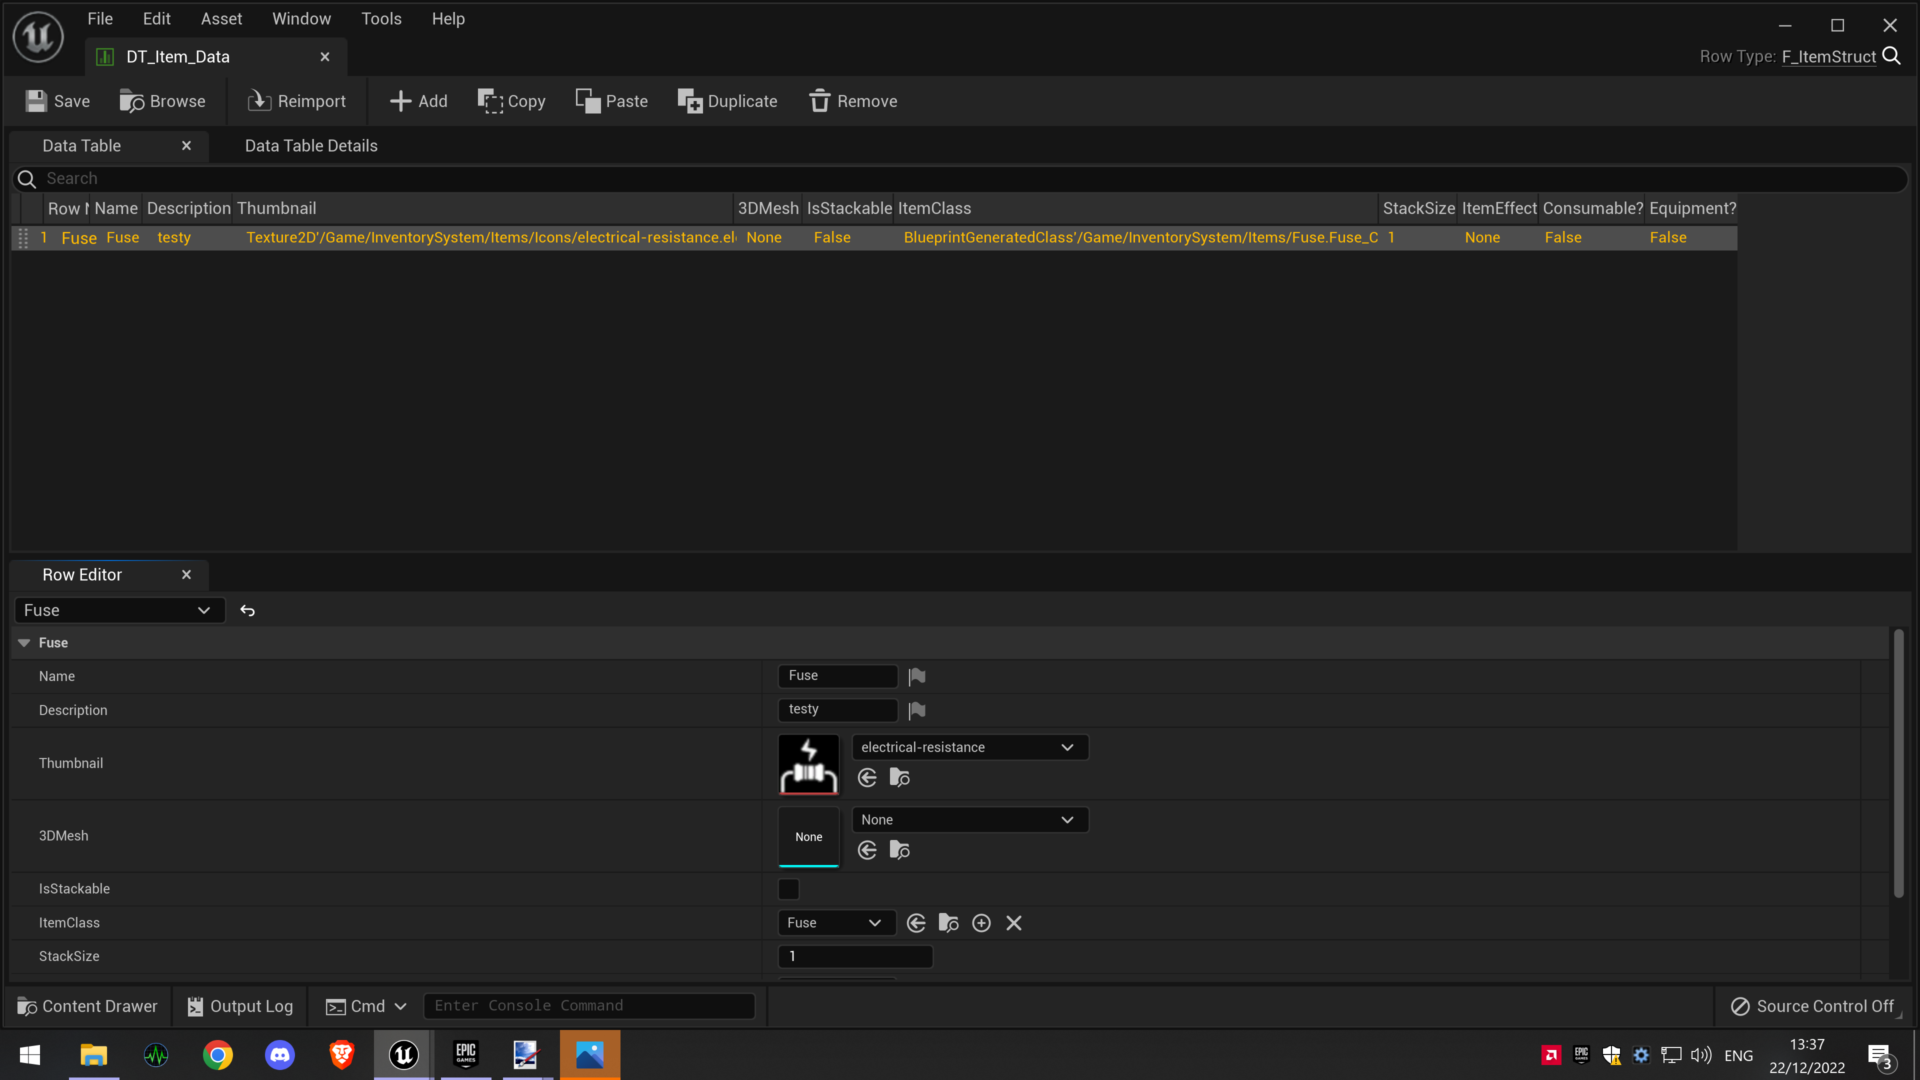
Item Data Component
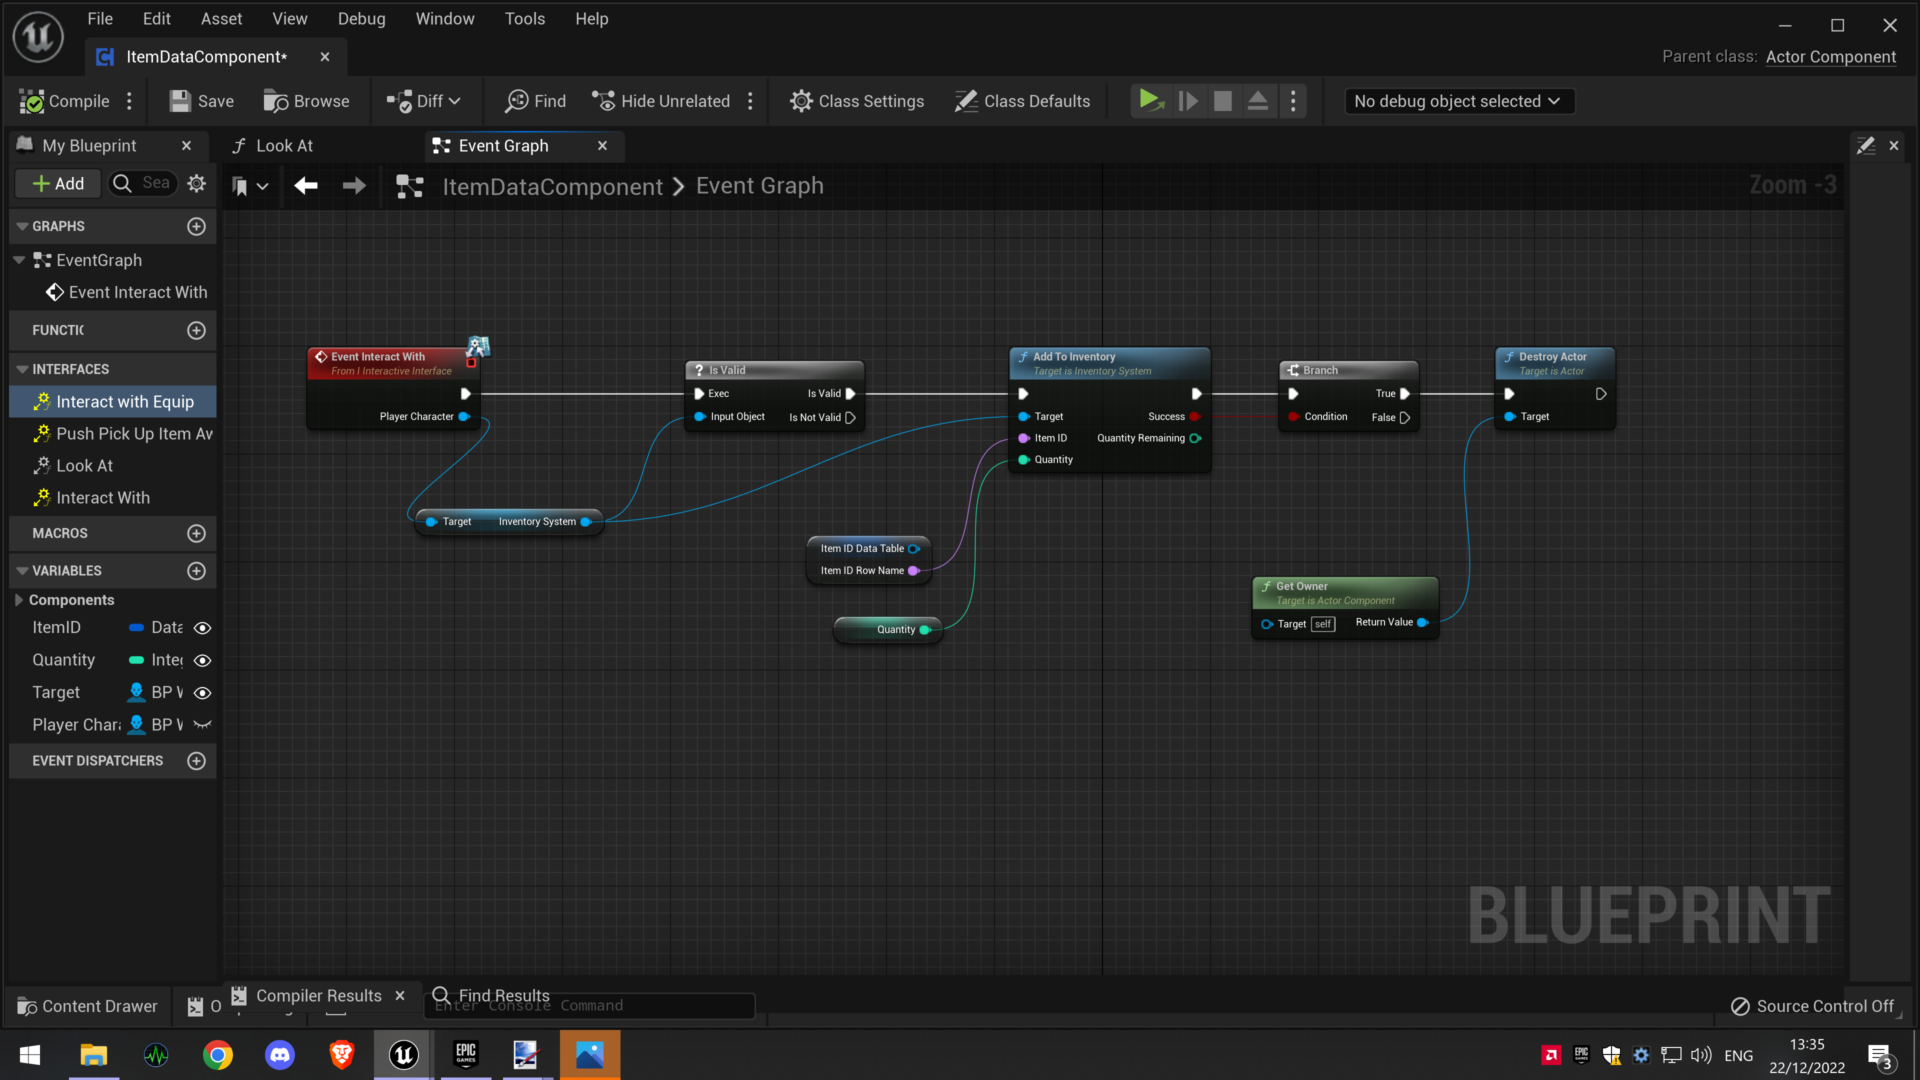
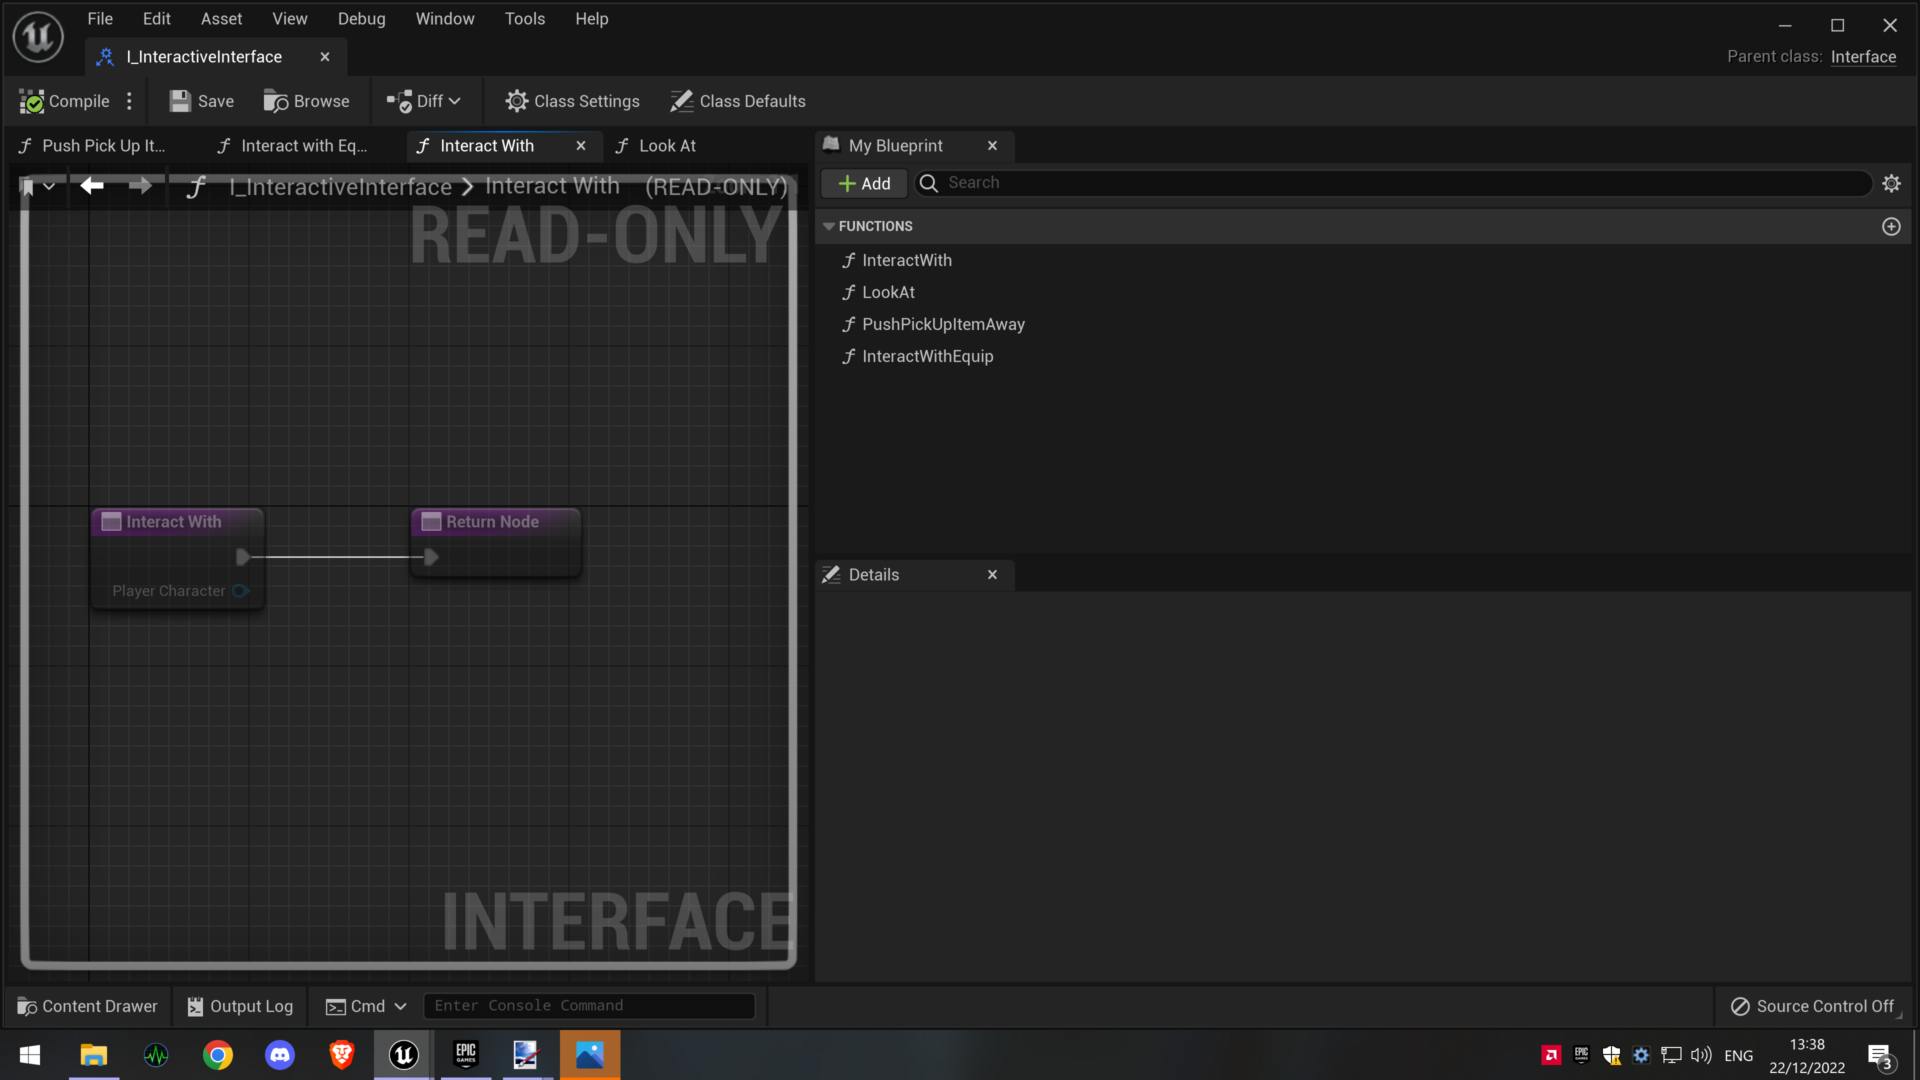
Interactive Interface
Item data config
Interaction Trace
Inventory Menu
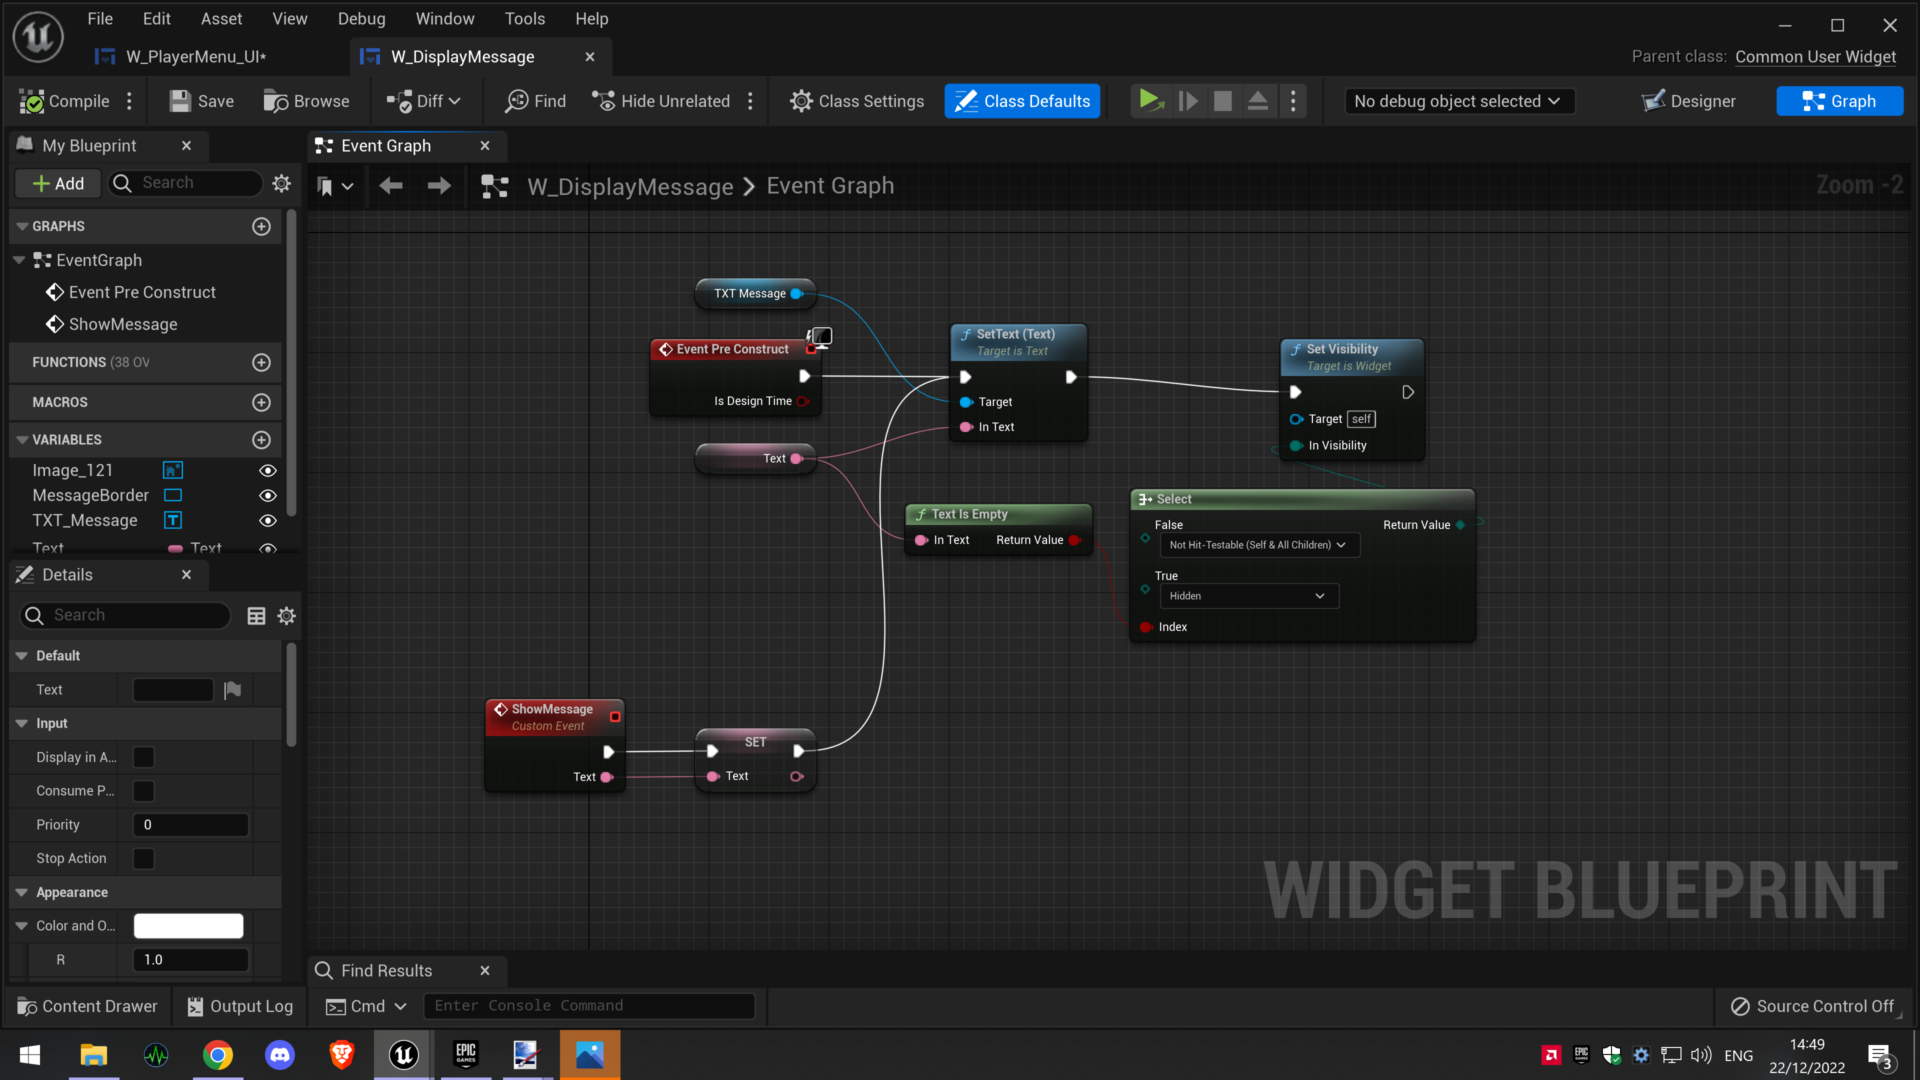
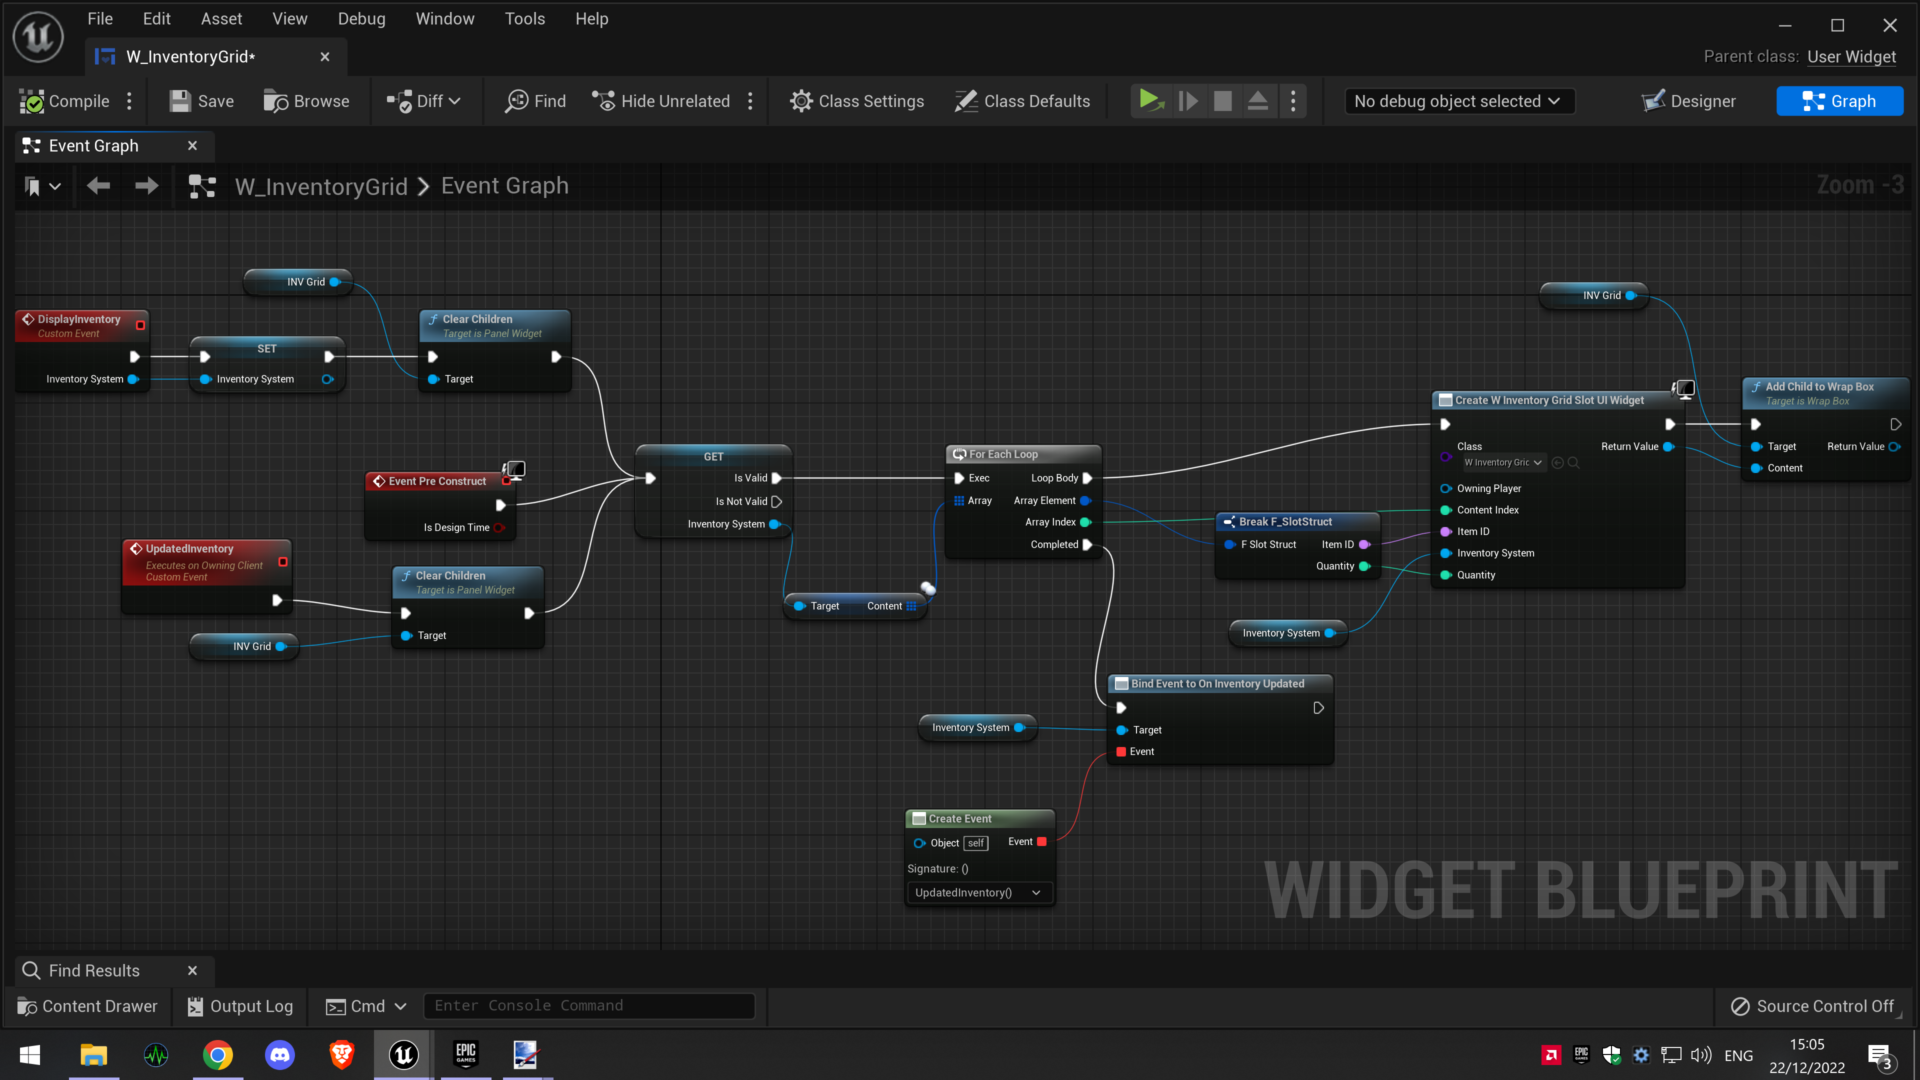
We then needed a way for the inventory contents to be visible and accessible to the player. Like the majority of games, this is done through a menu screen. This is created via Widgets which can be used to display text/videos/images etc to the player, they can also hold Blueprint code for the purpose of navigation and other effects, like opening sub menus or activating other blueprints when triggered.
The Inventory menu will let the player navigate through the different inventory slots using the Controller, the player will be able to press the X button on their controller whilst an item is selected to bring up a sub menu, this gives the player a choice to either drop the item or use the item if it has a use effect (Going forwards, I would like to make this menu not display the ‘use’ function if the item has no use effect just to avoid unneeded clutter).
If the player drops the item, the item is removed from the inventory and is spawned into the world at the players feet in a random location in a small cone which adheres to boundaries to avoid spawning items outside the level or clipped into objects. If the player selects the ‘use’ button, if the item has no use effect attached to it, nothing will happen, if however there is a use effect attached, the item will be removed from the inventory and the use effect will be triggered.
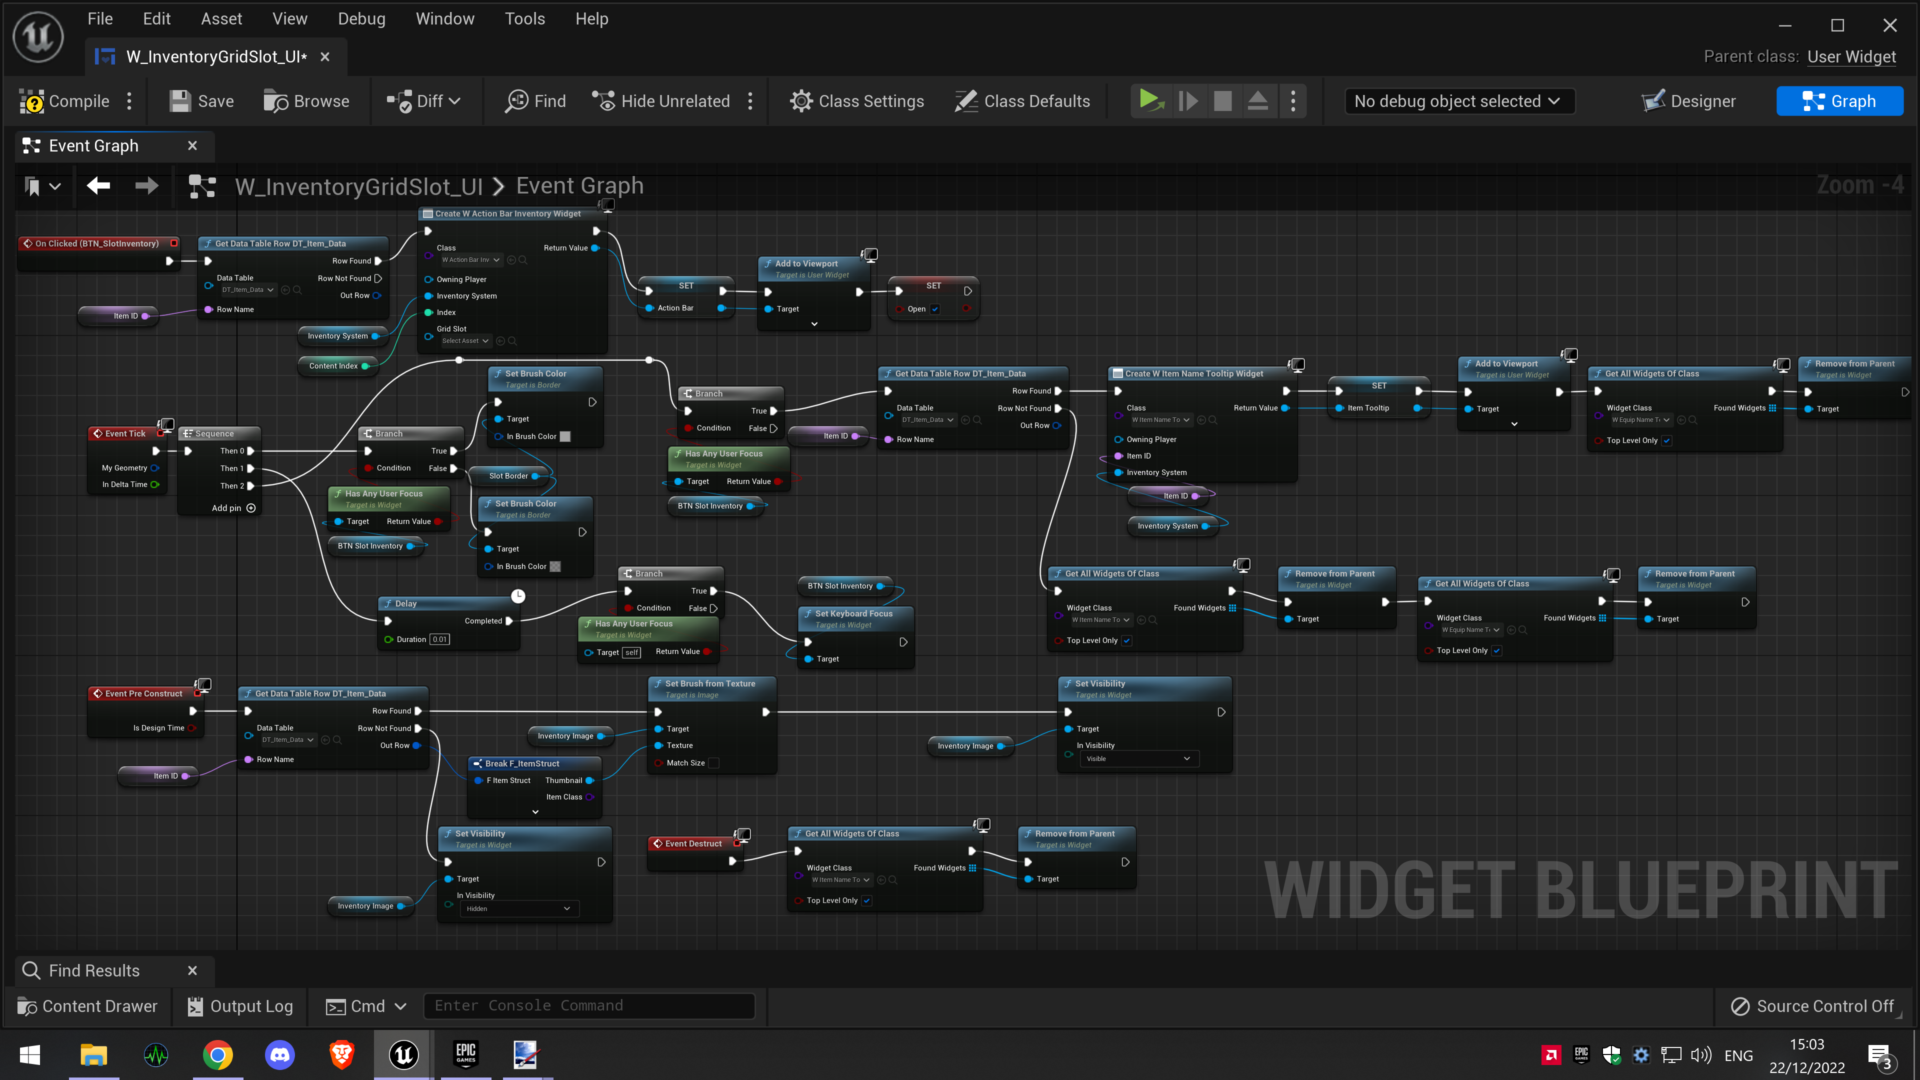
I have included screenshots of the Inventory menu blueprints below.
To cut down on the amount of screenshots, I have only included the inventory side of the widgets/blueprints as the equipment blueprints are nearly identical.
Inventory Grid Slot BP
inventory sub menu
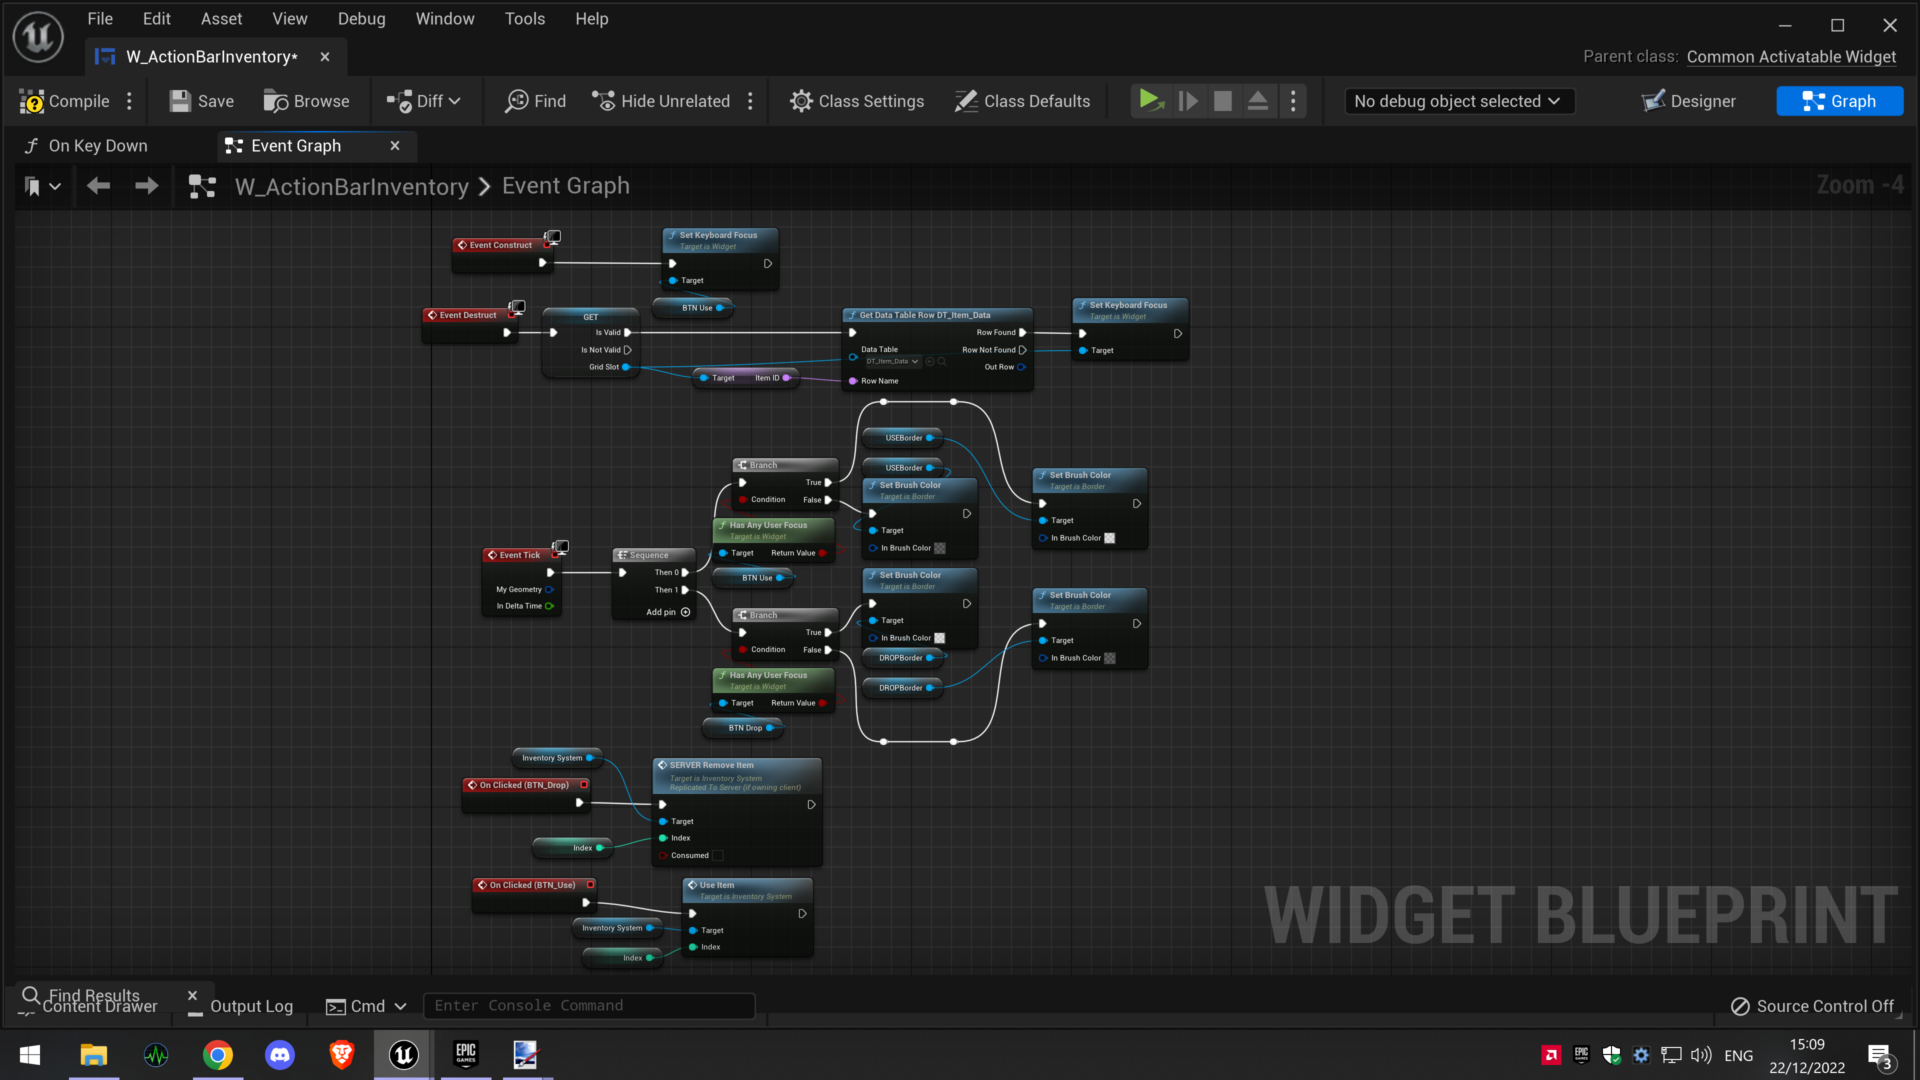
Open Inventory sub menu
Inventory Tooltip
Inventory Update
Menu
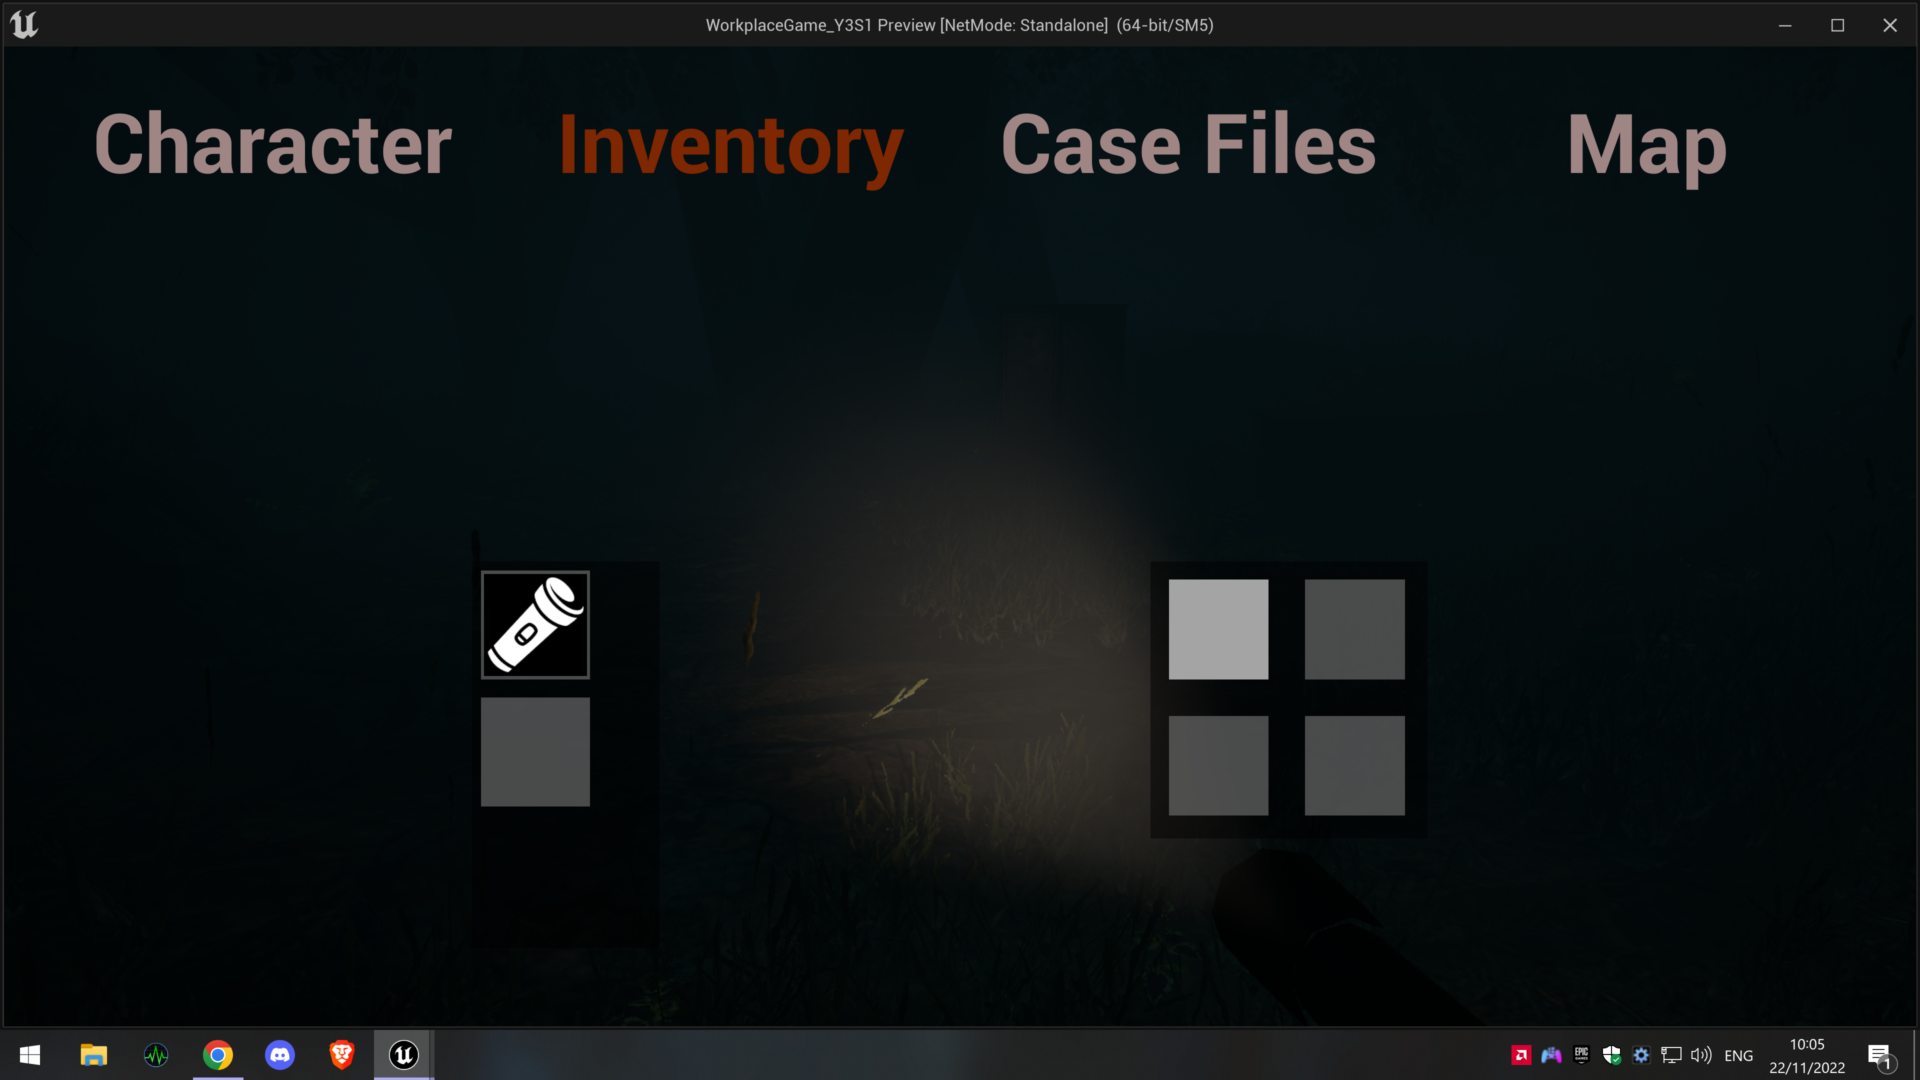
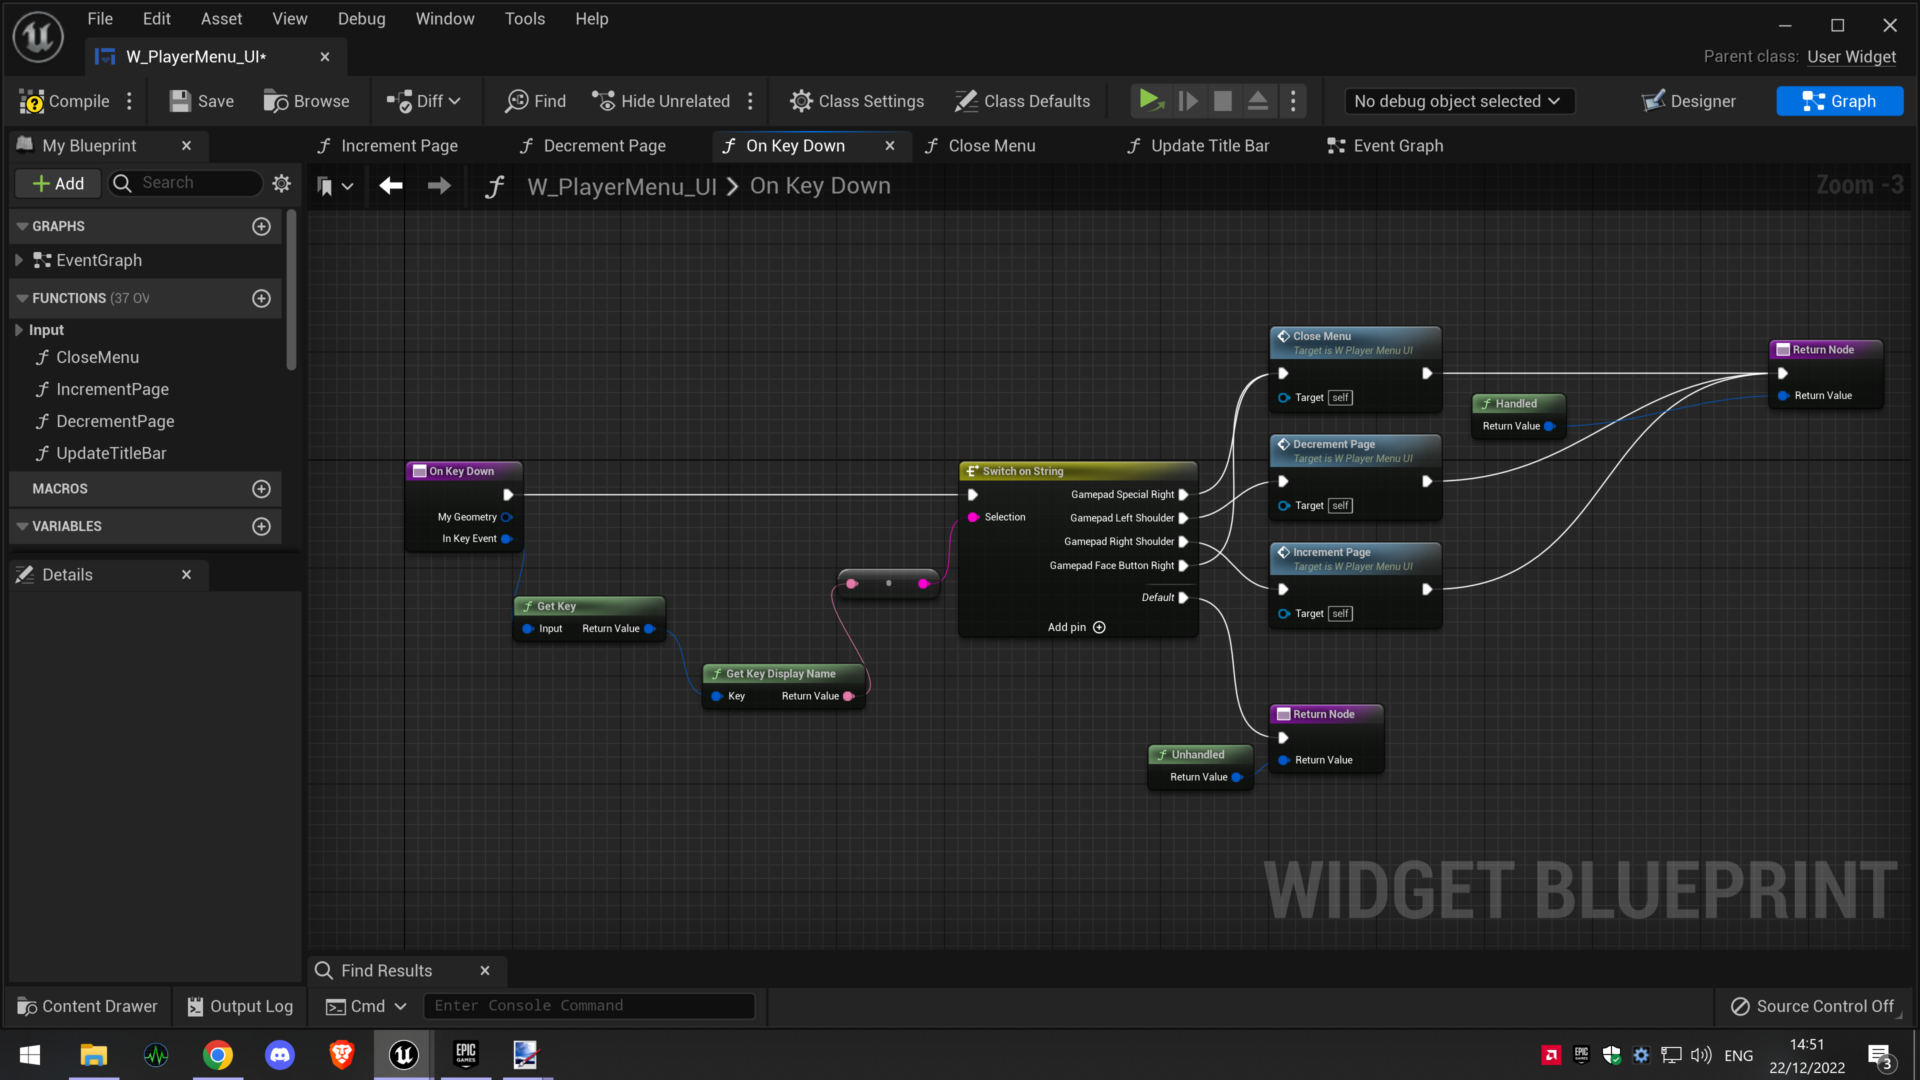
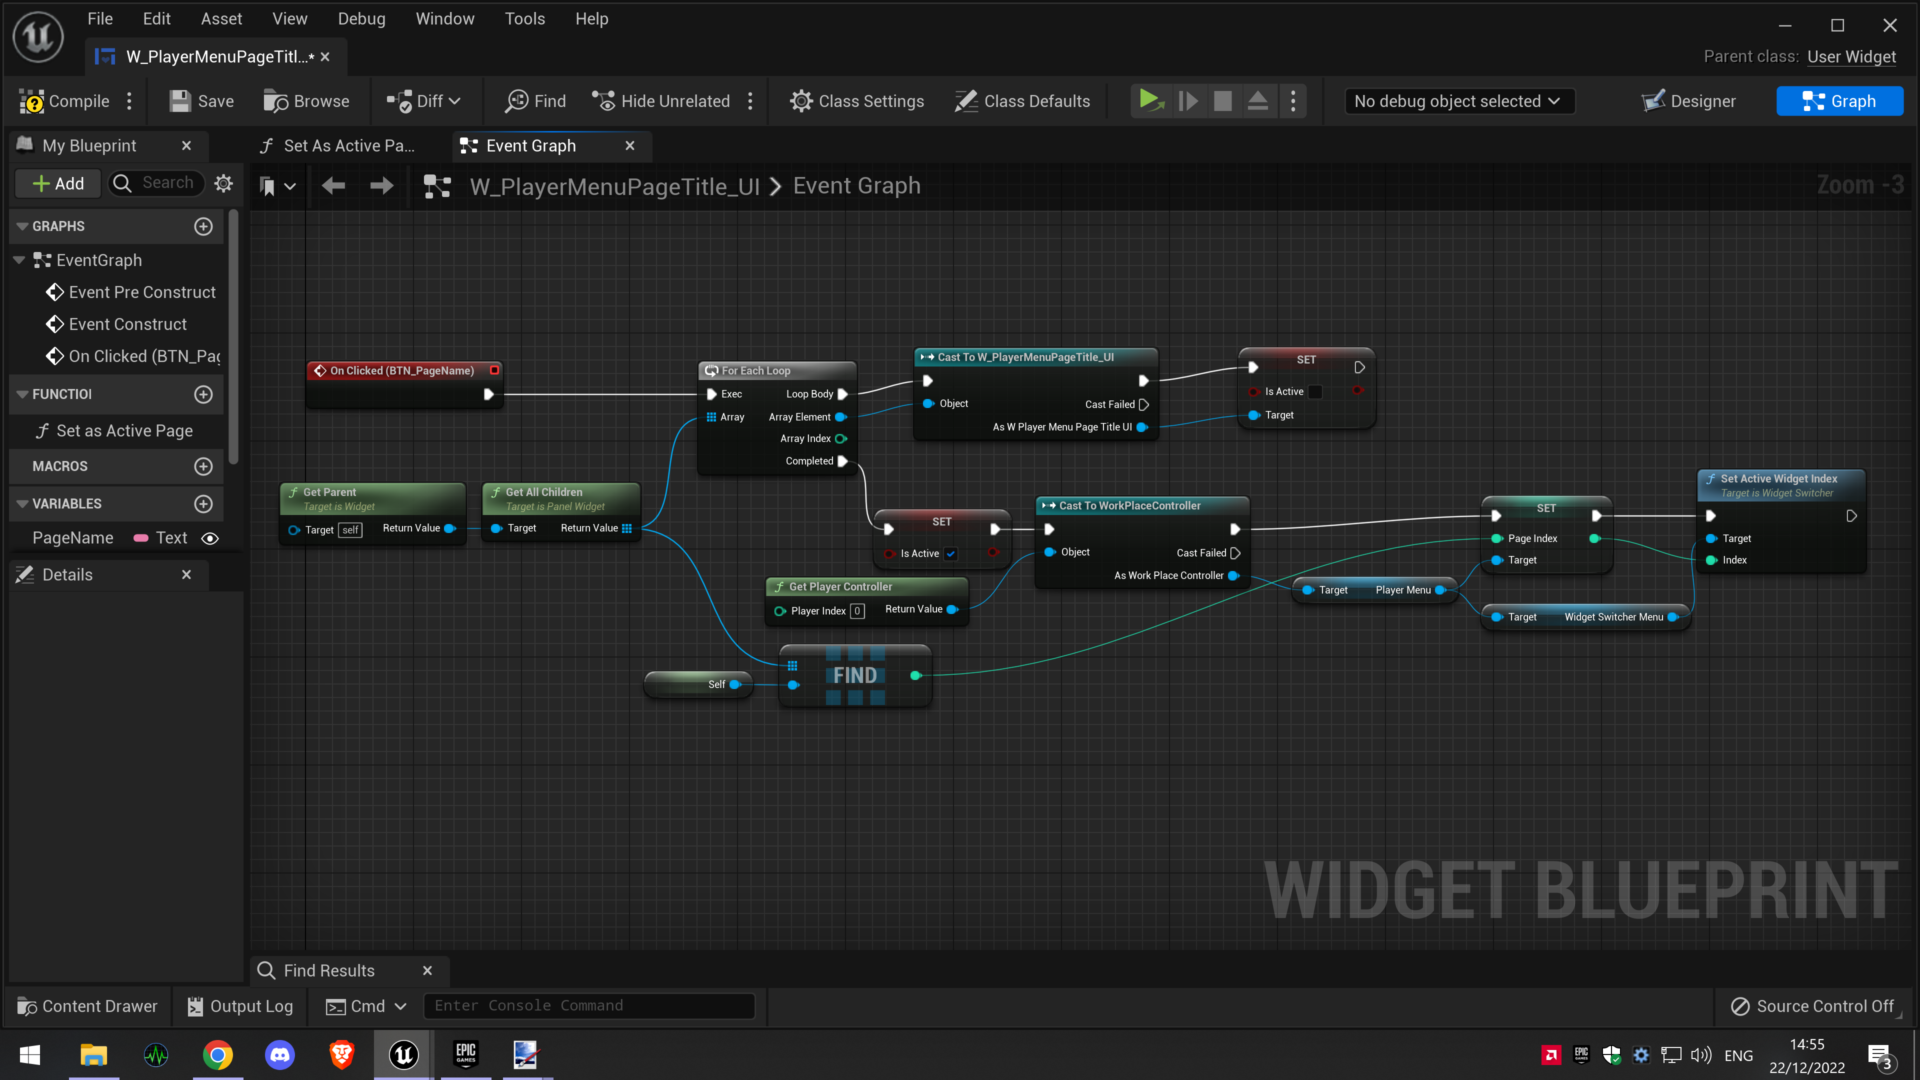
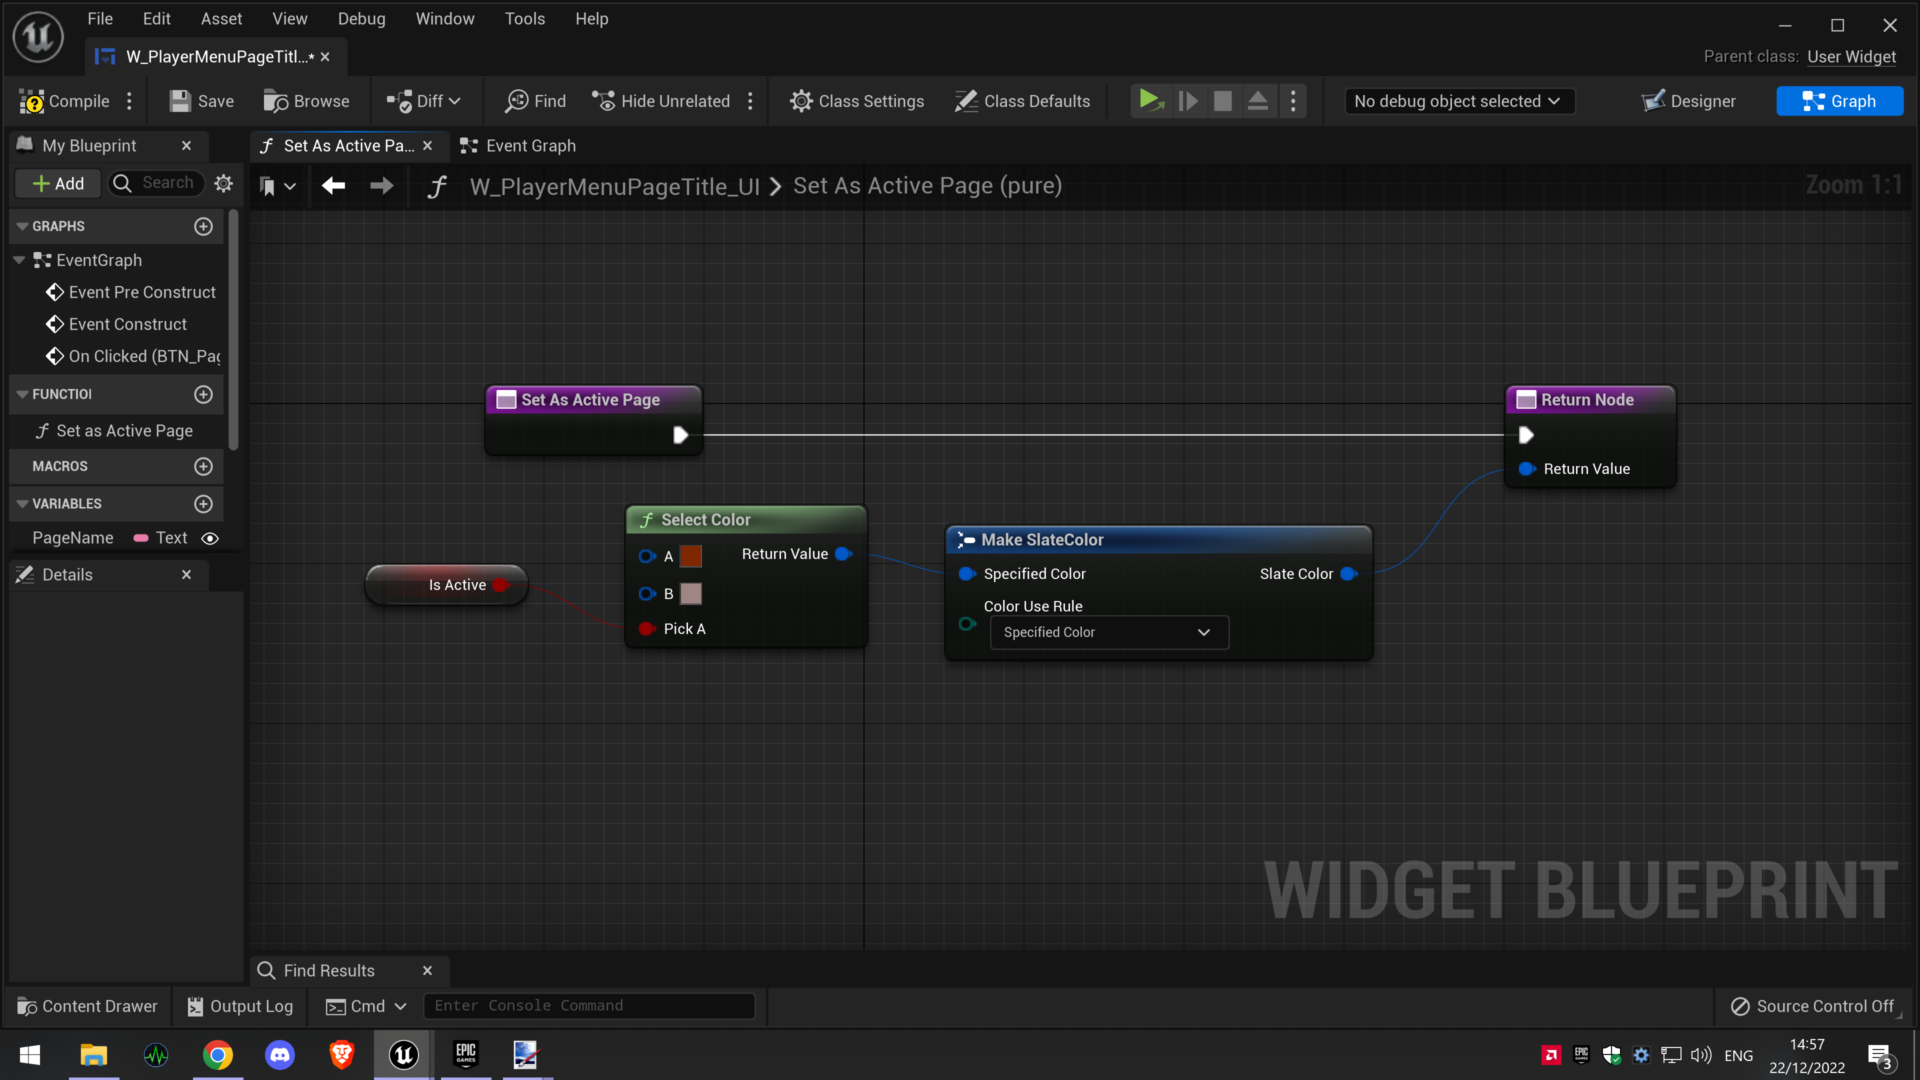
To get to the inventory screen, there needs to be a Menu screen, this is done using Widget blueprints and a widget switcher component, this lets the player switch between the different menu screens available using the shoulder buttons. The menu title also updates and displays which menu is currently being shown to the player. At the moment the only fleshed out menu is the inventory one so I will only include those screenshots below. All menus and icons you see are not a representation of the final look as I was not supplied any designs so made it to be functional, not pretty.
Screenshot (11)
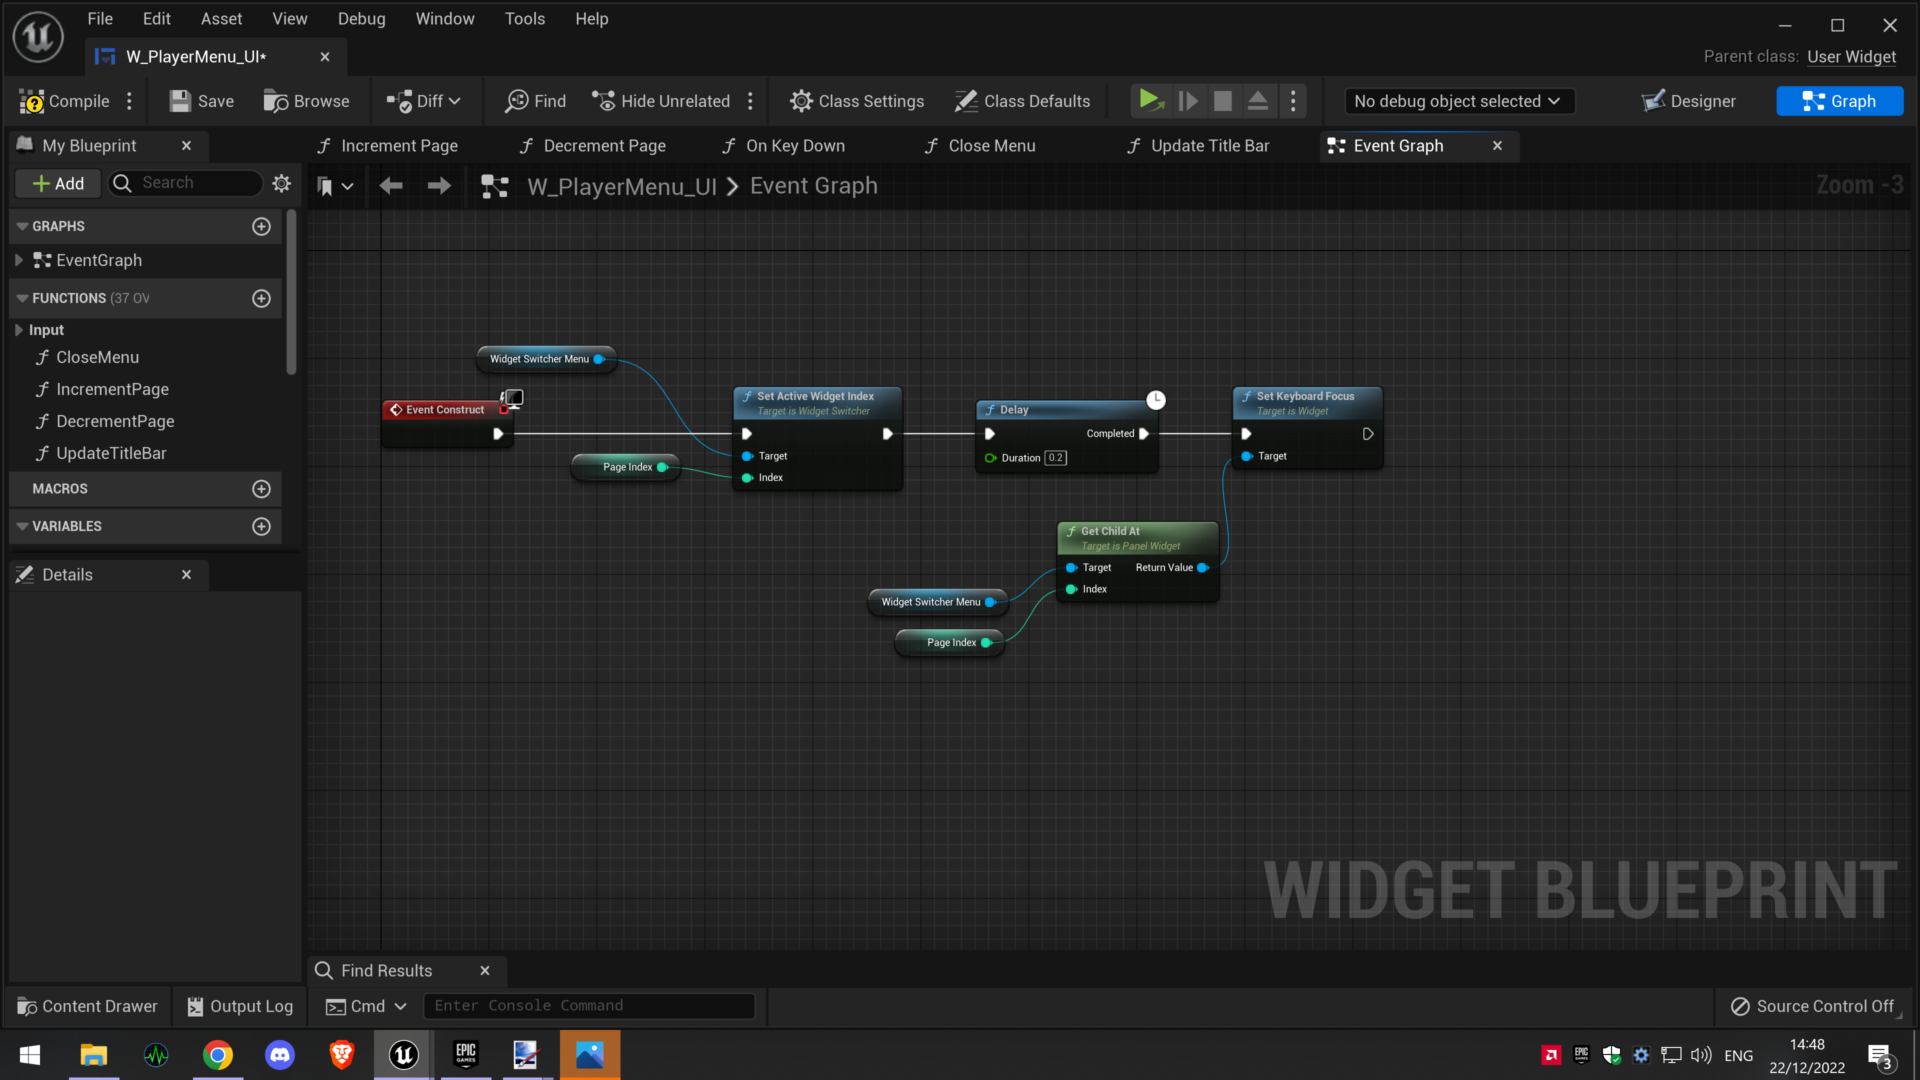
PlayerMenu Event Graph
Menu Controls
Update Menu Title
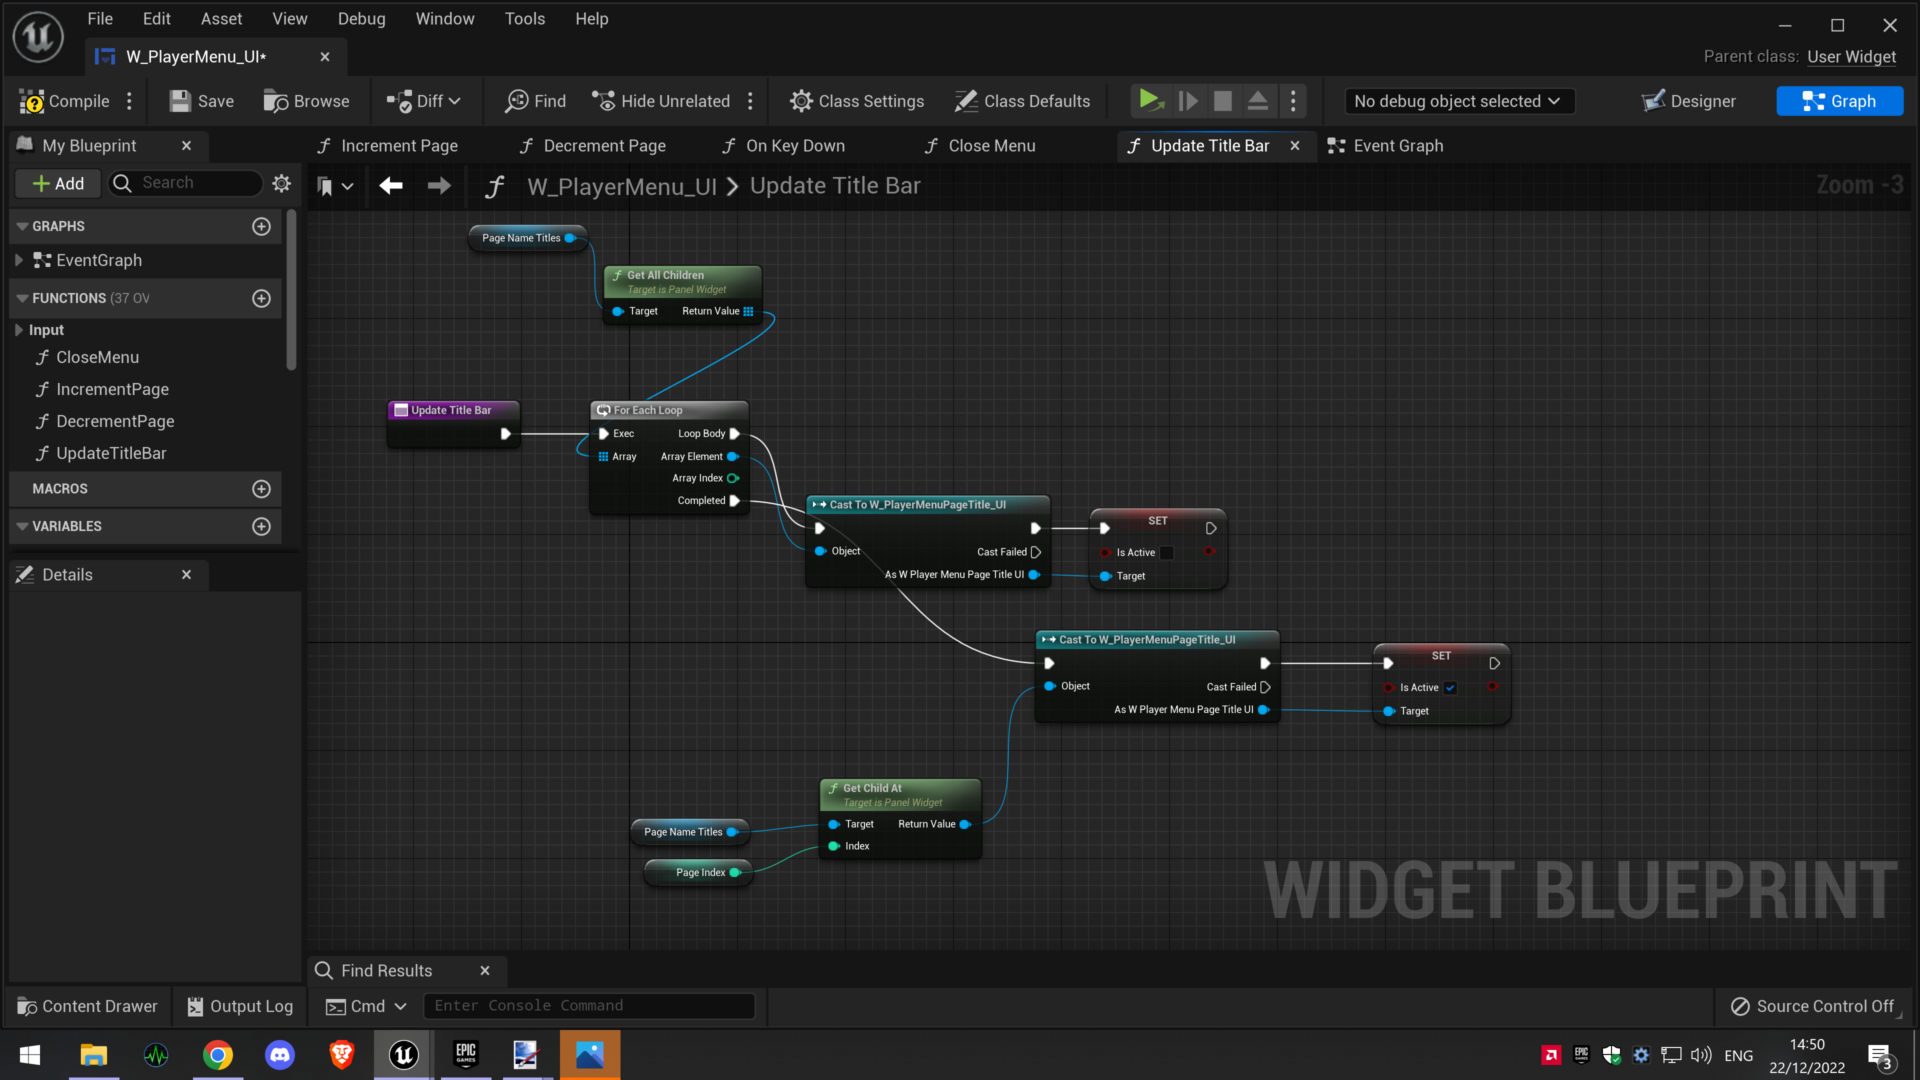
Set menu Title
Set menu title 2
Decrement Menu page
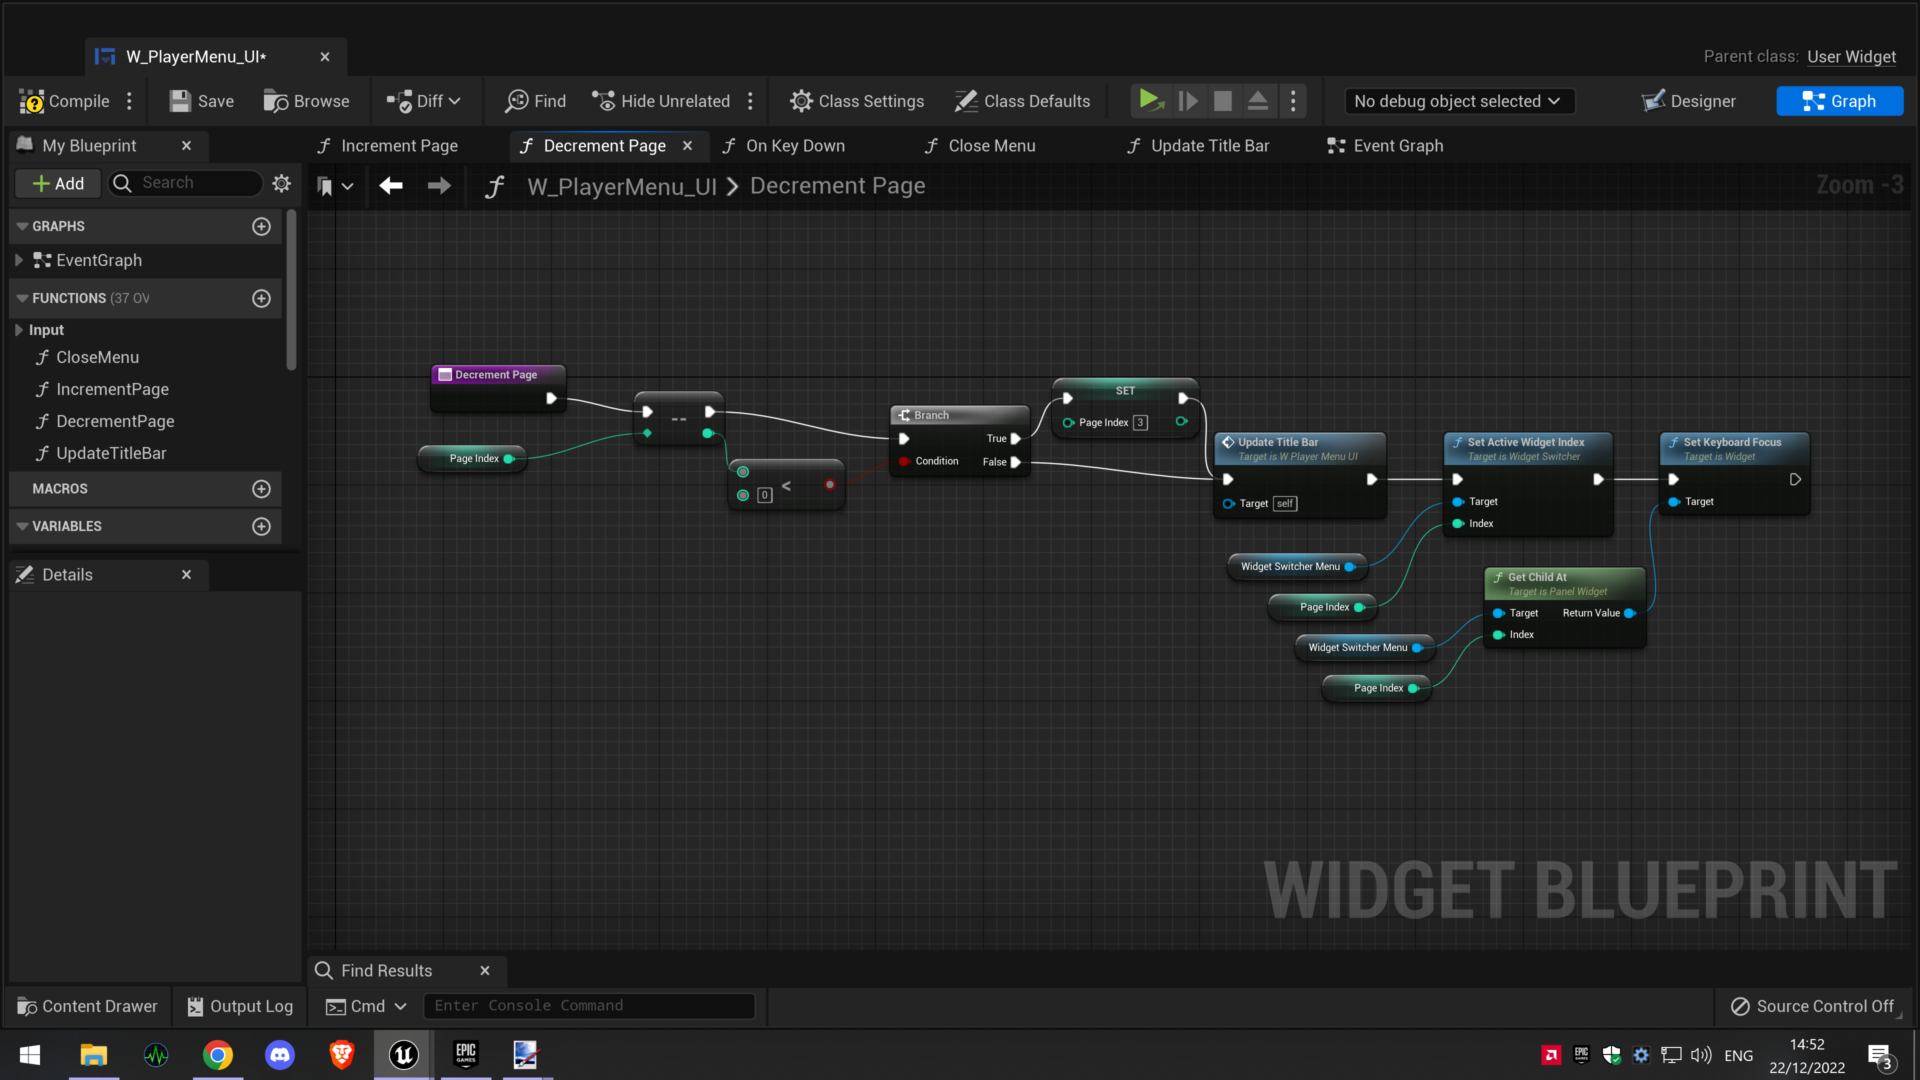
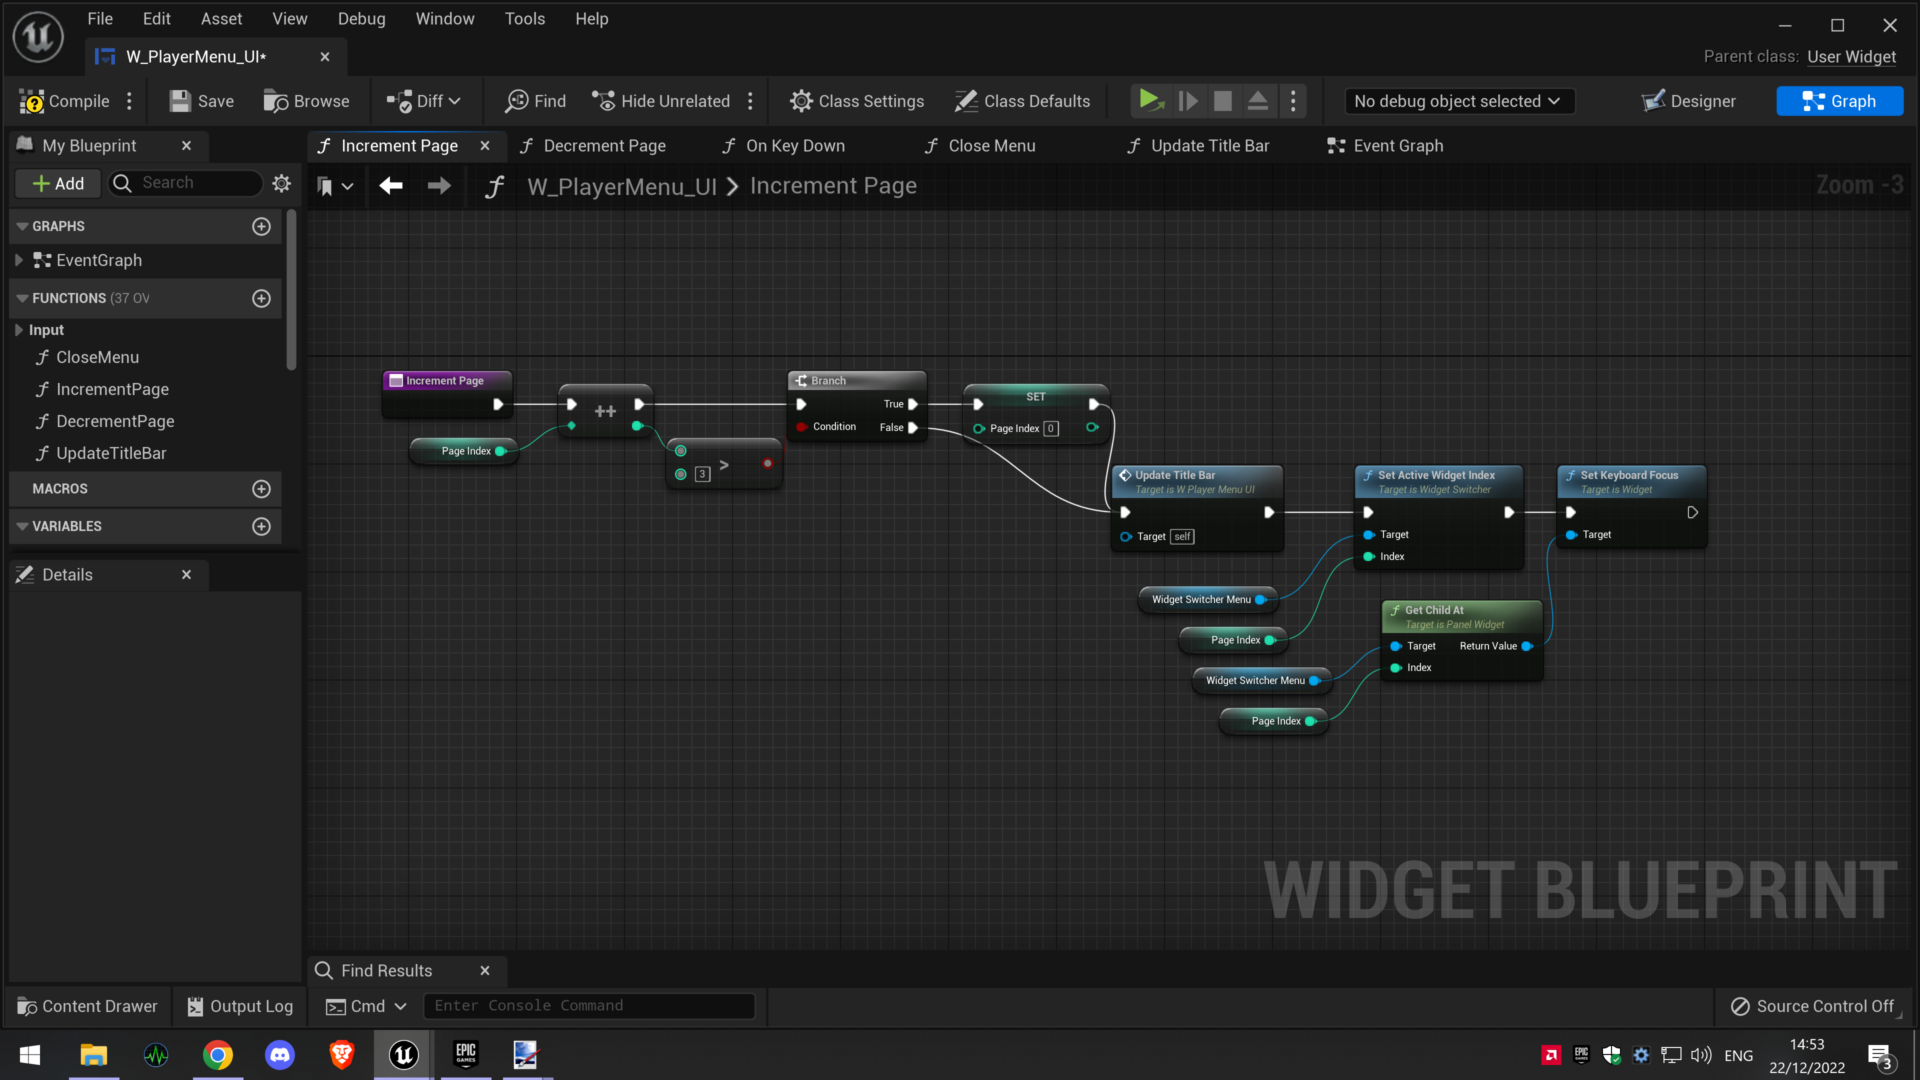
Increment Page
Close menu

Player controls and movement
To play the game, the player will need to be able to move through the environments and use their controller inputs to interact with the world. Achieving this with a gamepad only control scheme was actually a lot more difficult that I would have imagined. Movement was not an issue as this was already built into the Unreal Engine 5 player character blueprint however Unreal Engine does not recognise a Playstation 4 controller so I was unable to test anything with a controller until I downloaded some 3rd party software to make the PS4 controller appear as an X-Box 360 controller, a small frustration but that was easily avoided.
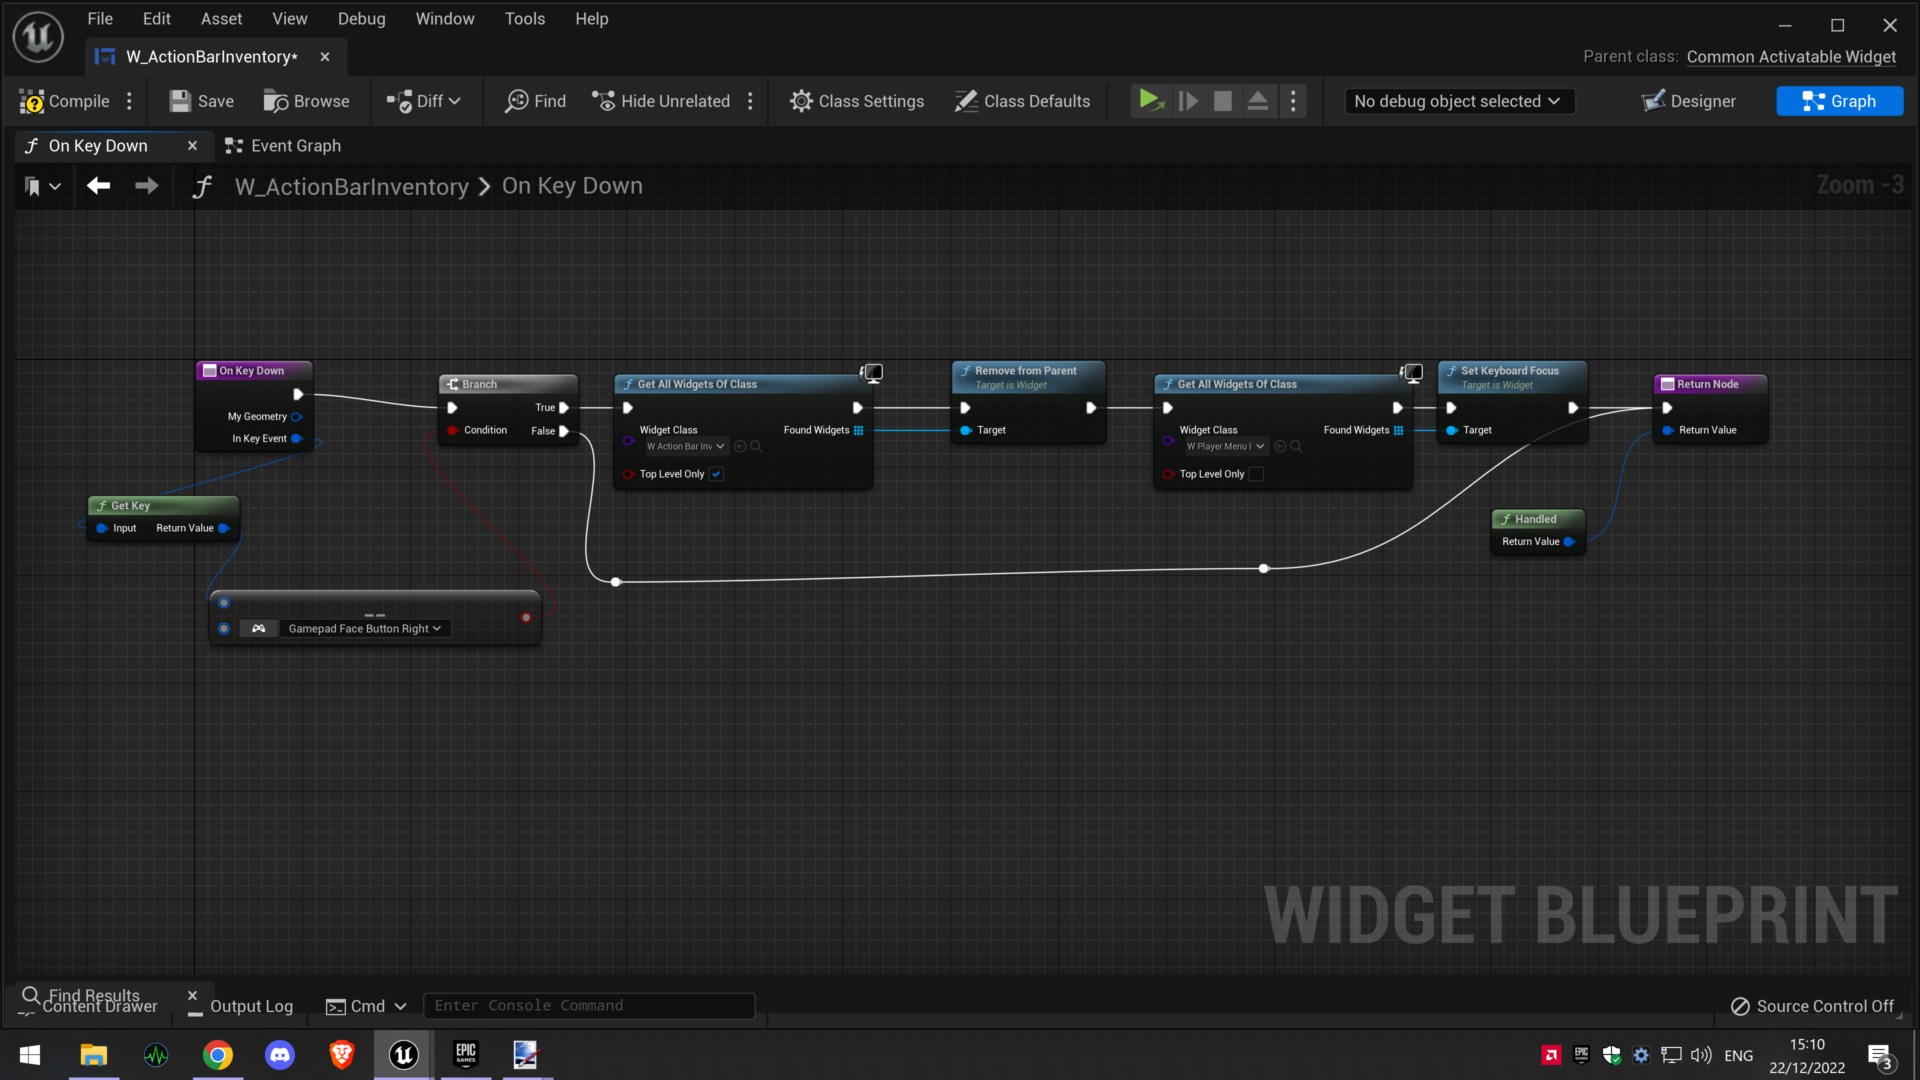
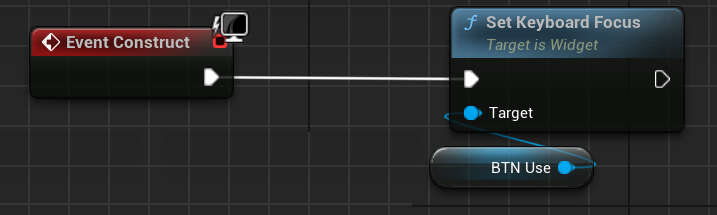
The real difficulty I struggled with was being able to navigate and use the menu screens via controller only. First of all I had to install a plugin called GamepadUMG which was recommended through searching the Unreal engine forums, this solved the navigation issue, however another issue still remained, I found the game loses focus every time a new widget is opened and when the game state changes, this means I would have to click back onto the game with a mouse for the game to become controllable again, not ideal when the game will be controller only. I got around this issue with the below code on all widgets that open, this sets the game focus and keyboard focus (there is no function for gamepad focus as this works for both) to the newly opened widget so the player is able to navigate the menus.
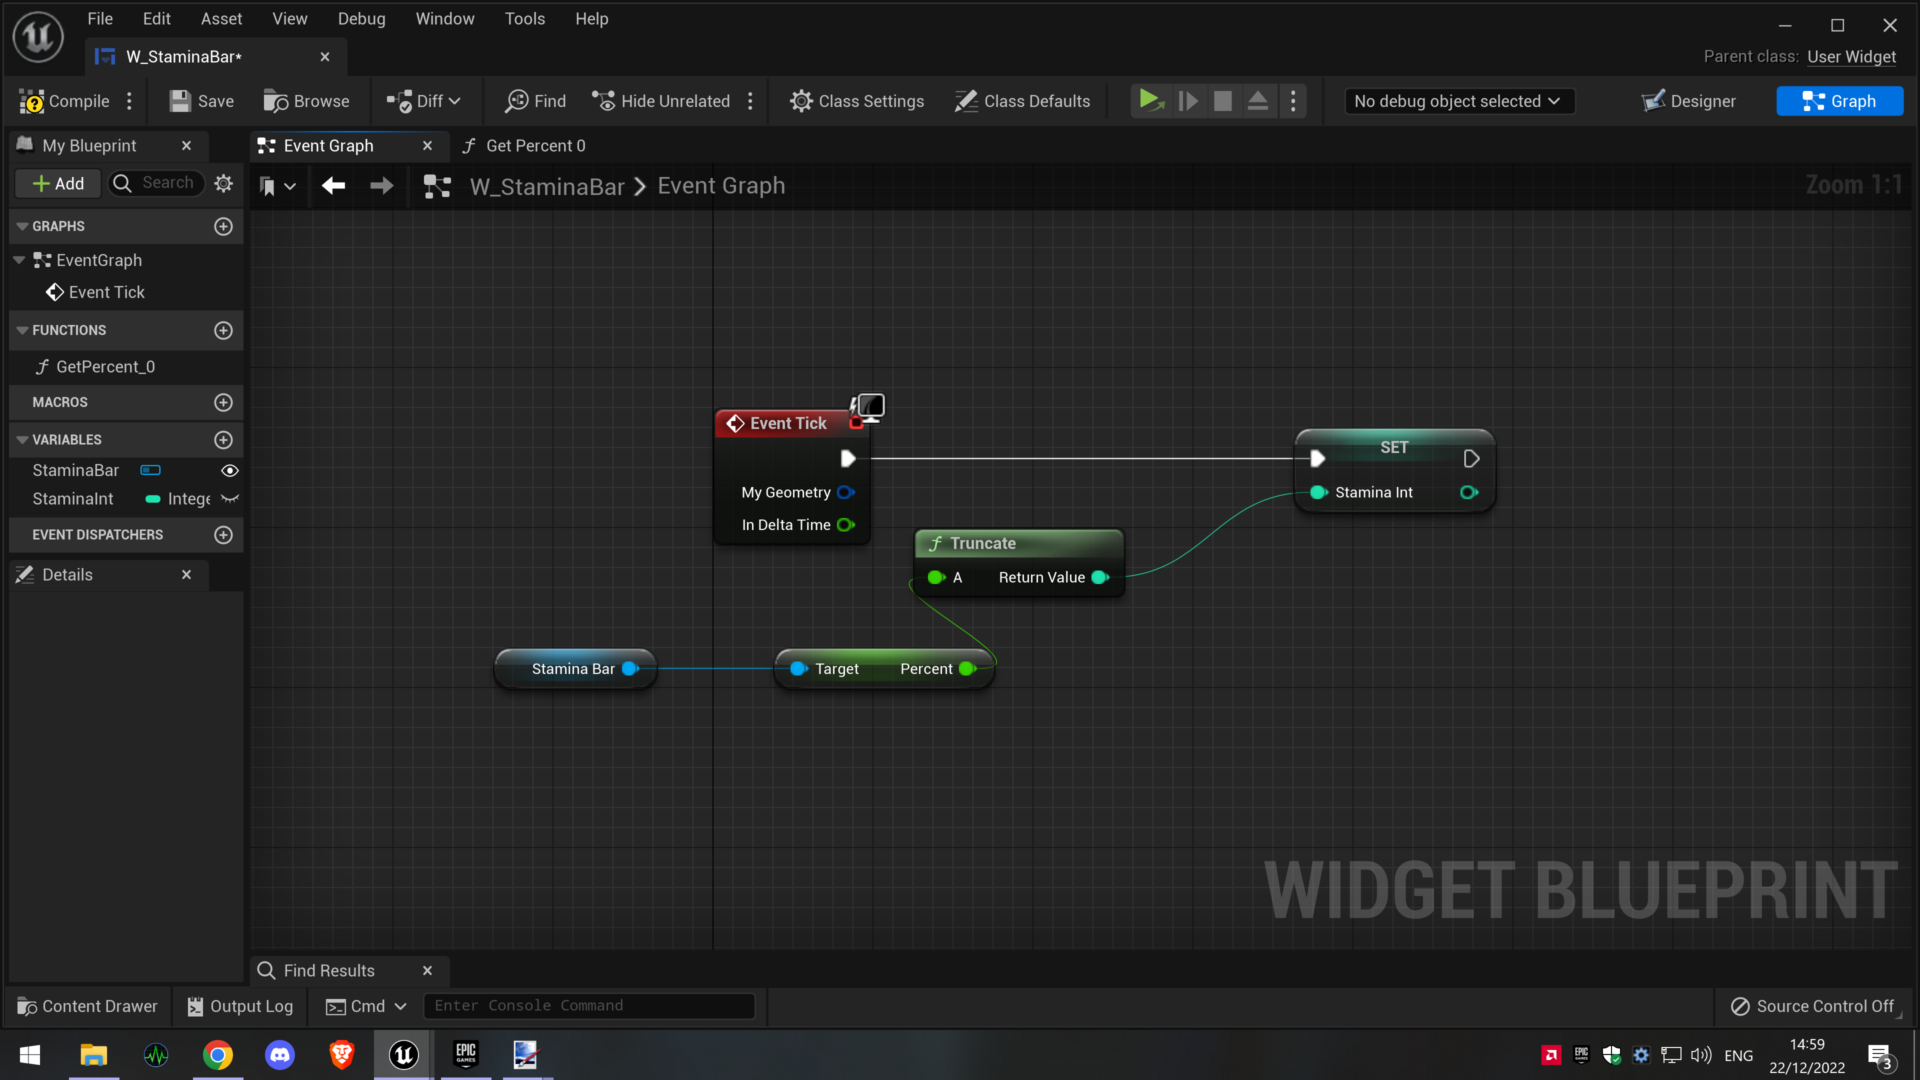
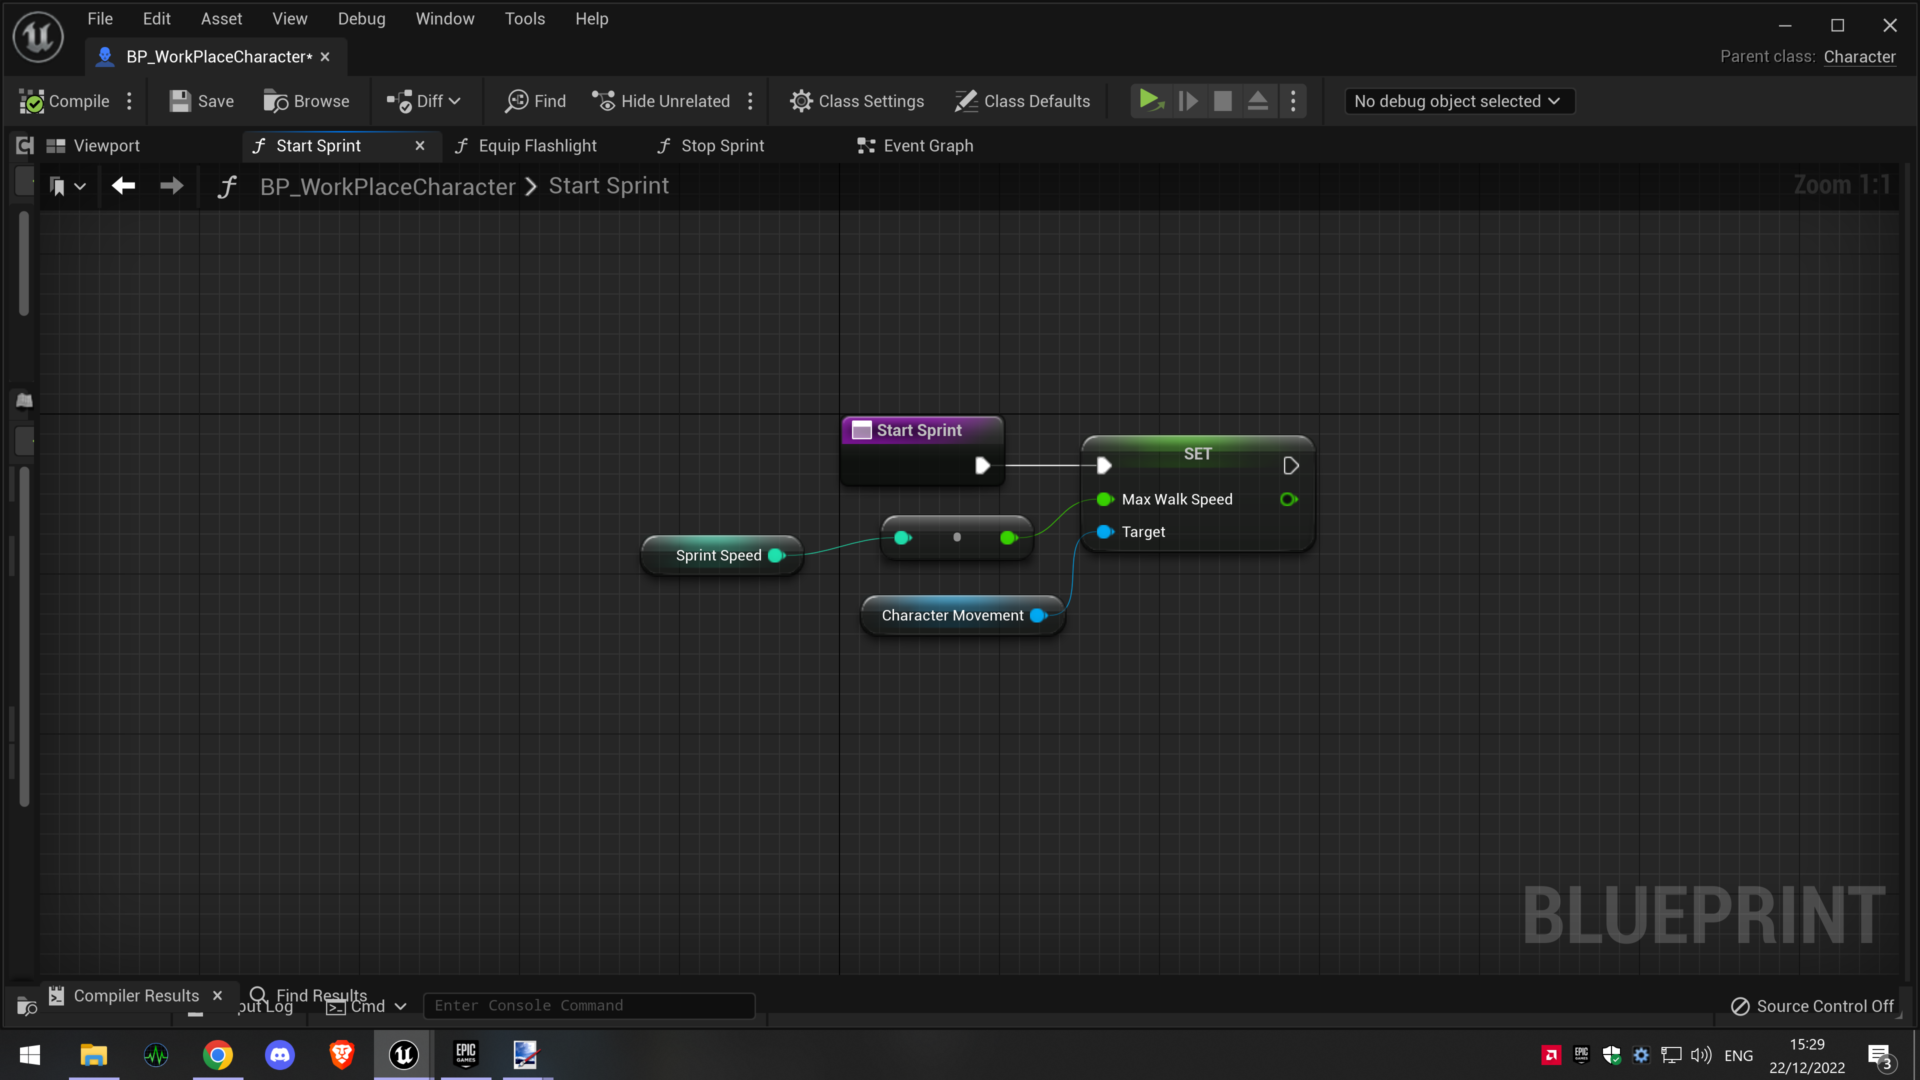
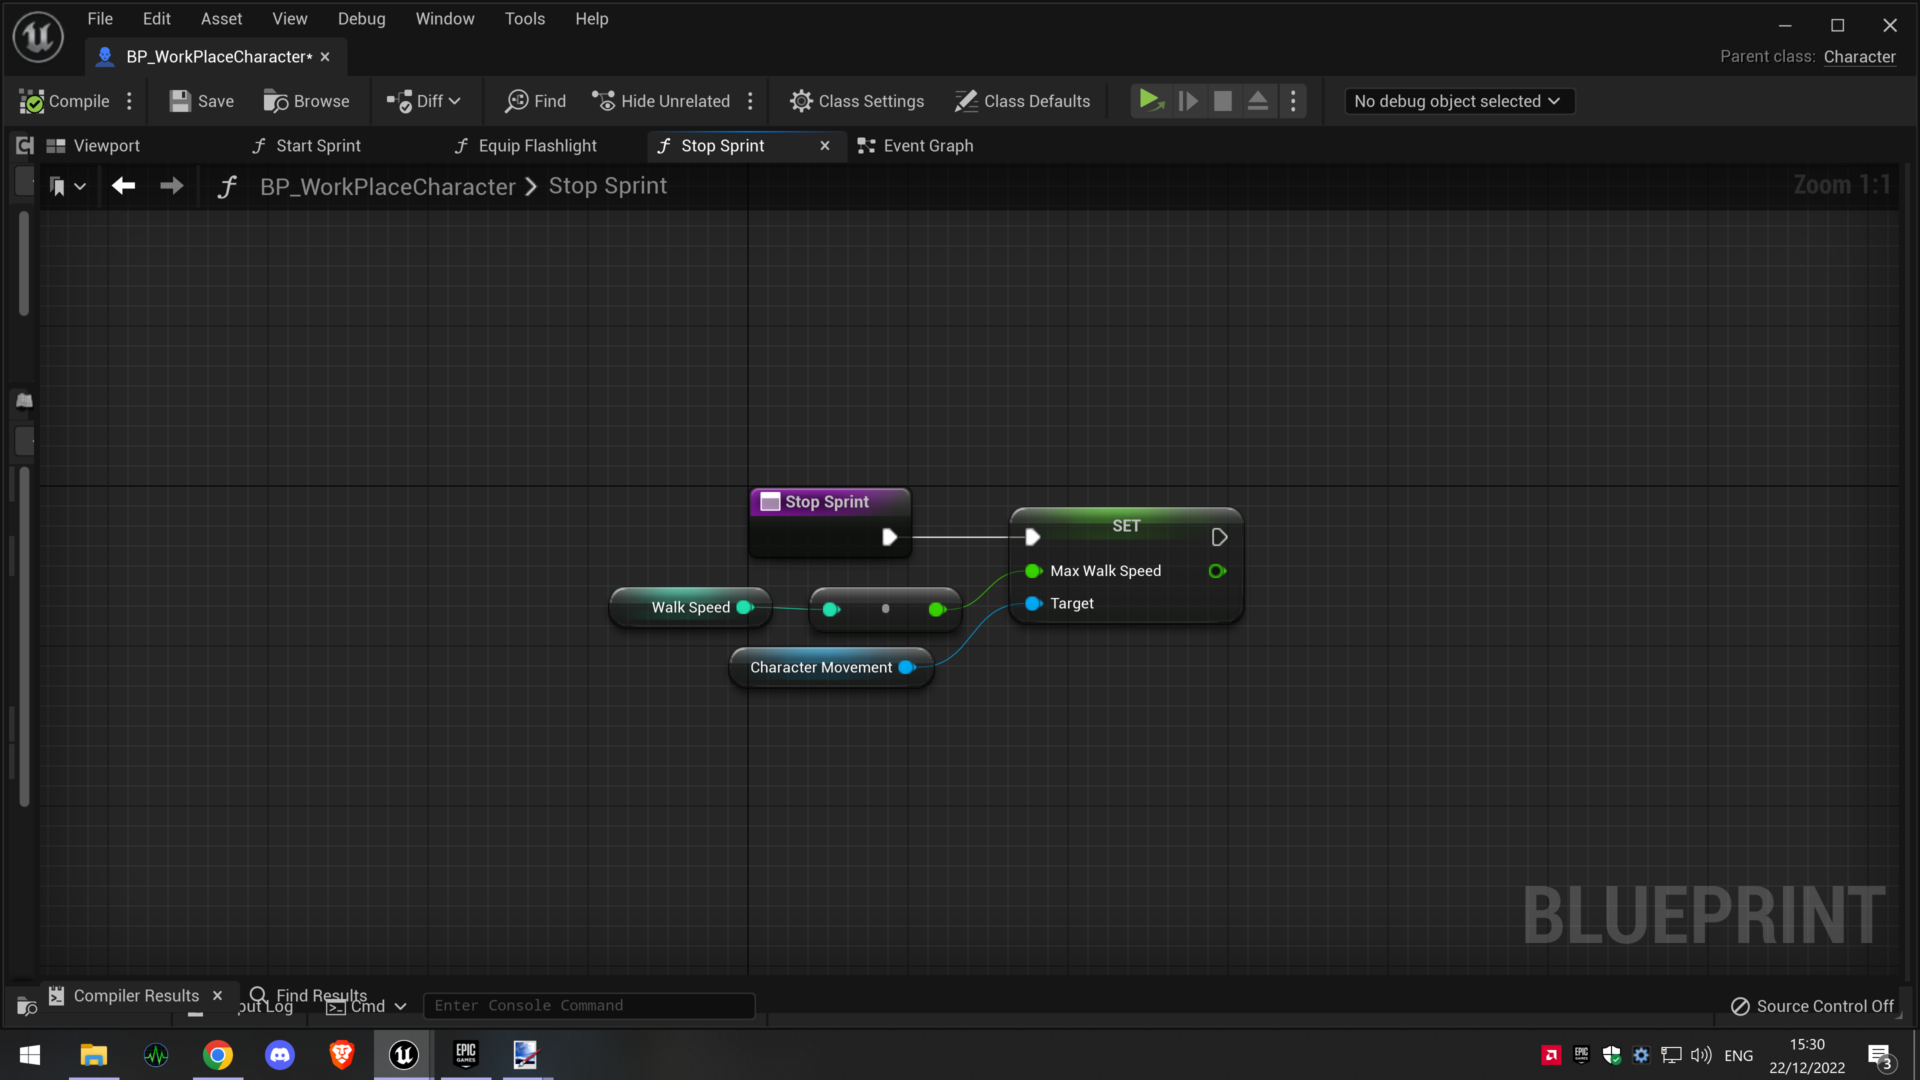
In terms of Controls, we needed a swap equipment input which would swap the players currently held equipment with the other equipment in their inventory. If the player only has a single equipment, it will cycle between equipped and not equipped. To activate the currently held equipment, I added an input to do so. The game needed an interact button which would be used to pick up items, hide in objects, open doors and solve puzzles. Next was a sprint button which when held down, causes a sprint bar to appear, showing the current amount of stamina left, the player character will speed up when sprinting (also causing the footsteps to quicken) and the stamina will be depleted. Once out of stamina, or if the button is released, the player’s speed will be reduced to normal and the stamina bar will stay on screen for a couple of seconds showing what speed it is being replenished at. The last input needed to be added was one to open the menu so the player can access their inventory and then close the menu when pressed whilst it is open.
Please find the blueprints for the above input events below. Click on the image to open a full size version.
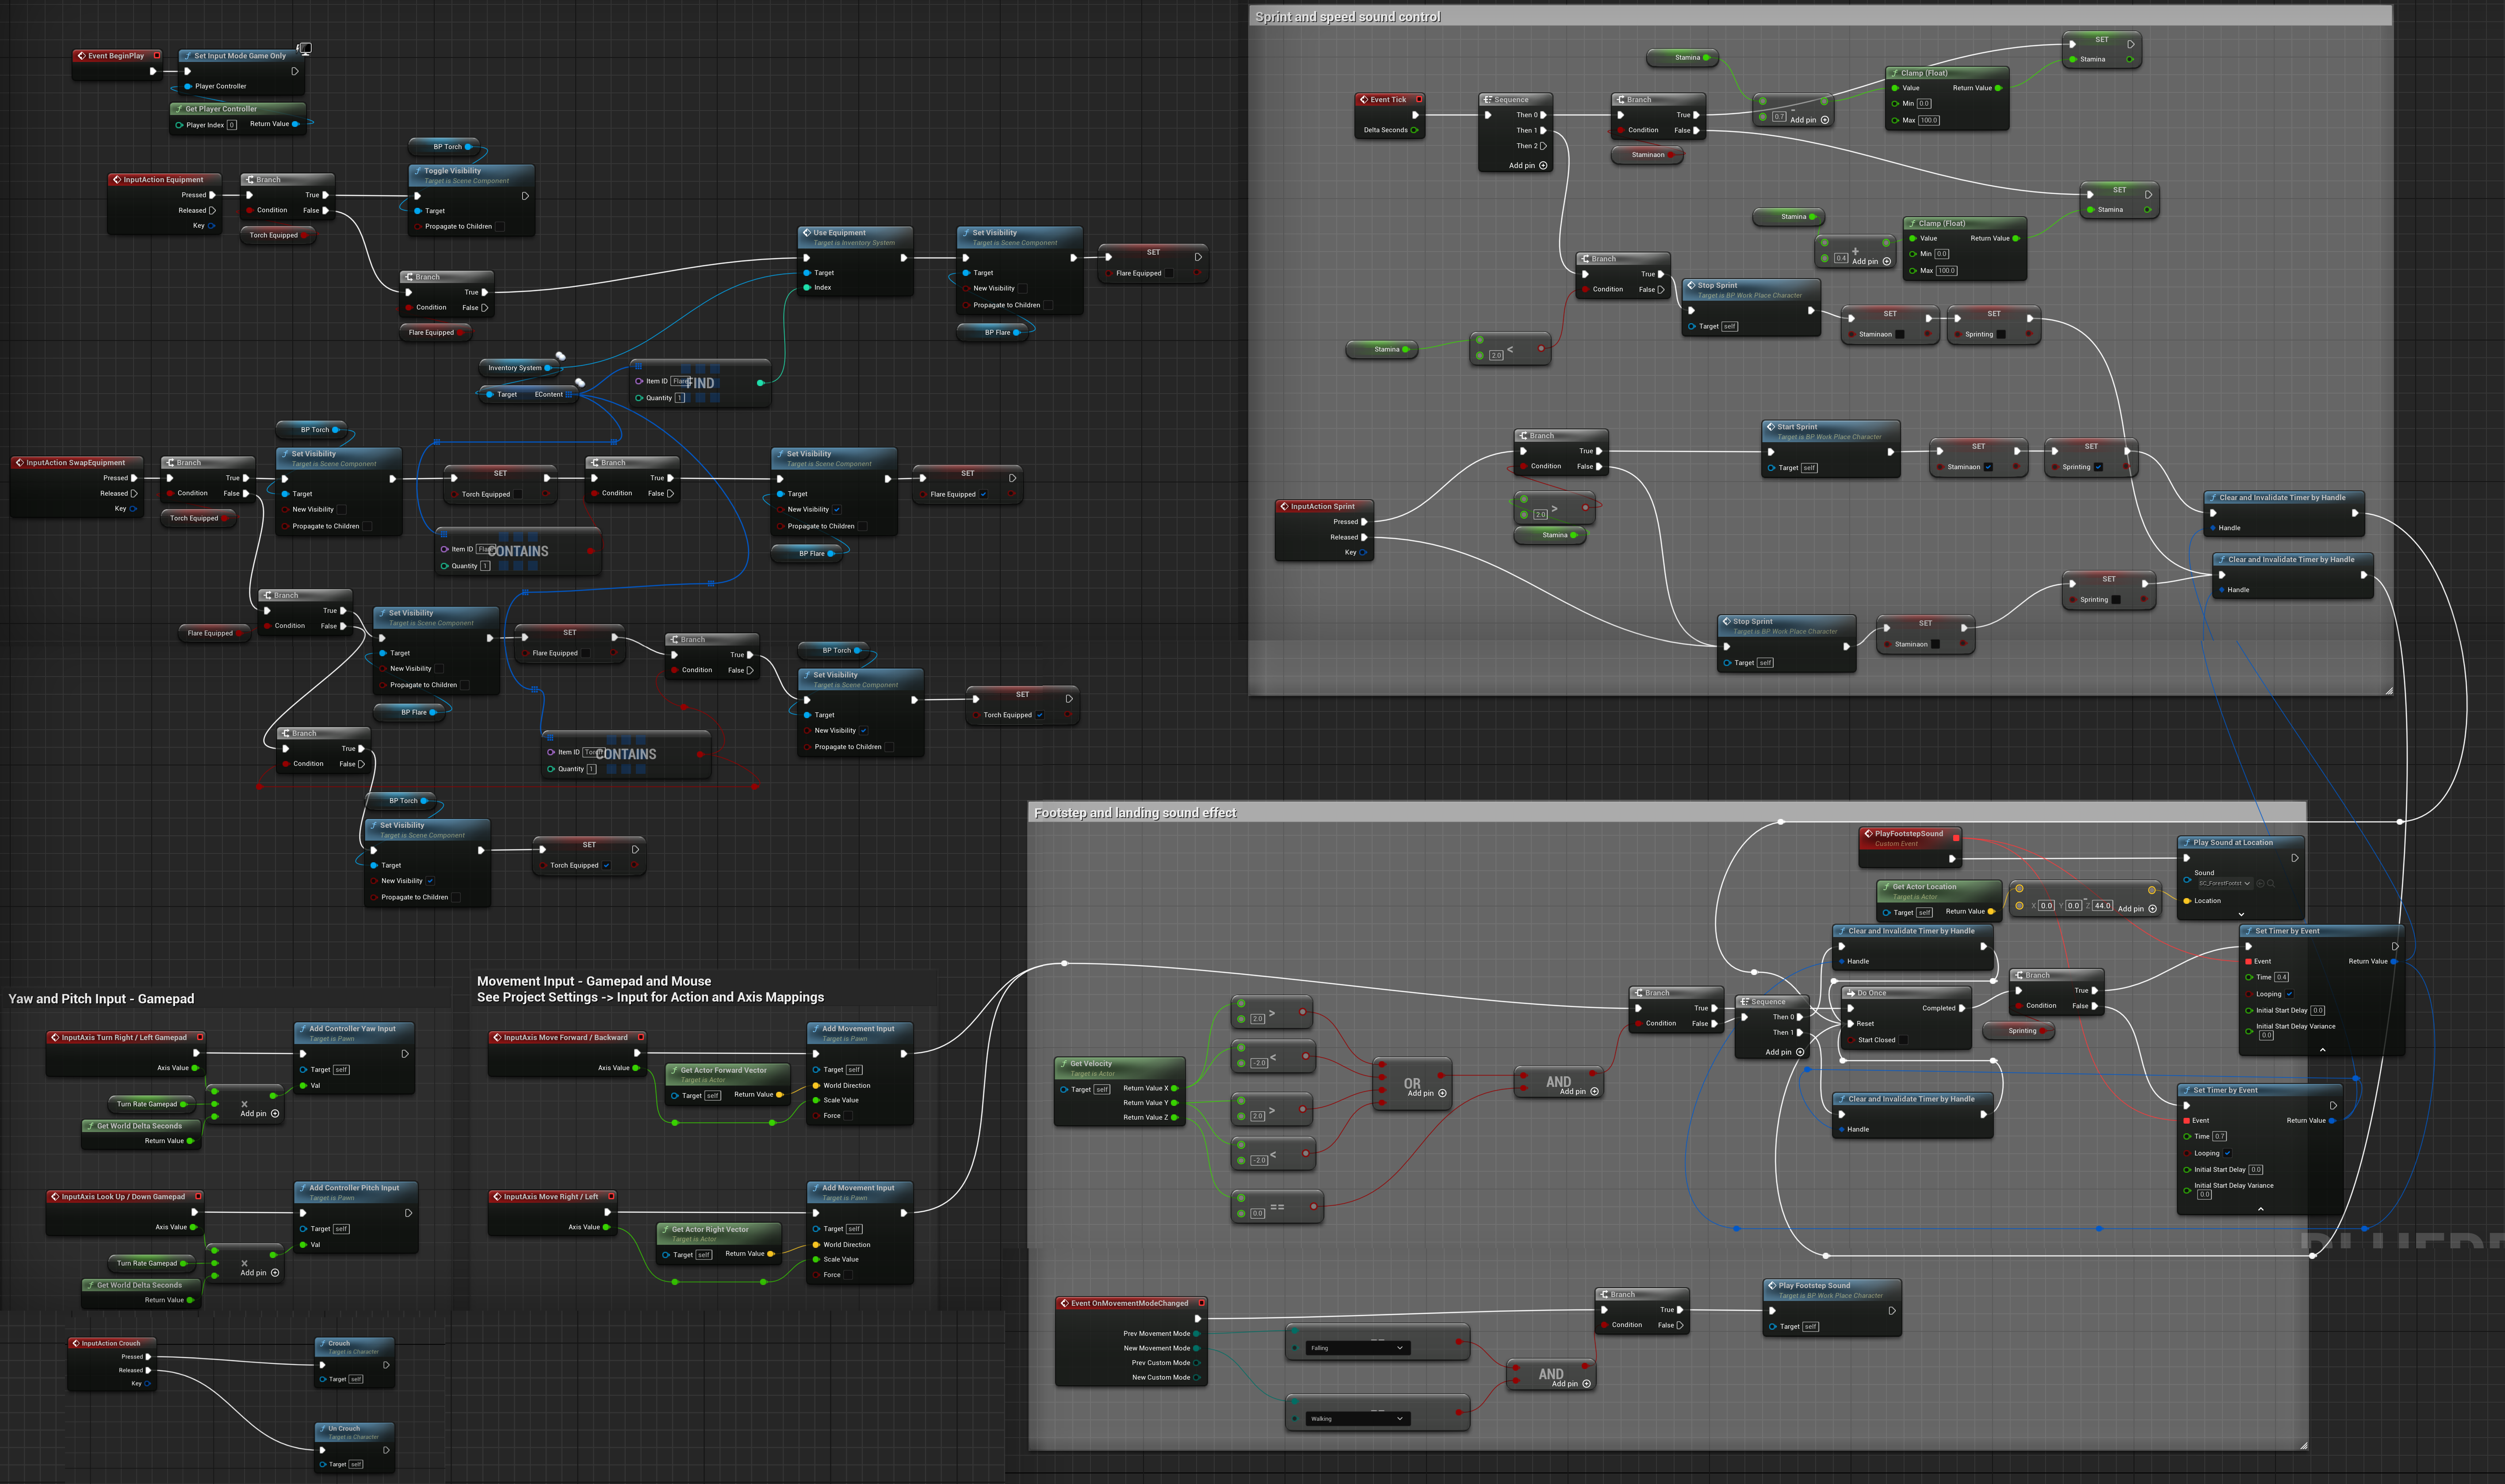
Sprint Blueprints
Get Stamina percent
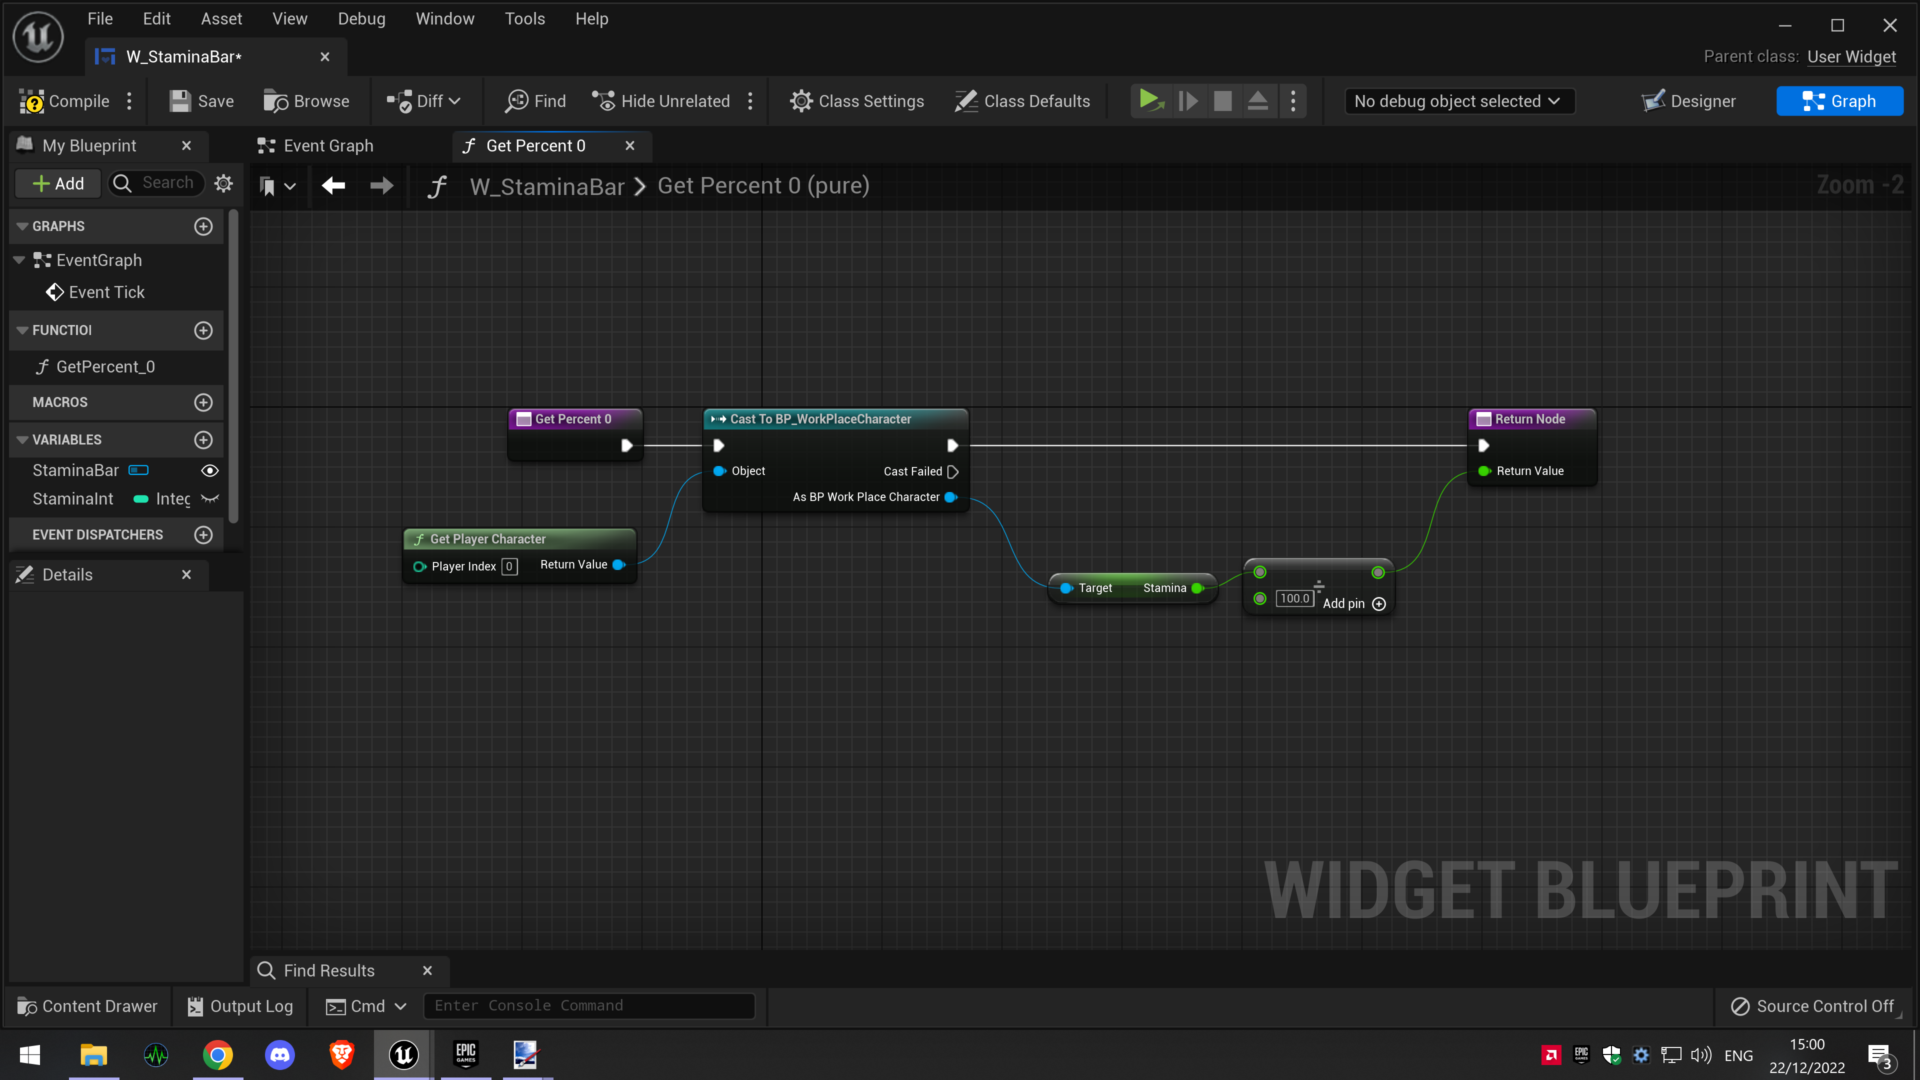
Stamina Bar
Start Sprint
Stop Sprint
Monster AI and mechanics.
A main part of the game will be avoiding the detection of a monster which roams the levels. The monster uses the unreal engine sensor components to detect whether it can see the player or not, using this trigger I programmed the monster to chase the player once detected, if the monster catches the player an animation will trigger and the player will die causing a game over. This will restart the game at the beginning of the current level.
Using the NavMesh function in Unreal Engine, I marked out the areas the monster could roam and used a blueprint to have the monster choose a random location within a radius of the player and navigate to it, this gets updated every 4-7 seconds, this time frame can be changed easily within the blueprint. When the Monster sees the player, it triggers music so the player knows they have been spotted, the monster will chase the player at a faster speed than their walking speed until the player hides out of sight, once the monster no longer sees the player the music fades away and the monster will return to it’s roaming, a delay could be added to the stop chasing command to make the monster continue to chase for a few seconds after breaking line of sight with the player. The monster also has blueprinting for footsteps which are affected by it’s current movement speed. Unfortunately the 3D artist was unable to rig the animations properly so they are not visible on the video above, I would like to look into this going forwards however as it will be useful knowledge to have.
Please find the relevant blueprint for the monster AI below.
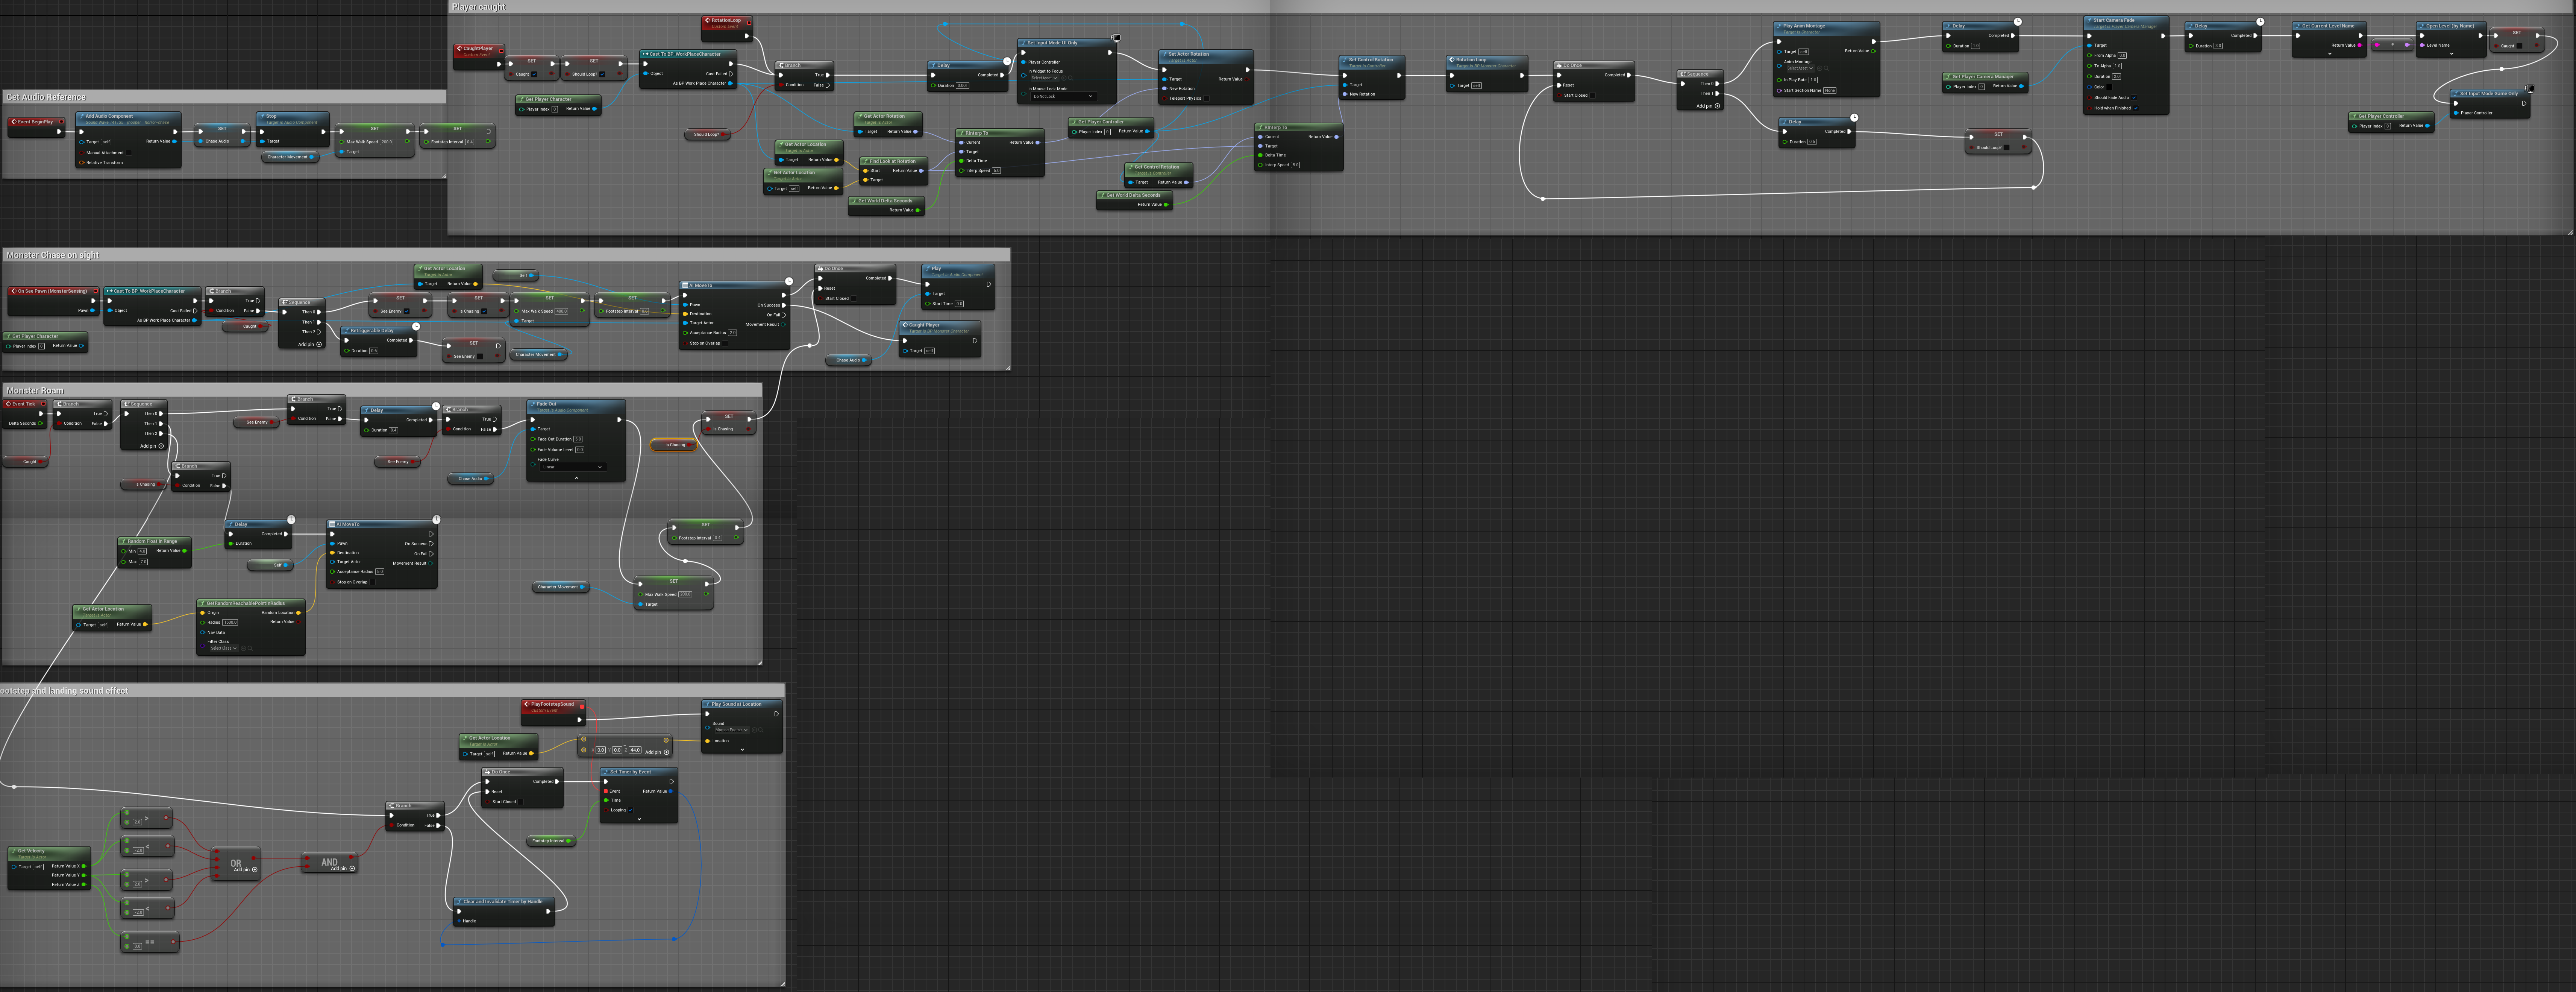
Hide Objects
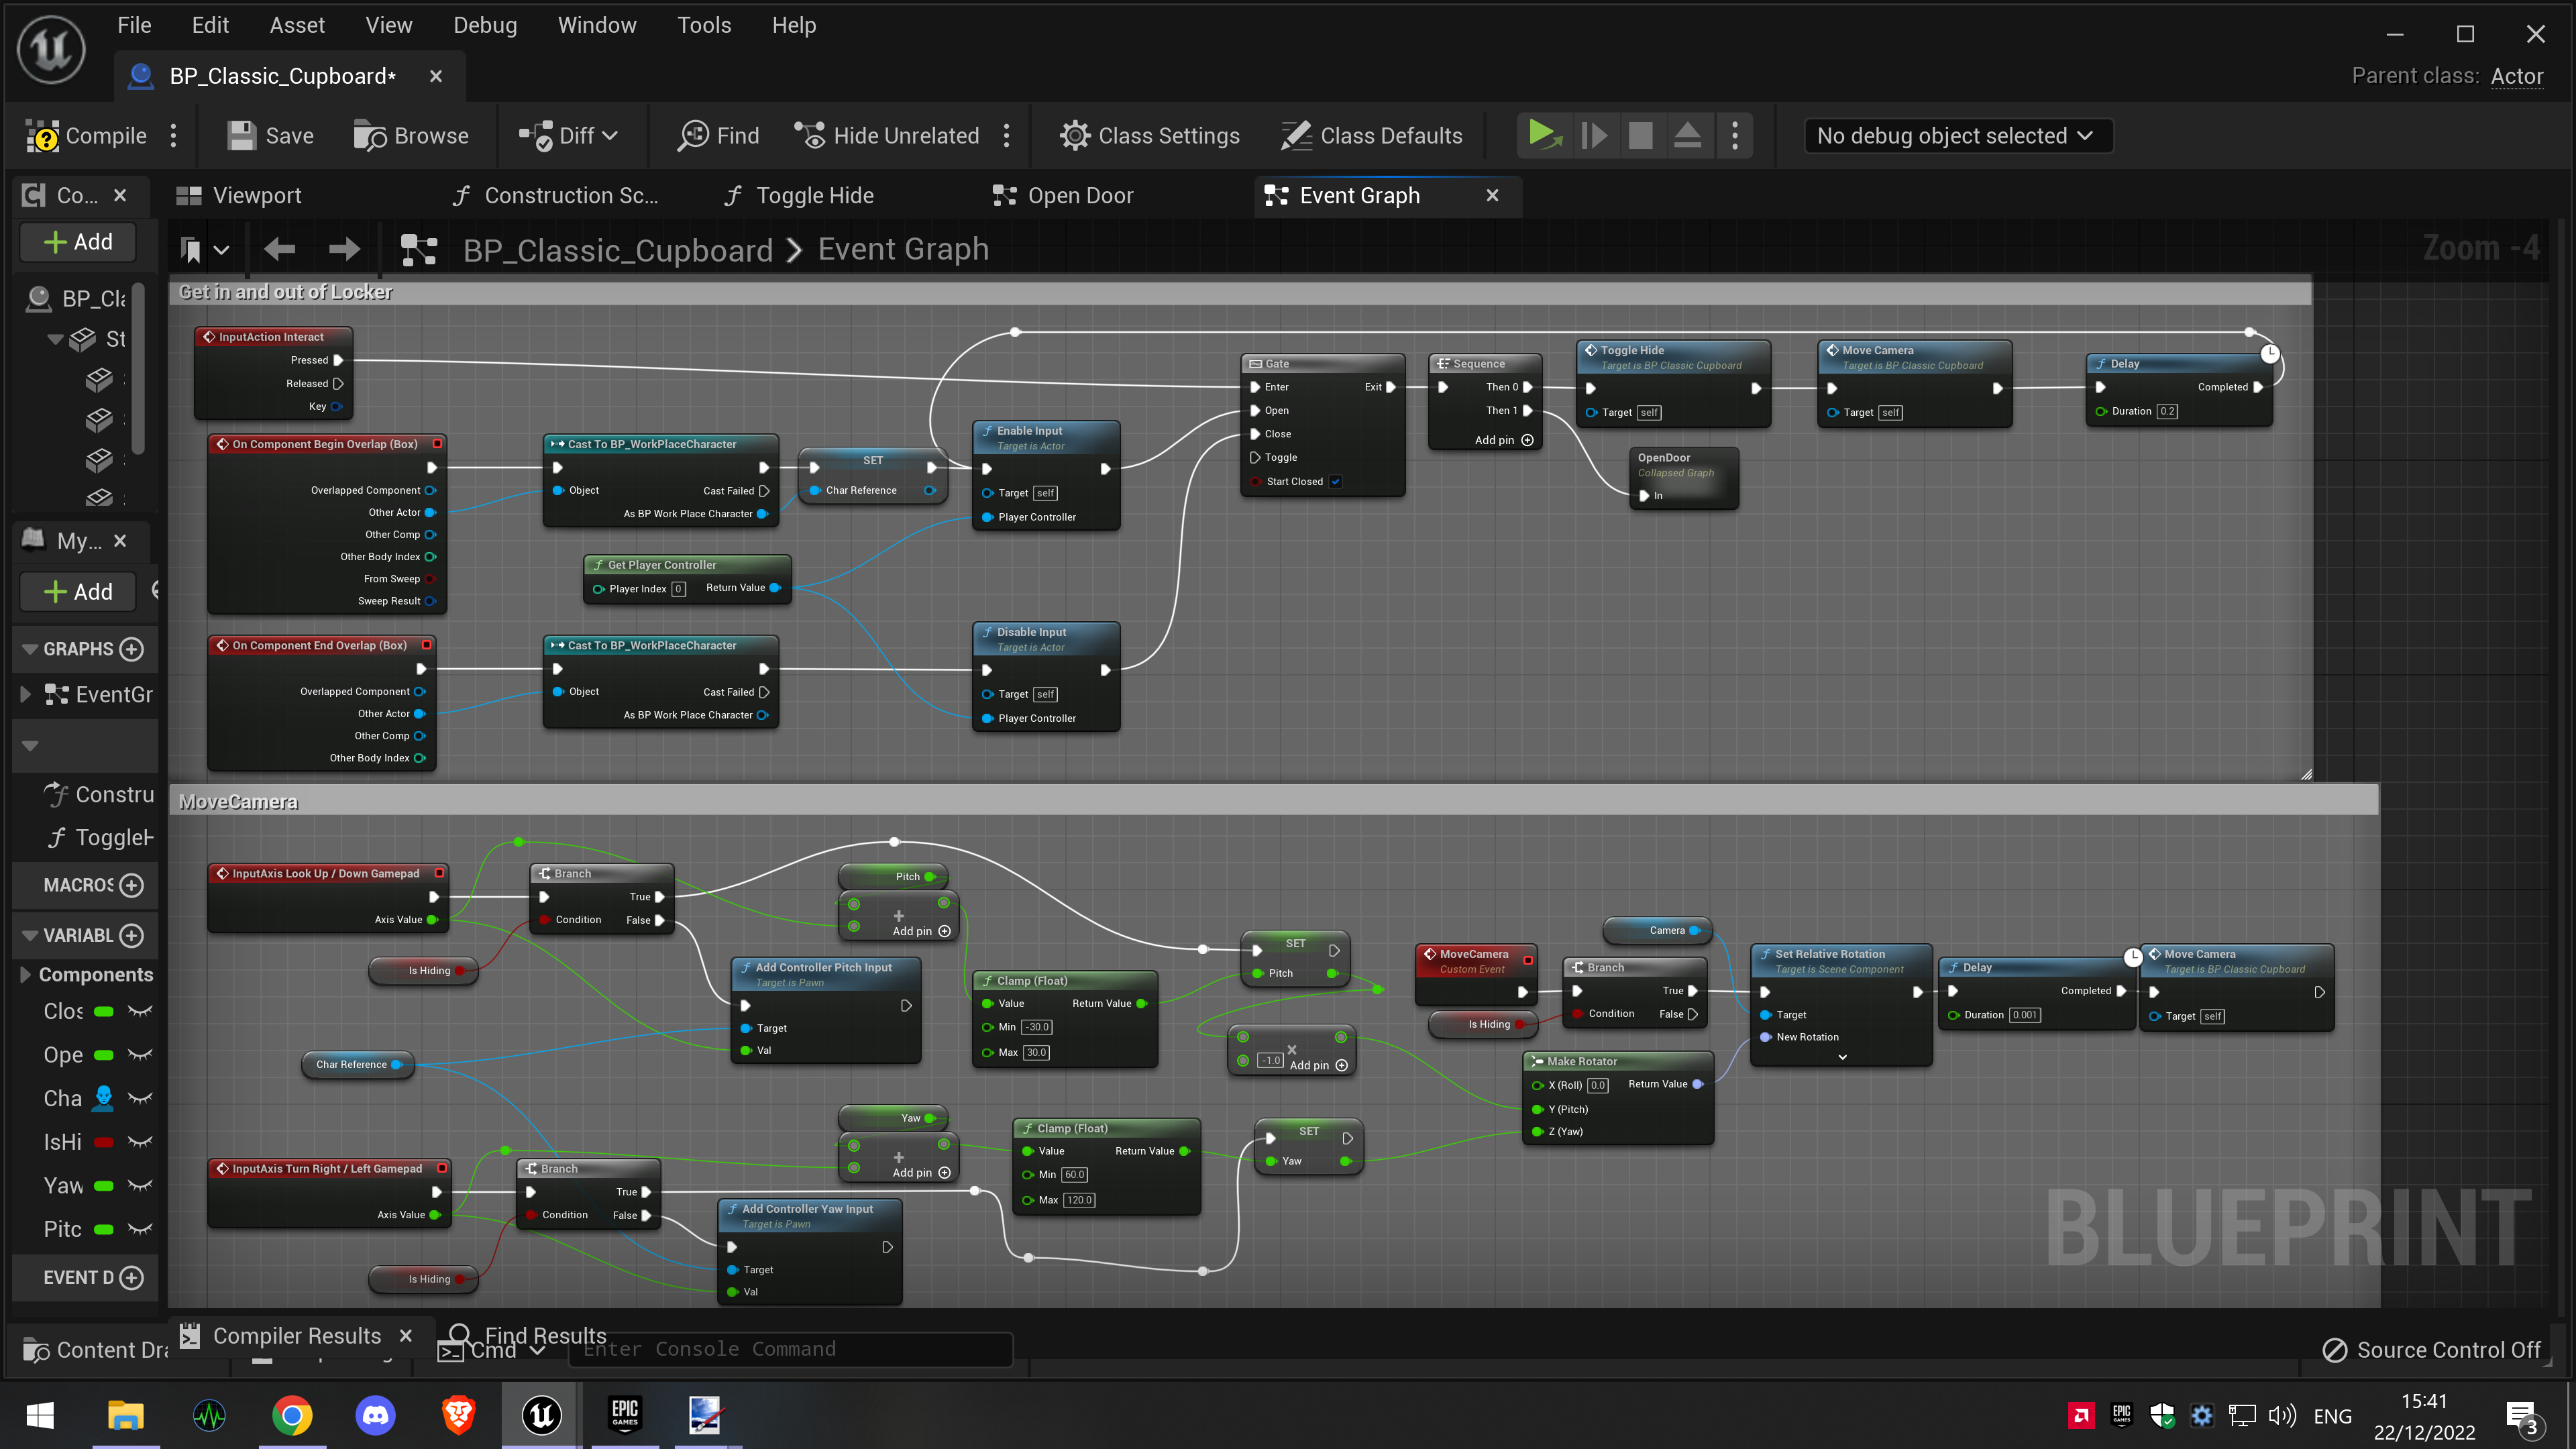
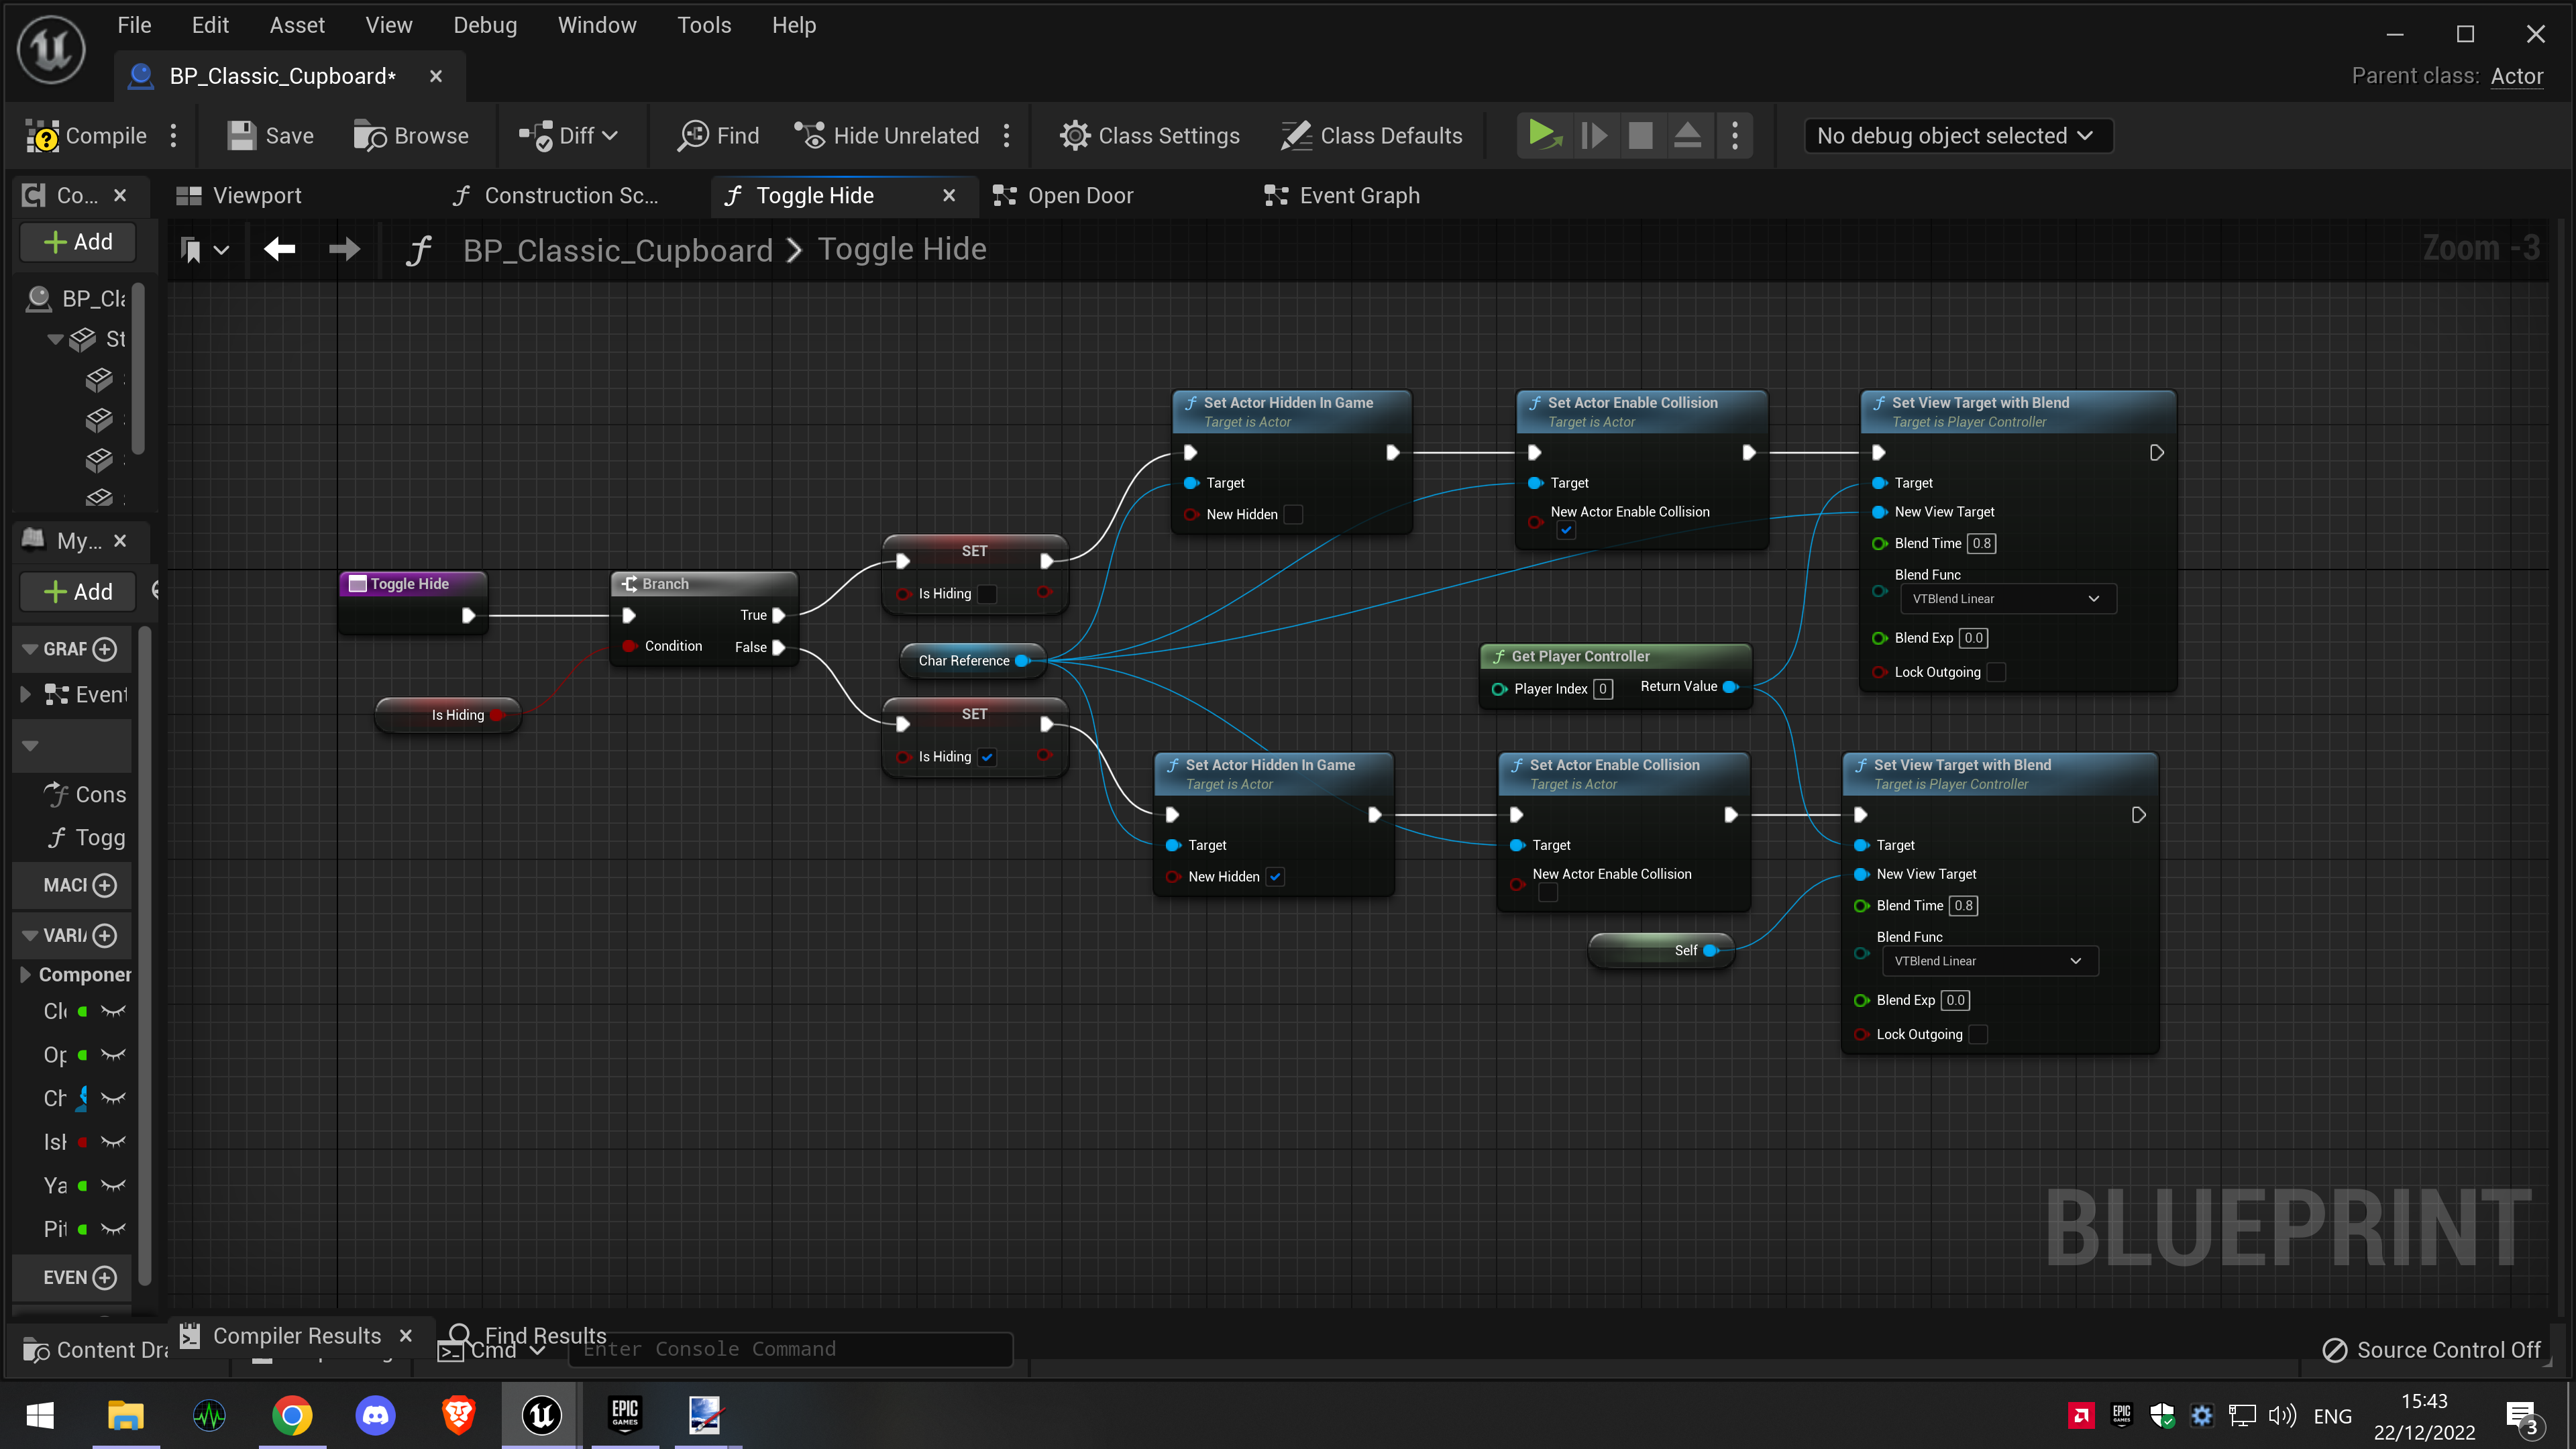
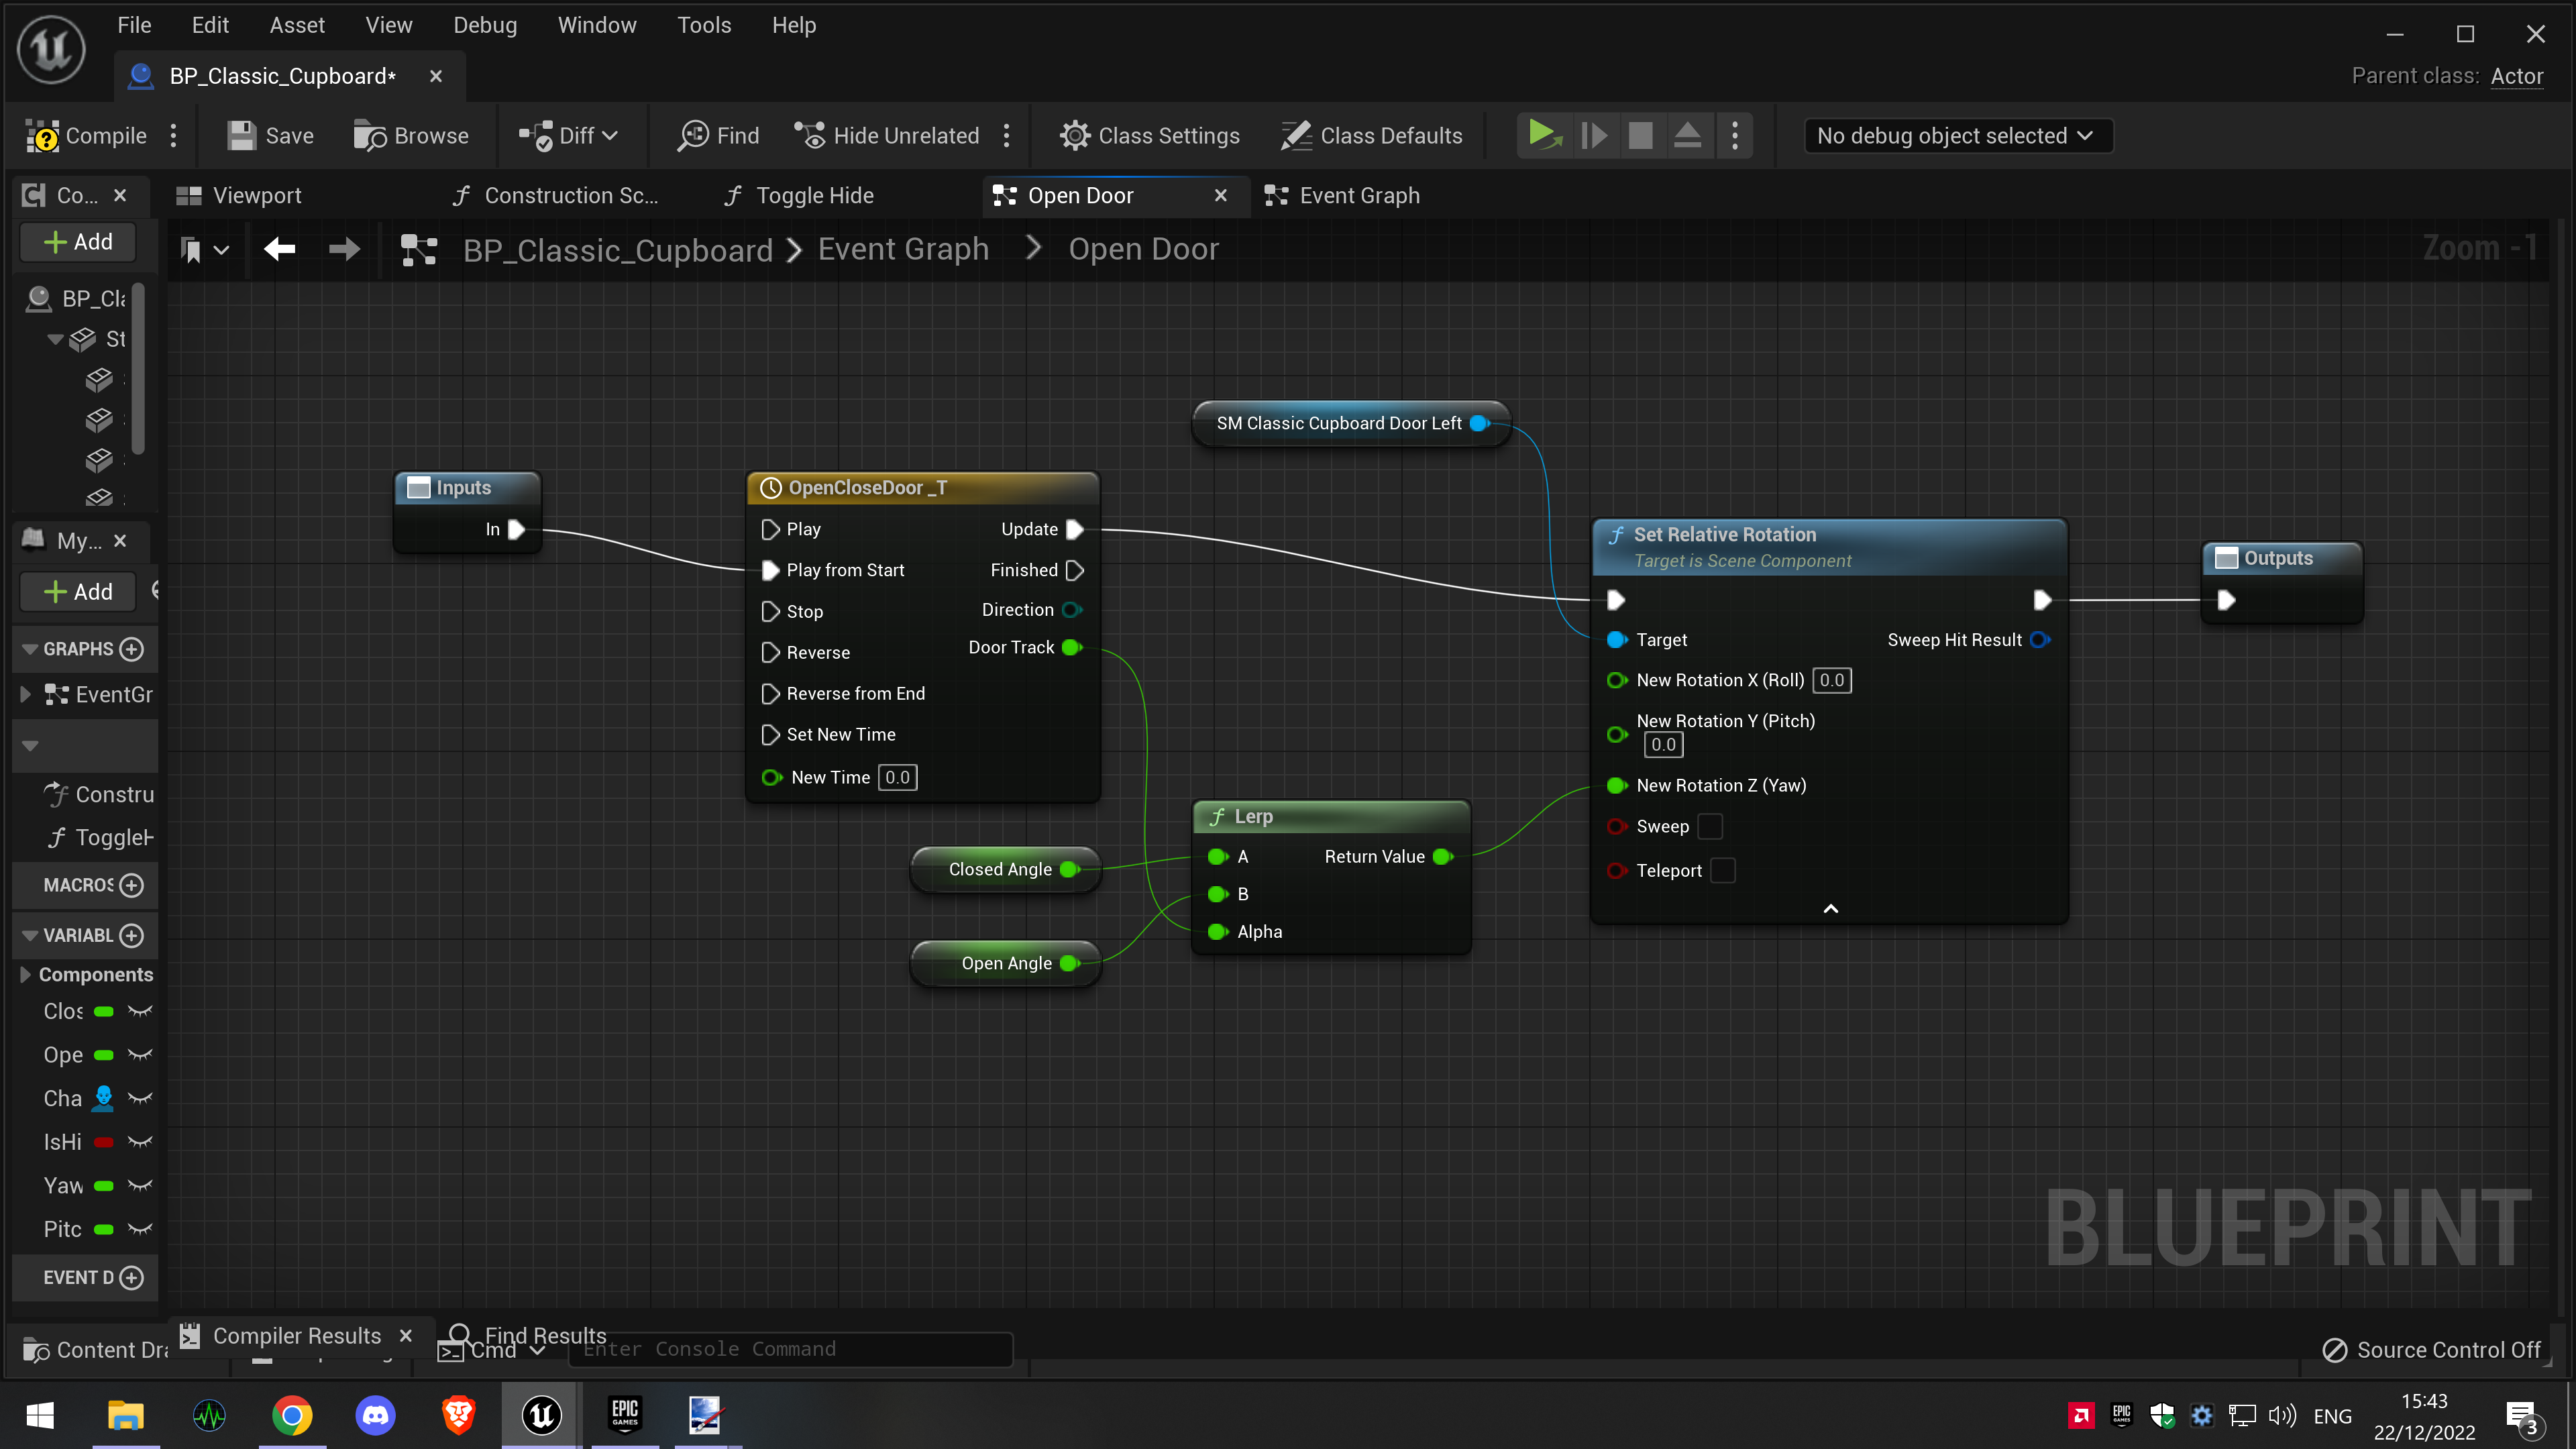
While the player will be able to escape the monster by running away and breaking line of sight, this will not always be possible so I created a blueprint to turn different objects into hiding areas for the player. When hiding inside these objects, the player will be invisible to the monster and it will stop chasing, returning to it’s roaming state. In the case of the cupboard, I also needed to include rotation for the doors so the player character doesn’t just clip through them.
The blueprint essentially takes control of the players point of view and changes it to a camera attached to the object that the blueprint is inside. The Camera locks to a certain view cone to avoid the player being able to spin their heads 360 degress which would be pretty unrealistic in a cramped space. The cupboard doors are not see through so the player will need to rely on the audio of the monsters footsteps to know when it is safe to stop hiding which will build tension. Whilst hiding, the player can open their menu and inventory, as doing this does not pause the game, the hiding spots are valuable areas for the player to organise their inventory and read up on any lore items they may have picked up so far, the player can also press the interact button to exit the hiding spot and become visible to the monster again, this gives back full control to the player and changes the camera back to the original player pawn one.
The blueprint is quite versatile and not much would need to be edited so it can work with other furniture/objects, the camera would need to be changed to a position that makes sense and rotation/movement needed for any doors or hatches.
Going forwards I would like to add a way for the monster to be able to catch the player even when hiding if the player hides whilst the monster is hot on their heels, as it’s not very realistic for a monster to forget what it was chasing 2 seconds ago because the player ducked under a desk.
Please find the relevant blueprints for the Hide areas below.
Other Mechanics
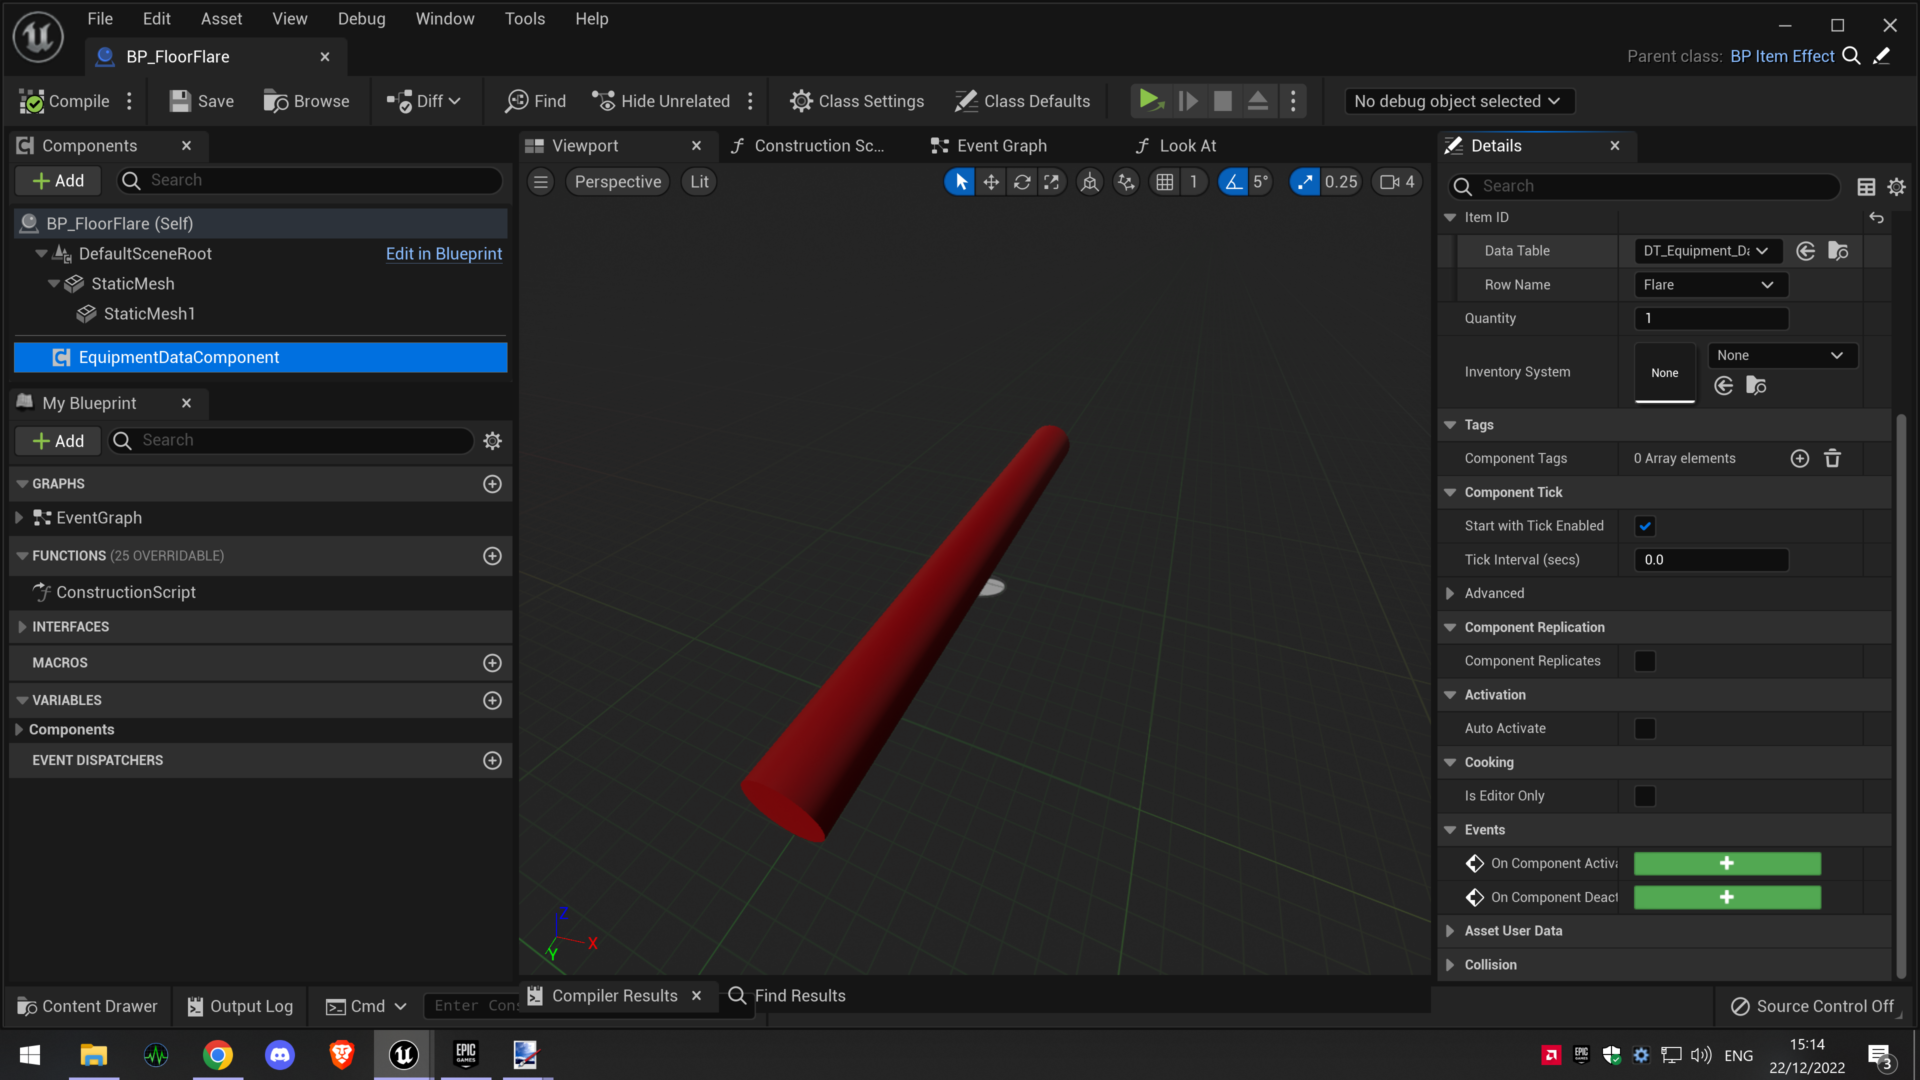
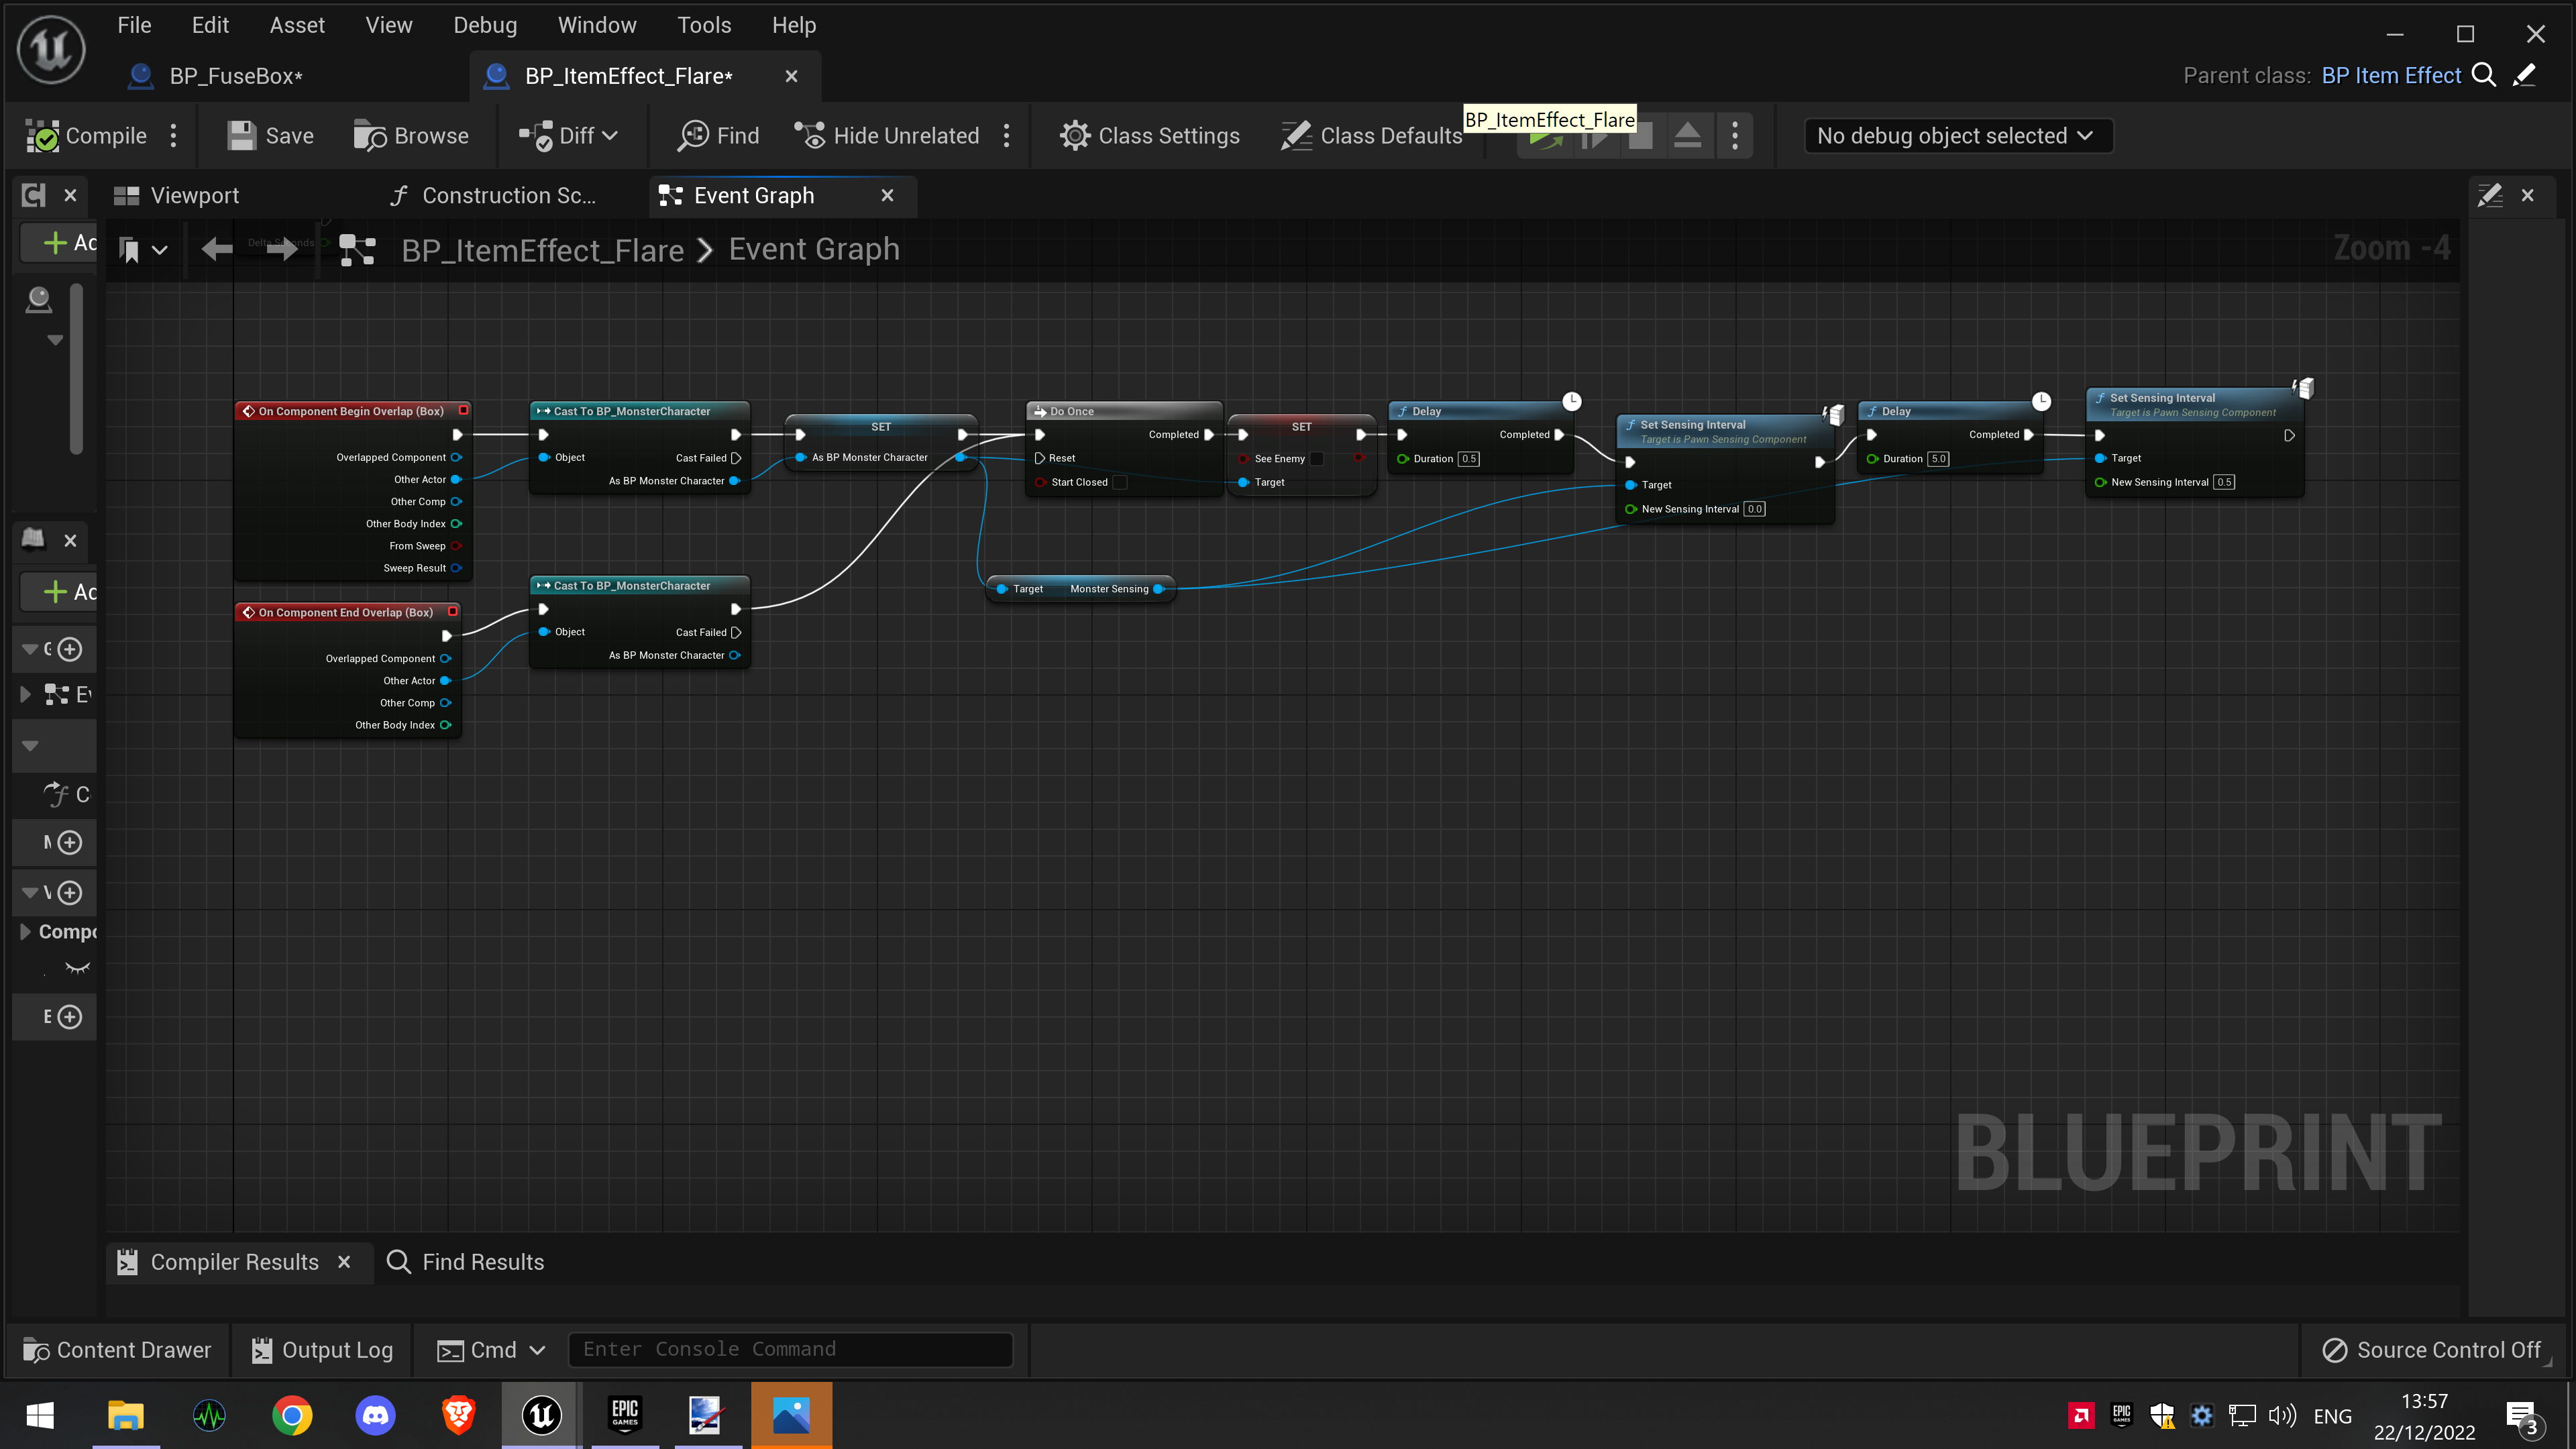
Flare
During the game, the player will find and pick up flares. When used through the inventory menu or if the player presses the ‘Use equipment’ button whilst having a flare equipped, the flare in the players inventory is removed and a different flare object is spawned at the player’s feet which has light and spark emitters to simulate a road flare. This instance of the flare has a box trigger component that, when triggered by the monster, turns off the monsters sight sensor and causes the monster to stop chasing if it was currently doing so. The flare is destroyed after around 20 seconds and the monsters sight sensor is turned off for 5 seconds when walking through the flare.
Stalking sound emitter/actor
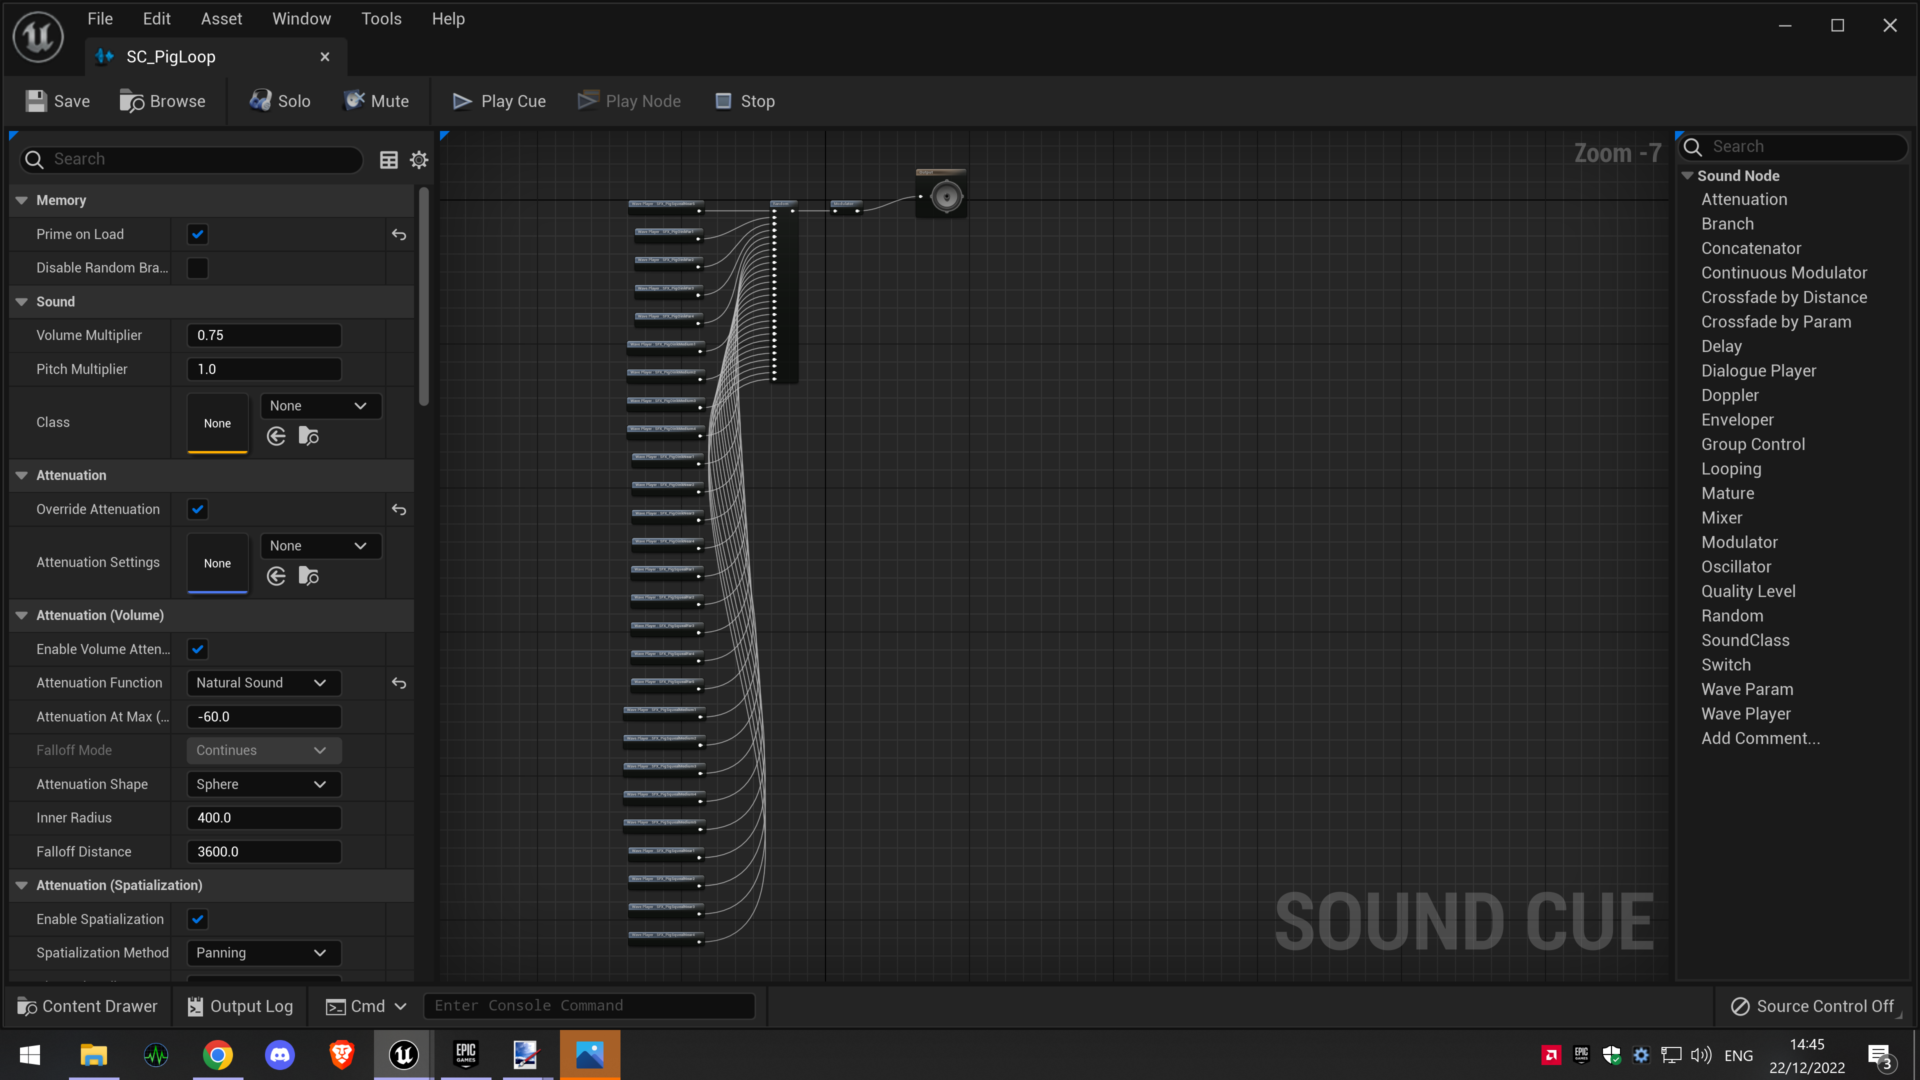
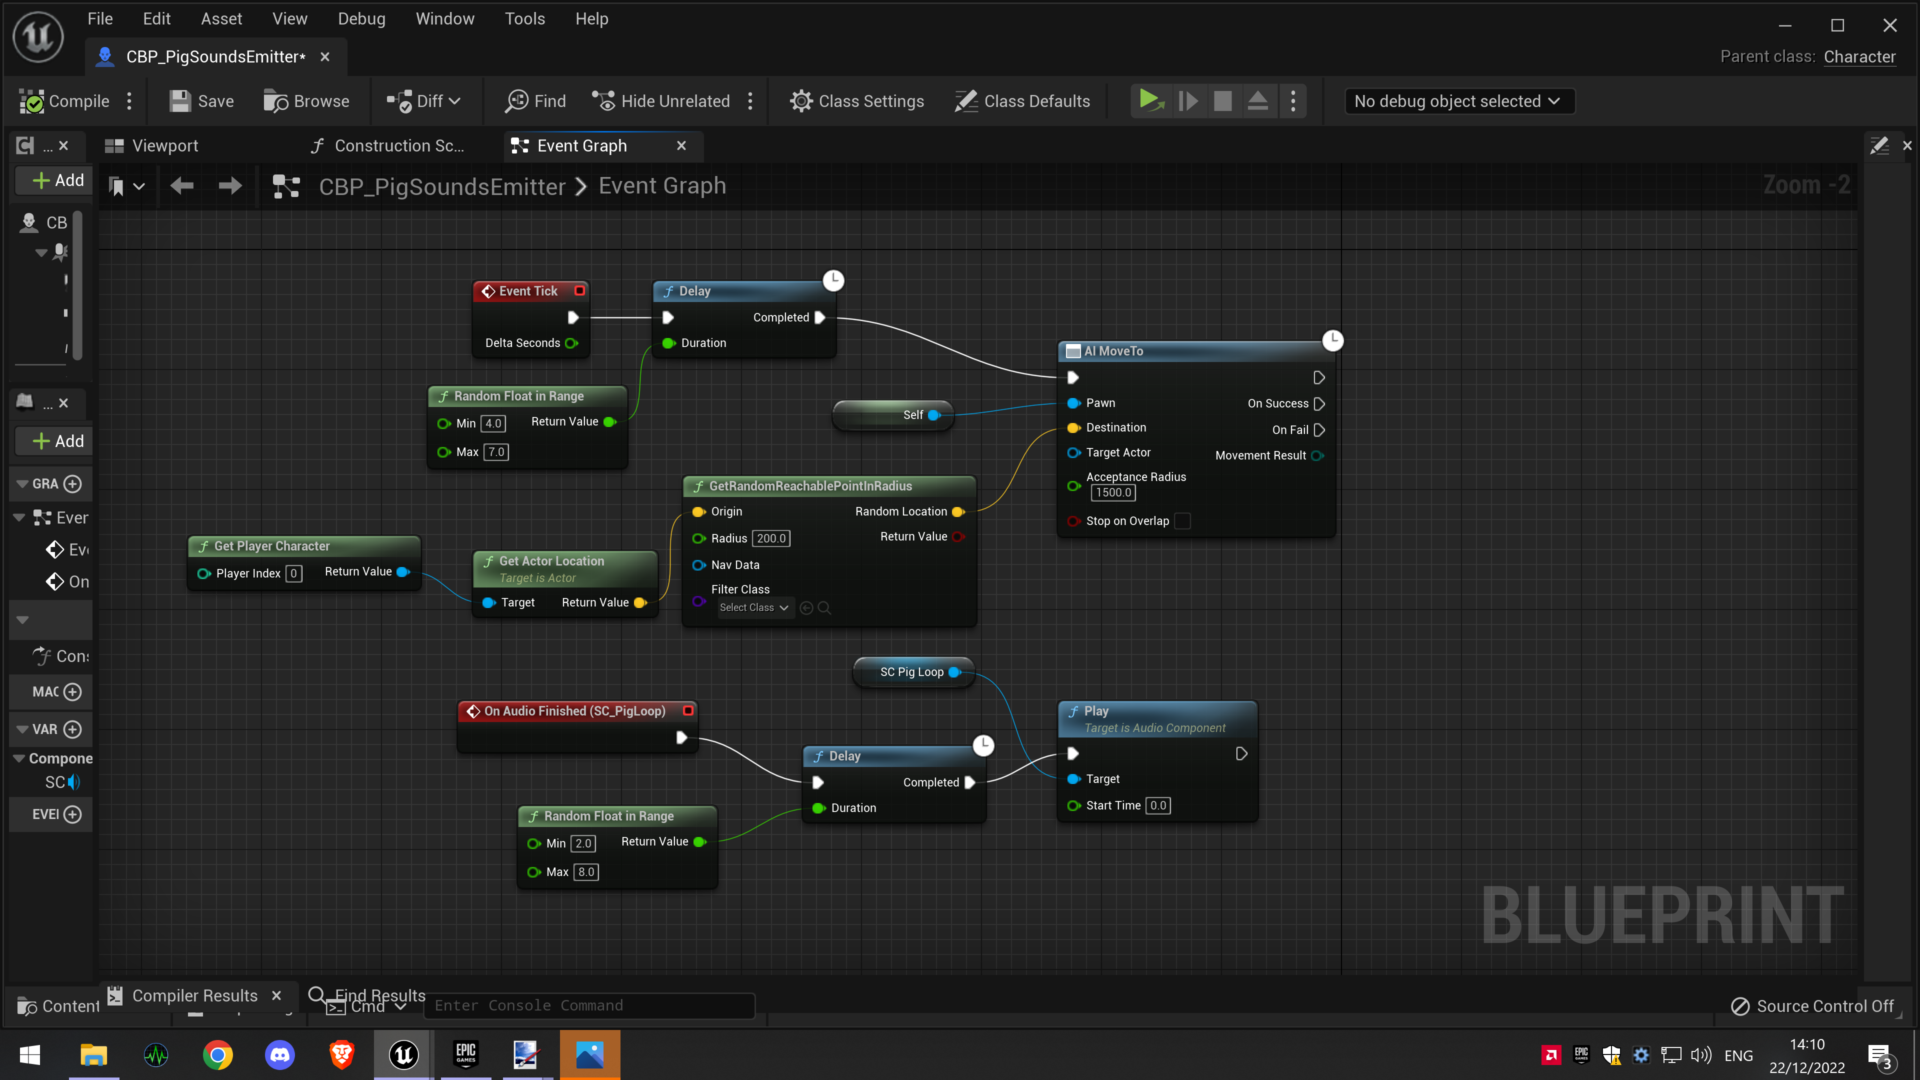
In the video at the top of the page, in the forest section I have created an actor blueprint which will follow the player at a certain distance playing audio cues, this actor is invisible to create unease in the foggy forest, although this could be changed to create visual threats that follow the player, either directly behind or in certain areas, the blueprint would need to slightly change depending on what you want the stalker to be and do, but it wouldn’t be too difficult. The sound cue randomly choses what sound to emit.
Please find both the Sound cue and the Stalker blueprint below.
Sound emitter sound cue
Stalking sound emitter
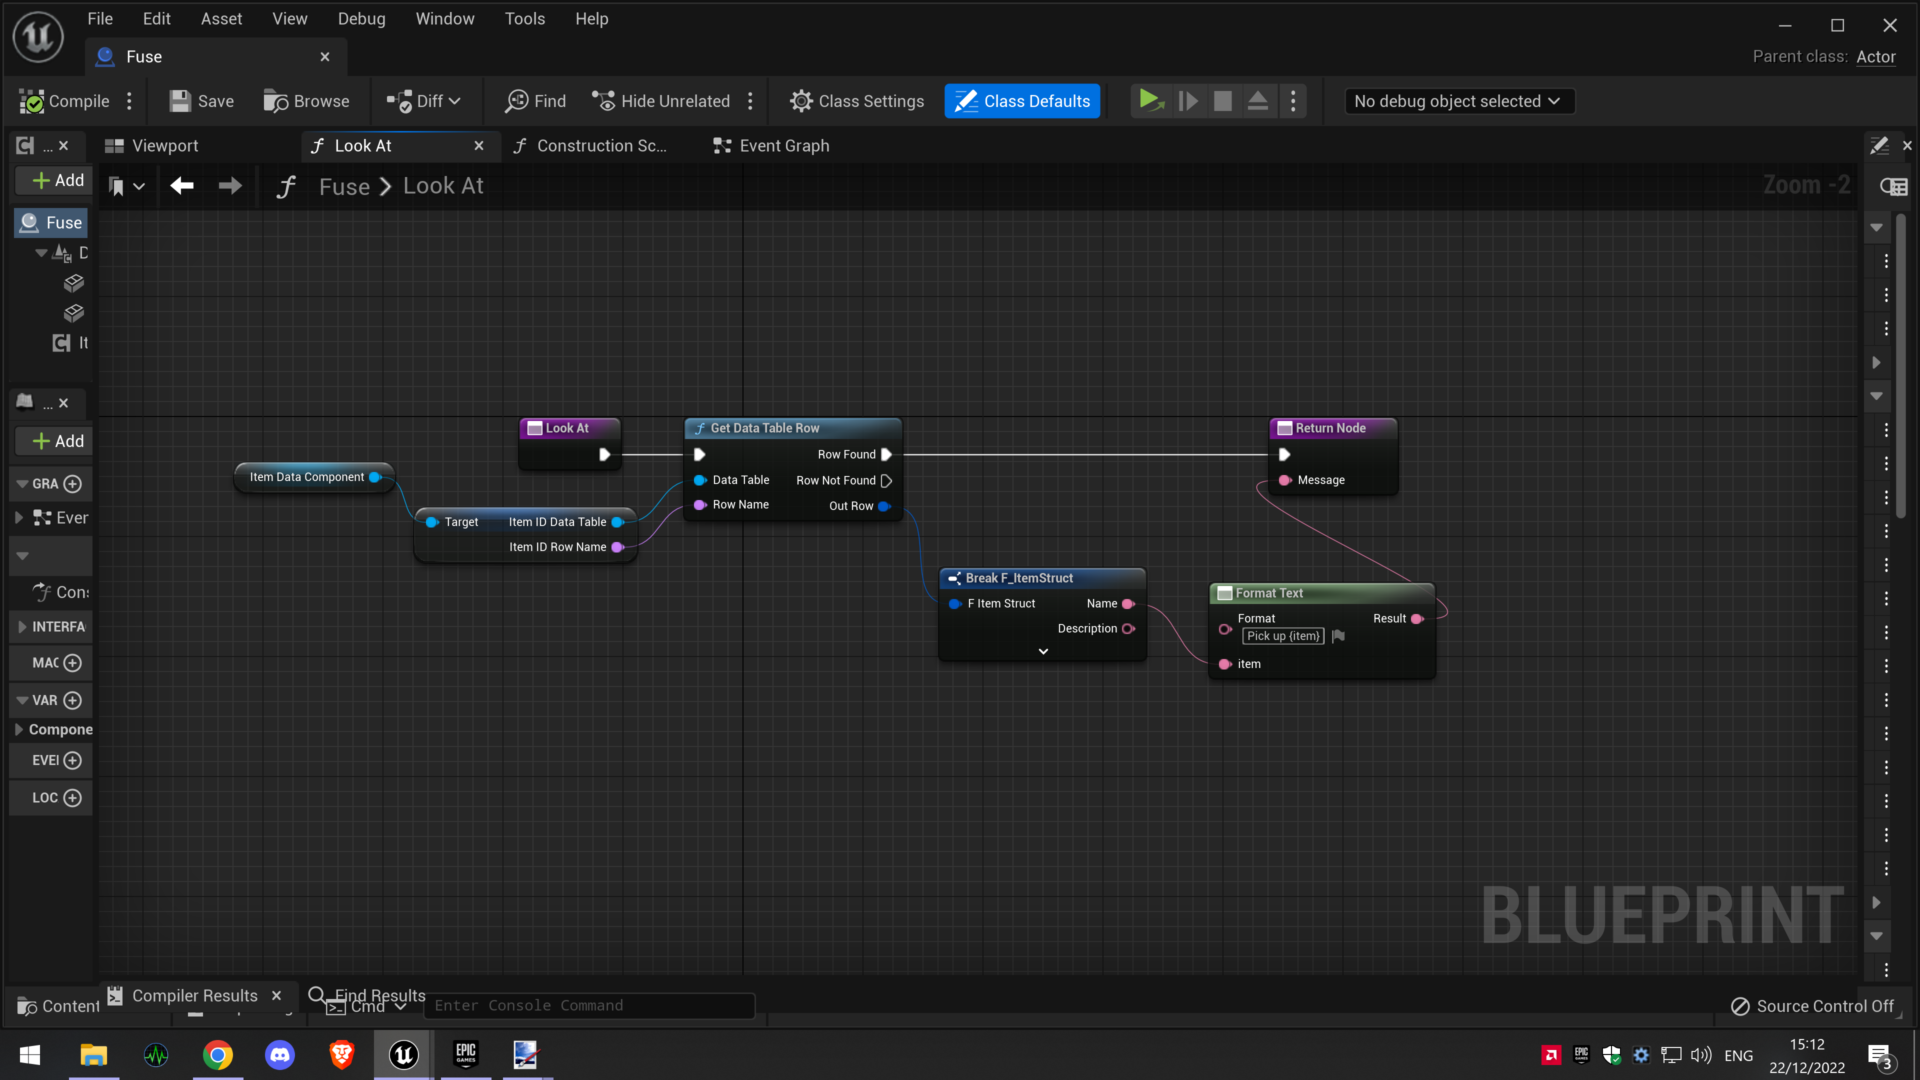
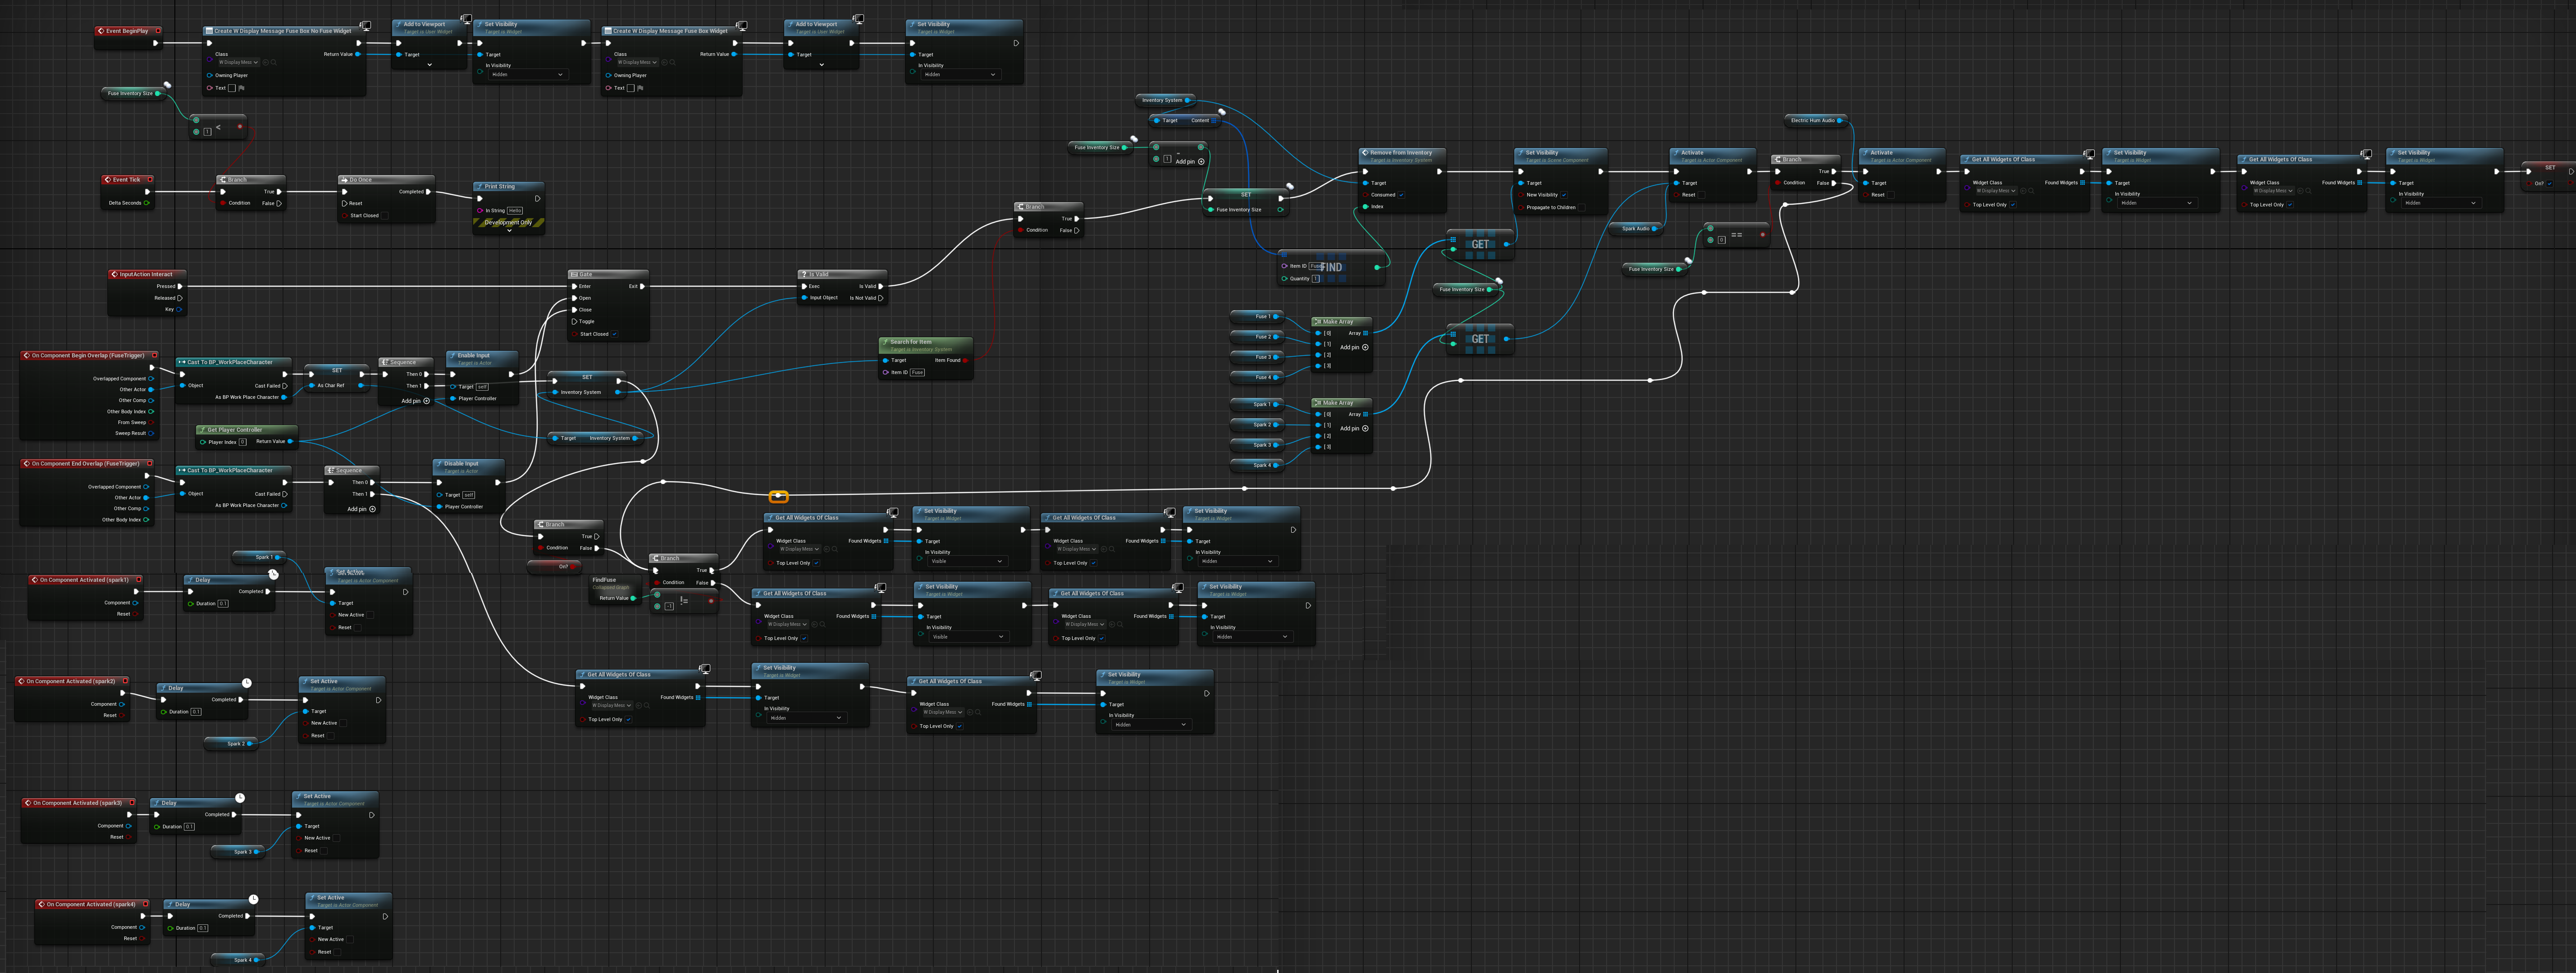
FuseBox/Puzzles
Puzzles and roadblocks will be needed for the game so it doesn’t become stale. I have created a blueprint to simulate a fuse box puzzle where the player will need to find 4 fuses across the level whilst avoiding the monster. Whilst looking at the fuse box, Text will show depending on what the player has in their inventory. If the player does not currently hold any fuses, the text will display ‘No fuse in inventory’, if the player does have a fuse, it will display ‘Press X to insert fuse’. If the player presses X, a fuse will be removed from their inventory and a fuse will appear in an empty slot on the actor in game which shows a visual aid for how many the player needs to get (The models in the screenshots and videos are just representing a rough demonstration on how it will look as I did could not find assets online that fit the bill). When inserting the fuse, an audio electric spark file will play and a spark emitter will trigger where the fuse is placed, then a check is made to see how many fuses have been placed into the fuse box, if the number reaches 4, it will trigger code to open a door, turn on an elevator or anything else that would fit into the game, at the moment the code just activates an electrical hum sound file to simulate the power being turned on and a print string to say ‘Hello’ to show it is working correctly.
Going forwards I would like to implement this in other ways and have the trigger potentially start a cutscene to show a far of door opening.
Please find the blueprints for the Fusebox below and video of it working.
Final thoughts
Thank you for reading about what I did for this brief, unfortunately our team is no longer in contact with our client due to reasons out of our control so we were unable to hand over our combined work and receive feedback from them, even so I really enjoyed this project and am getting much more confident with the Unreal blueprint system and look forwards to using it again in the future to make games, I find it much easier to remember as opposed to C#. I am most likely going to continue with this project in the next semester if it is available so I hope to be adding to this page in the near future. I will be looking to creating triggerable cutscenes for story moments, a more extensive items and equipment list, jump scare triggers, more advanced puzzles that require more of a challenge, a save, load and chapter select feature.
During the presentation of our group’s work, it was mentioned that the game looks too dark, whilst some of this is down to Youtube’s compression, I do agree many parts are still too dark and I would like to research more into lighting in the Unreal engine to try to improve the visual clarity for the player. I would also like to research different traversal techniques in video games, for example there are parts in a game called ‘The Stanley Parable‘ where the player walks through impossible hallways, for example a hallway with six 90 degree clockwise turns in quick succession without overlapping scenery/level. A quick moment that isn’t even acknowledged by the games narrator that impresses me every time I play through it, so I would love to learn how it is done and implement it in a way that fits Case Closed.
RSA Brief Project
Helping Hands – Solo RSA project
For the RSA project, we were to choose between 9 briefs, of which I decided to go with Brief 5 – Amplifying Connections. I chose this as one of video games main advantage over other media is it’s ability to bring connections between multiple people over vast distances and time zones. As the group project was solely a video game project, I wanted to lean towards developing an app as to broaden my skills. I decided to develop a mobile device app that let’s parents, who are not able to have face to face interactions with their children, video call, play games and help their children with homework via an upload and edit function. I decided to use Unity for the creation of the App as I have some experience using it already and I had been given a tutorial on networking for Unity, making it the more logical choice, however I would likely use Unreal Engine in the future as I find the UI building tools are much faster and more intuitive to use even with my lesser knowledge on Unreal Engine, another possibility would be to use Android studio which is specifically made for mobile apps.
Networking
As this was a connectivity brief, the first obstacle I wanted to tackle was connectivity between two separate App instances. Using the tutorial provided, I created a networking GameObject which I then attached the Network Manager component to. The Network manager is a component that manages the networking aspects in the Unity application, like the server client settings. The Network Manager is then set up like the below picture shows, making sure to change the transport type to ‘Unity Transport’, this will generate another component which is also below.
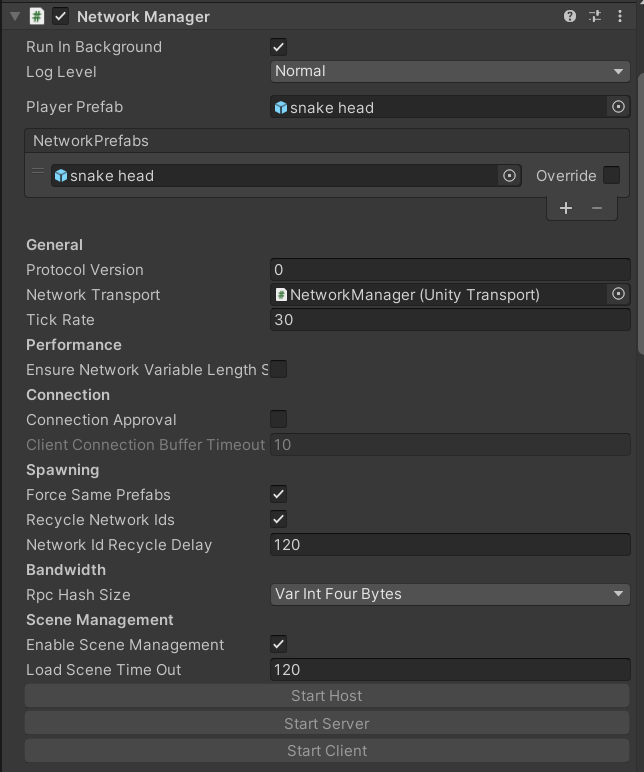
The snake head is a prefab of a player object, this will be spawned in for each person who joins the network, I will go into why it is called snake head later below. Now I have the basic networking components it has to be tested. I could have just build the app using unity to open it on my laptop, then use the test feature in the Unity Engine itself to see if the two instances could join the network, however as this was to be a mobile app, and I wanted to make sure it was connecting via a network and not just being on the same machine, I looked into using my Android phone as an app instance. I had to enable the USB Debug mode on my phone in the advanced Developer options and then built the app onto the phone using Unity’s ‘Build Android’ feature. I built a basic UI and added in a Network Manager HUD component as seen below, this generates buttons for connection to the network, and allows the user to type in IP addresses manually if needed, though you can choose a specific IP address in the fields before building to avoid having to do this.
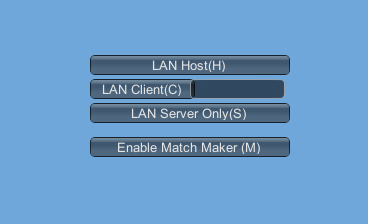
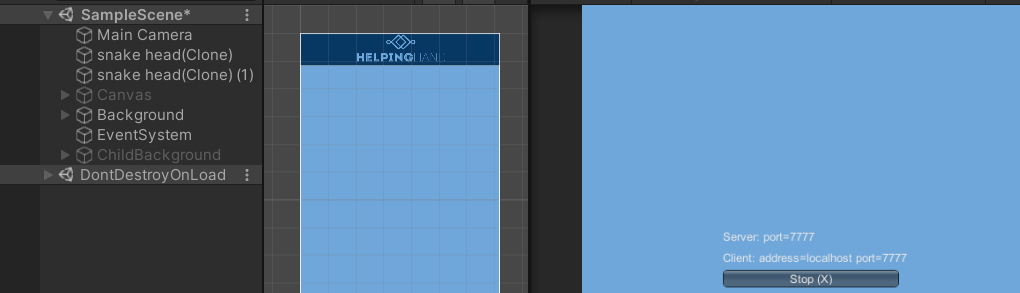
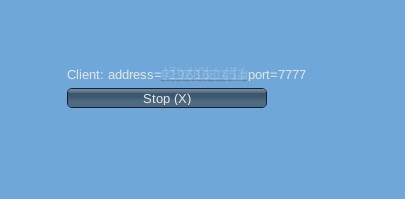
When set up as stated above, if i click on LAN Host(H) on one instance of the app, and on the other I click LAN Client(C) (The IP address will be already filled into the field if set up on the component in unity beforehand) I get the following confirmations that I can see both clients have connected. A message showing a successful connection on my phone and 2 clones of the Snake head GameObject have been spawned on the Unity test version.
Video Chat function
Next I wanted to tackle the video chat function in the app. Doing some research into methods told me that using a premade program for unity would be the smartest option, as trying to code it myself would have been far too time consuming, I decided to go with Agora (Agora.io) which is a plugin made for Unity and other engines. I created an account and created a project on their website as seen below.
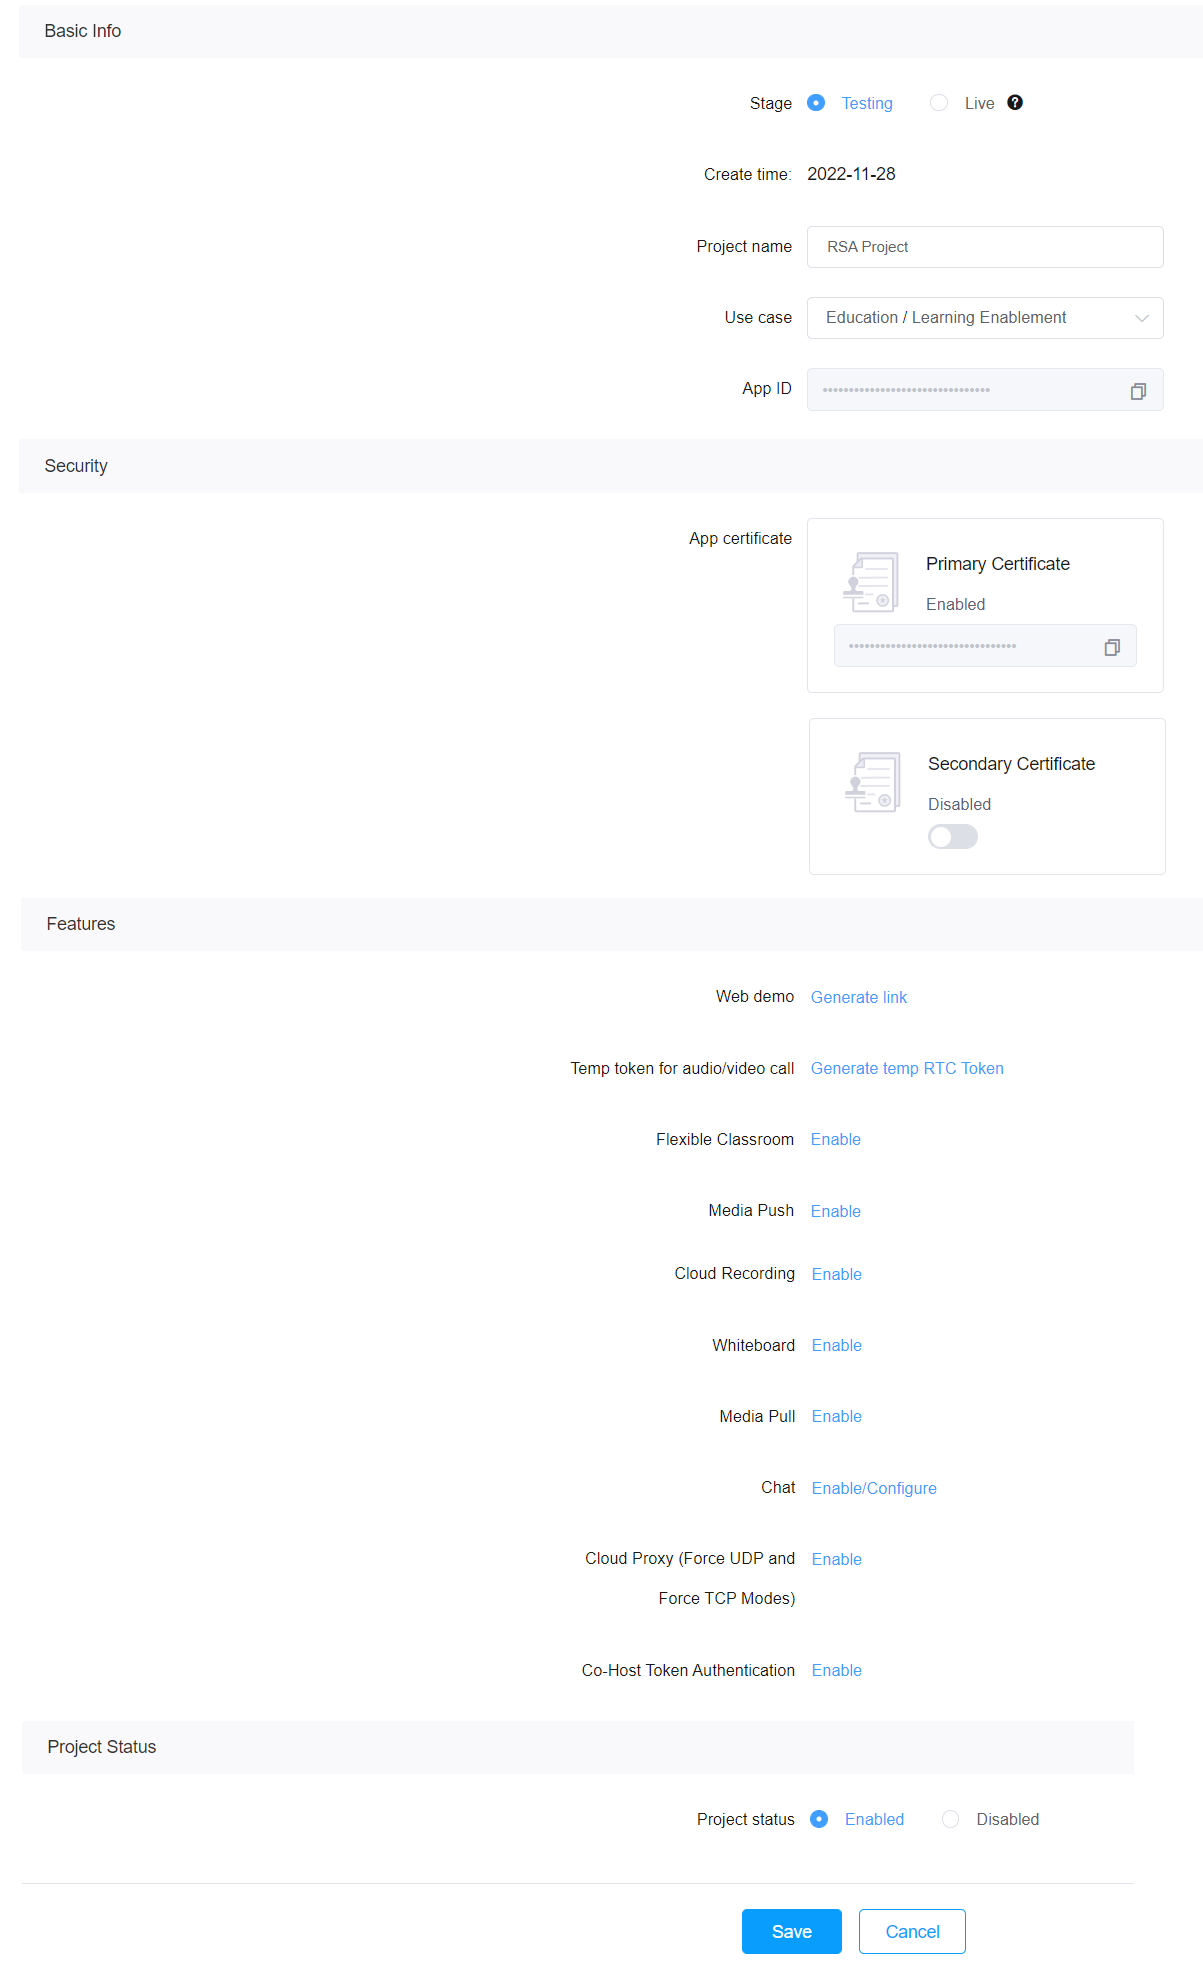
I then downloaded the AgoraVideo Unity SDK and imported the files into Unity. I then attached the following script to a canvas that would be activated when the Video chat button is pressed on the app. To make this work with two different instances of the app, I needed to generate a temporary RTC token and create a Channel name and input this into the fields below in the Component. Clicking the image below will also open the script for this component.
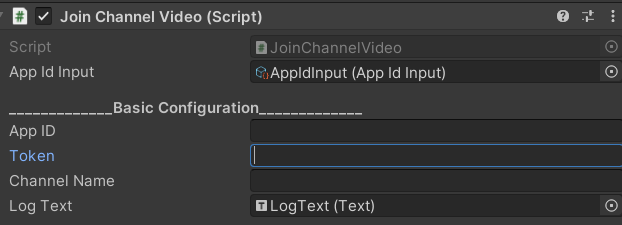
I had to change the size and locations of the screens quite a few times using trial and error to end up with a satisfactory look due to the different camera aspect ratios on my laptop and phone. With the token generated and inputted into the component, when the app is built and opened one my phone and laptop, the video call function works as seen below. It turns out my laptop camera is pretty bad. Going forwards I hope to improve the UI of this feature and building in a token Generator so the video chat sessions are private.
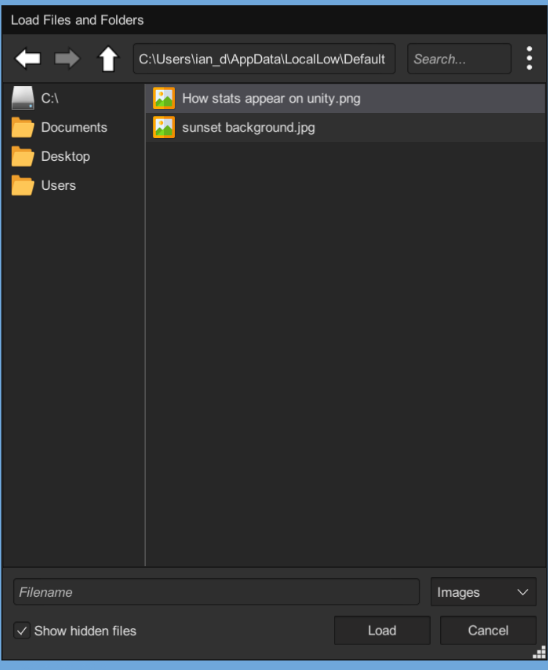
File browser
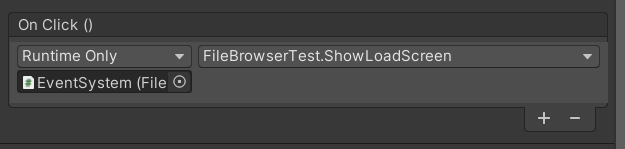
The next job was to integrate a function to upload files for the purpose of the parent being able to assist with homework. Again, creating this from scratch seemed unrealistic in the time remaining so I opted to use the ‘Simple File Browser’ made by Yasirkula on Github. By importing the scripts into Unity and attaching the ‘File Browser test’ script to the Event system GameObject, I am able to open the file browser, in app, by assigning the ‘ShowLoadScreen’ function to a button as seen below. I also had to add code to make sure it chose the correct folder path on start up, the file browser remembers the last folder that was opened even between app uses.
        if (SystemInfo.deviceType == DeviceType.Desktop)
        {
           defaultInitialPath = Environment.GetFolderPath( Environment.SpecialFolder.MyDocuments );
        }

        //Check if the device running this is a handheld
        if (SystemInfo.deviceType == DeviceType.Handheld)
        {
            defaultInitialPath = Environment.GetFolderPath( Environment.SpecialFolder.MyFiles );
        }
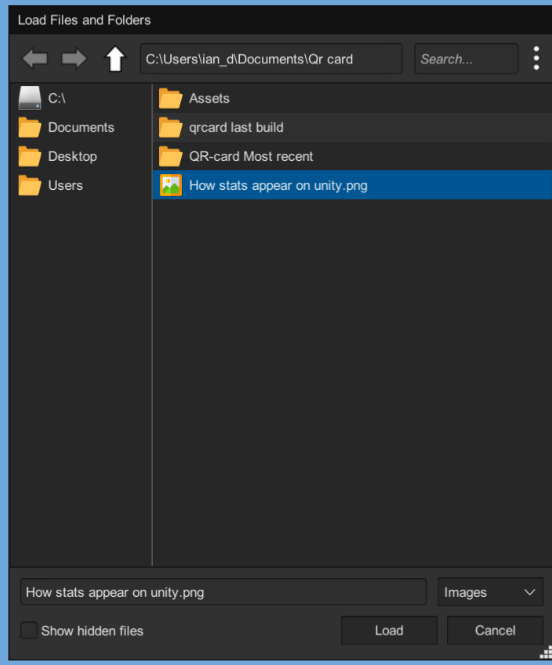
When the button with the ‘ShowLoadScreen’ function is pressed, the file browser appears, open at the default folder, or the last folder that was open when the browser was last used. I have set the script to only show Image files, though this can be changed to include other file types like word documents or PDFs. When an image is double clicked, it is stored in the local file directory which, when navigated to, shows the files that were stored there previously, these persist even after restarting the laptop/phone.
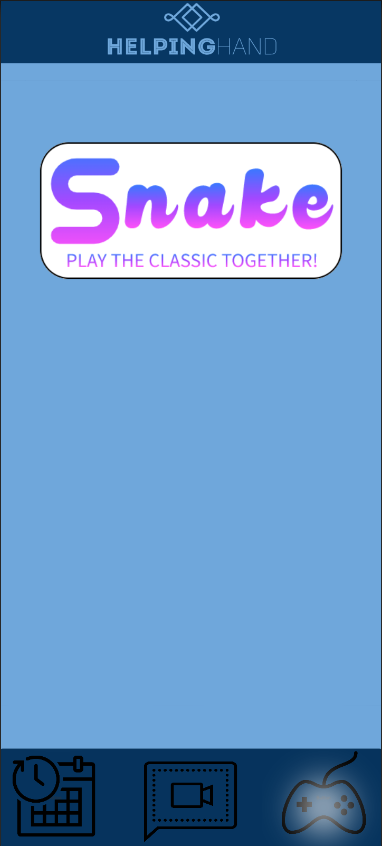
Multiplayer game
Pressing the game pad icon will bring up the game list, as of yet there is only one but this would obviously be expanded upon going forward if the app was to go to completion.
For the purpose of testing the network multiplayer capabilities I decided to make just a simple Snake clone, creating an arena using lines and 2D Box colliders, I then created a script to randomly spawn the food inside the arena every 4 seconds, starting on second 3 of the game starting, the code for this can be found below. The food asset is just an image with a 2D box collider attached to it so the player can pick these up.
using System.Collections;
using System.Collections.Generic;
using UnityEngine;

public class NewFood : MonoBehaviour

{

    public GameObject foodPrefab;
    public GameObject SnakeCanvas;
    public Transform borderTop;
    public Transform borderBottom;
    public Transform borderLeft;
    public Transform borderRight;

    // Start is called before the first frame update
    void Start()
    {
        InvokeRepeating("Spawn", 3, 4);
    }
    void Spawn()
    {
        int x = (int)Random.Range(borderLeft.position.x,
                                  borderRight.position.x);
        int y = (int)Random.Range(borderBottom.position.y,
                                  borderTop.position.y);
       GameObject Spawnedfood = Instantiate(foodPrefab,
                    new Vector2(x, y),
                    Quaternion.identity) as GameObject;
                    Spawnedfood.transform.SetParent(SnakeCanvas.transform);
    }
}
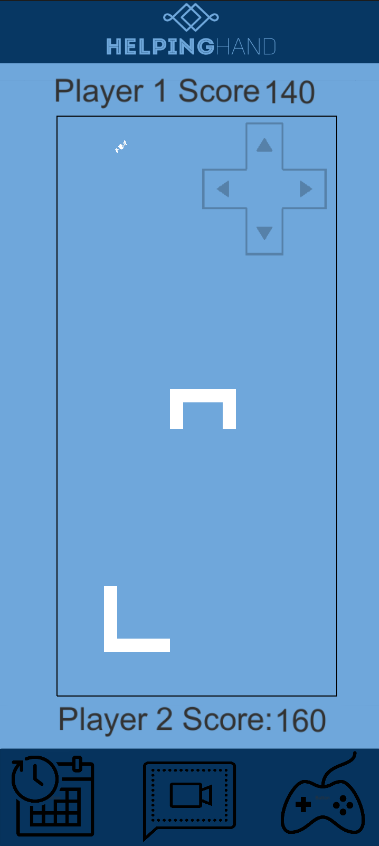
For the movement using the Arrow keys on a keyboard (Whilst primarily a mobile device application, many people still use such apps on their laptops/desktops, as seen with Whatsapp and Snapchat, so there is no harm in including controls for computers) or the on screen D-pad changes the direction of the snake. The snake moves every 0.1 seconds a small distance forwards, this gives a smoother feel instead of the old style. Because of the small distance travelled each tick, I had to reduce the box colliders of the snake parts so they did not overlap and game over instantly when spawning new parts/travelling. If the snake head comes into contact with the food, the script remembers the location of the head, then places a tail prefab at that location which grows the snake and depending on which player gets the food, they get 20 points. If the snake collides with any other object except the food, it’s game over and the combined player’s points are displayed as this is a game to survive the longest as if the objective was to end up with the most points, one player could just purposefully end the game by colliding with the other player or a wall when they are higher in points to instantly ‘win’. Because of the small distance travelled each tick, I had to reduce the box colliders of the snake parts so they did not overlap and game over instantly when spawning new parts/travelling.
using UnityEngine;
using System.Collections;
using System.Collections.Generic;
using System.Linq;
using UnityEngine.UI;
using UnityEngine.EventSystems;

public class SnakeControl : MonoBehaviour
{
    public float Distance = 25f;
    Vector2 dir = Vector2.right;
    public GameObject SnakeCanvas;
    public float time = 1.0f; //seconds
    List<Transform> tail = new List<Transform>();
    bool ate = false;
    public GameObject tailPrefab;
    public GameObject GameOver;


    public Text P1score;
    public Text P2score;
    void Start()
    {
        Time.timeScale = 1.0f;
        InvokeRepeating("Move", 0.1f, 0.1f);
        P1score.text = P1score.ToString();
        P2score.text = P2score.ToString();
        P1score = 0;
        P2score = 0;
    }
       void Update()
    {
        if (Input.GetKey(KeyCode.RightArrow))
            dir = Vector2.right;
        else if (Input.GetKey(KeyCode.DownArrow))
            dir = -Vector2.up;
        else if (Input.GetKey(KeyCode.LeftArrow))
            dir = -Vector2.right;
        else if (Input.GetKey(KeyCode.UpArrow))
            dir = Vector2.up;
        {
            if (GUILayout.Button("Rightbutton"))
                    dir = Vector2.right;
                else if (GUILayout.Button("Rightbutton"))
                dir = -Vector2.up;
                else if (GUILayout.Button("Rightbutton"))
                dir = -Vector2.right;
                else if (GUILayout.Button("Rightbutton"))
                dir = Vector2.up;
        }
    }
    void Move()
    {
        transform.Translate(dir * (Distance));
        Vector2 v = transform.position;
        if (ate)
        {
            GameObject g = (GameObject)Instantiate(tailPrefab,v, Quaternion.identity);
            g.transform.SetParent(SnakeCanvas.transform);
            tail.Insert(0, g.transform);
            ate = false;
            if (this.gameObject = "Snake Head (CLONE)")
                P1score + 20;
            else if (this.gameObject = "Snake Head (CLONE) (1)")
                P2score + 20;
        }
        if (tail.Count > 0)
        {
            tail.Last().position = v;
            tail.Insert(0, tail.Last());
            tail.RemoveAt(tail.Count - 1);
        }
    }
        void OnTriggerEnter2D(Collider2D coll)
        {
            if (coll.name.StartsWith("FoodPrefab"))
            {
                ate = true;
                Destroy(coll.gameObject);
            }
        else
            {
            GameOver.SetActive(true);
            Time.timeScale = 0.0f;
            }}
}
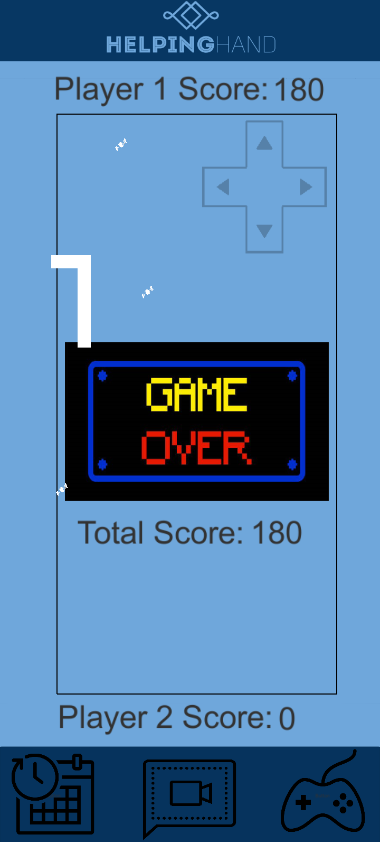
I have inserted a couple of screenshots of the finished game with network capabilities, I had to disable collision on the first screenshot as I found it too difficult to control both snakes at the same time and get a good screenshot, the second screenshot I disabled the networking to show off the Game over screen for the same reason as I turned the non food collision back on.
Final thoughts
Overall I am fairly pleased with how this project has progressed, I’m happy I was able to get the video chat and networking features working to an acceptable level, however I do wish I was able to get all the features to a standard closer to being ‘launch ready’. Whilst i did use plugins and software already available, getting them to work is never as easy as just importing the files and it works instantly, I’m still coming to grips with the more technical functions in C# so I find it is still taking me a lot of time to get into a working state. Added to this also having to learn the Unreal engine at the same time, hopefully this will be less of an issue going forward and I will also have to be more strict in splitting time evenly on each project, I just found myself ‘on a roll’ much more when working with the blueprint system. In the case another App style project is a part of next semester, I will be swapping Unity to Unreal Engine to see if it ends up with me being happier with the end product due to saving time with blueprints and the ease of the UI building system.
If this App was to go to completion, I would work on the Calandar function, where parents can set reminders, allocate which parent will do which task on a certain day, create events and these would sync across the parent’s and children’s application. I would then work on creating a working UI for the Video chat with the functionality to generate tokens to make sure video chat channels are only the people in the ‘Family group’. I would probably keep Snake inside the games but would work on making more technical games that require much more thought and attention to play, if the games are too basic then they just won’t get played. I would also create a child version of the app and improve the look of the original, preferably with the help of a designer and artist to create a more professional look to the final product.
Thank you for reading about the RSA project above, I hope to be showing off much more for next semester.